



Table of Content
AI SUMMARY
Quick Answer
Building an AI agent starts with defining a clear goal, preparing a reliable knowledge base, choosing the right model or platform, setting instructions, connecting tools, testing, and improving over time. This guide explains each step in simple terms and covers the key components behind an AI agent. It also shares a practical no-code customer support workflow built with REVE Chat’s Wize AI Agent, including triggers, knowledge, responses, and human handover.
Have you ever wished you could create your own smart AI assistant? One that can help you with tasks the way you want?
Many people think building an AI agent is very difficult and only for experts. But it’s becoming easier than you think.
In this guide, I’ll explain the basic ideas behind AI agents and what you need to know to build one. No complicated code tutorials – just clear and simple guidance. Plus, I also share my experience in building my first AI agent workflow.
So, keep reading. I hope you will find something interesting.
What Is an AI Agent and How Does It Work?
An AI agent is a smart system that can understand a goal, make decisions, and take action to complete a task.
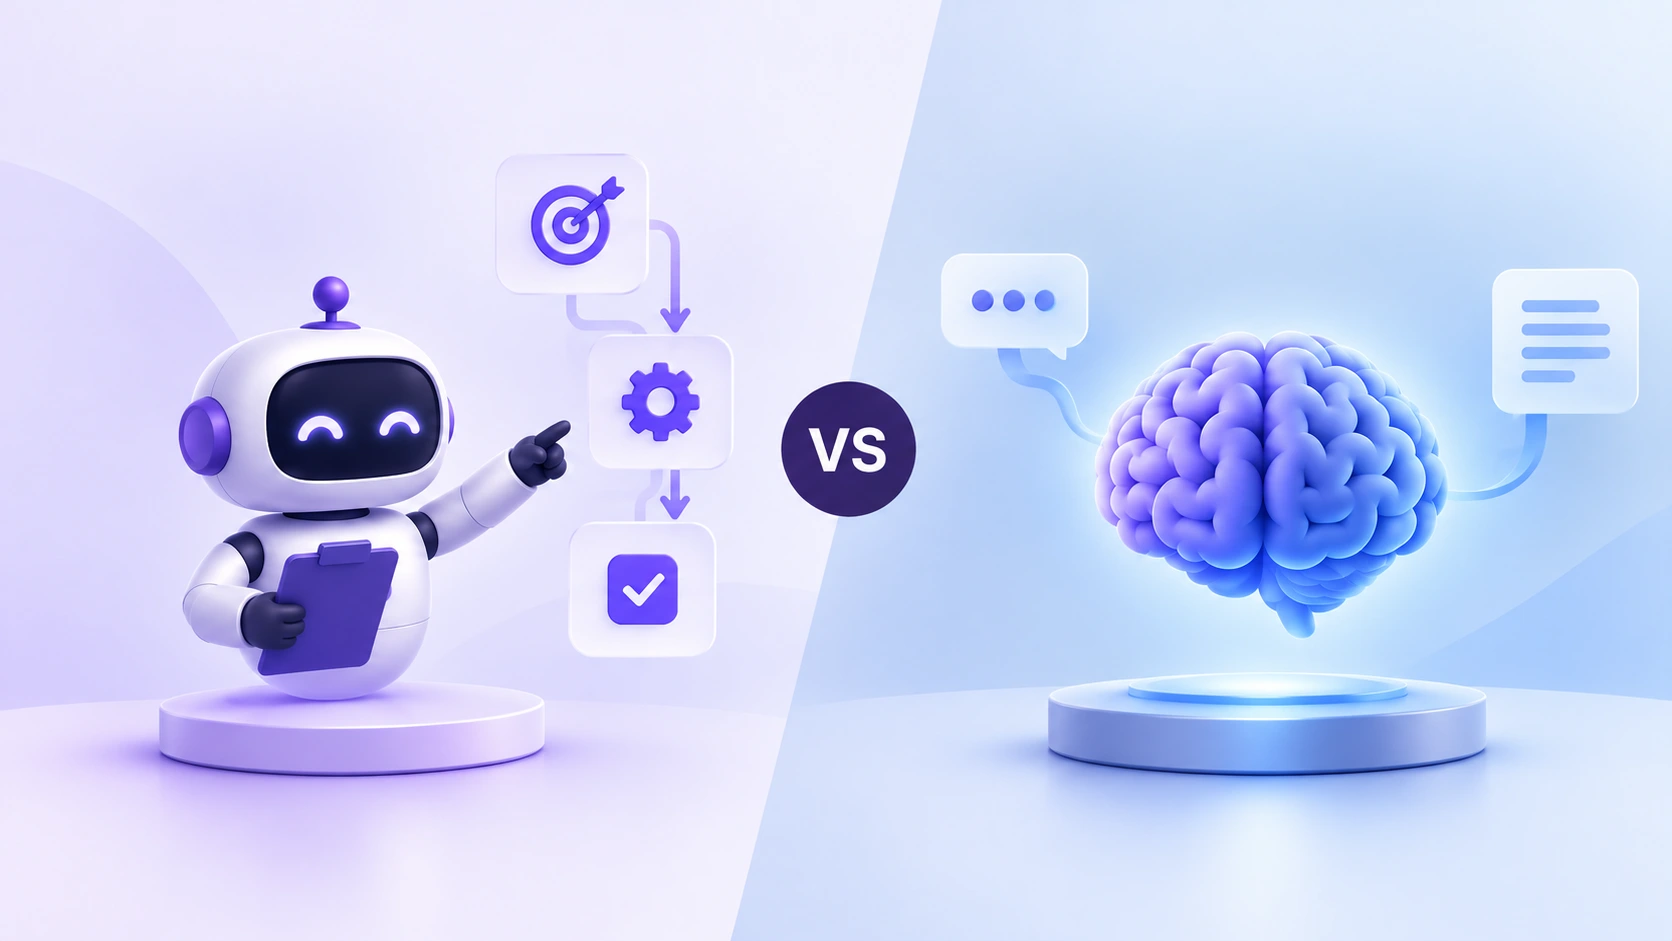
A normal AI chatbot usually waits for your question and gives one answer. An AI agent can go a step further. It can understand what you want, break the task into smaller steps, use the right information or tools, and continue working until the task is done.
For example, if a customer asks, “Where is my order?”, a simple chatbot may only reply with a general tracking link. But an AI agent can check the order status, find the latest update, and give the customer a proper answer.
An AI agent usually works in this simple way:
- It receives a goal or request
- It understands what needs to be done
- It uses information or tools
- It gives an answer or completes the task
In simple words, an AI agent is not just made to answer questions. It is designed to help complete tasks more independently.
The Foundation of Every AI Agent
Behind every AI agent, there are a few important ideas that help it understand users, make decisions, and give useful answers. You do not need to master these concepts to build an AI agent, but knowing the basics will help you understand how it works.
1. Machine Learning
Machine learning helps an AI system learn from examples instead of following only fixed rules.
For example, if an AI agent sees many customer questions about refunds, shipping, or pricing, it can start recognizing patterns in those questions. This helps it understand what the user may need and respond more accurately.
In simple words, machine learning helps the agent improve by learning from data and examples.
2. Natural Language Processing
Natural Language Processing, or NLP, helps the AI agent understand human language.
When a user types, “I want to cancel my order,” NLP helps the agent understand that this is not just a random sentence. It understands that the user has a cancellation request and needs help with an order.
Without NLP, the agent would not be able to understand questions, complaints, or requests properly.
3. Data Labeling
Data labeling means organizing information with clear tags or categories so the AI can understand it better.
For example, a customer message like “Where is my order?” can be labeled as a shipping question. A message like “I want my money back” can be labeled as a refund request.
These labels help the AI agent recognize different types of customer needs. Clean and accurate labels make the agent more helpful, while messy or wrong labels can confuse it.
How to Build an AI Agent Step by Step
Now that you understand what an AI agent is and how it works, let’s look at how to build one.
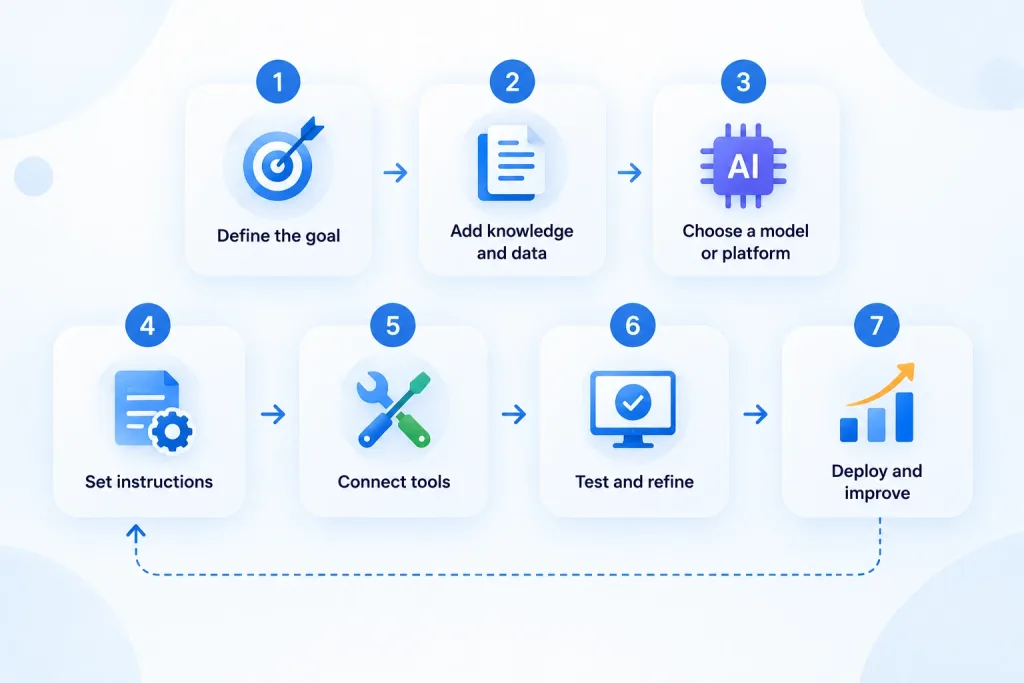
The process may sound technical at first, but it becomes much easier when you break it into small steps. Whether you use a no-code platform or build a custom AI agent, the basic process is almost the same: define the goal, add the right information, set clear instructions, test it, and keep improving it.
Before we go into the steps, let’s quickly understand the main parts every AI agent needs.
Key Components of Every AI Agent
Every AI agent needs a few important parts to work properly. These parts help the agent understand requests, use information, take action, and complete tasks.
- AI Model: The AI model is the brain of the agent. It understands the user’s message and creates a response.
- Instructions: Instructions tell the agent how to behave. They define the agent’s role, tone, rules, and limits.
- Knowledge Base: The knowledge base is the set of information the agent uses to answer questions.
- The better and cleaner your knowledge base is, the more helpful your agent will be.
- Tools: Tools help the AI agent take action. Without tools, the agent can mostly answer questions. With tools, it can complete tasks.
- Memory: Memory helps the agent remember useful details from past interactions. This makes future conversations smoother and more personal.
- Workflow Engine: The workflow engine controls how the task moves from one step to another. It helps the agent decide what to do first, what to do next, and when the task is complete.
Step 1: Clarify What the Agent Should Do
The first step is to decide the exact job of your AI agent.
Many people make the mistake of trying to build an agent that can do everything. But a good AI agent usually starts with one clear task.
Ask yourself:
- What problem should this agent solve?
- Who will use it?
- What should a successful result look like?
- When should the agent stop or ask a human for help?
For example, if you want to build a customer support agent, their job could be to answer common questions, share product information, and collect customer details before handing the conversation to a support team.
Start with a small and focused goal. Once the agent works well, you can add more tasks later.
Step 2: Prepare Your Data and Knowledge Base
Your AI agent can only give good answers if it has the right information.
Start by collecting the materials your agent will need. This may include FAQs, product pages, pricing details, return policies, shipping information, support tickets, chat history, or internal documents.
After collecting the information, clean it properly. Remove outdated, duplicate, or confusing content. Make sure the information is easy to understand and well-organized.
Clean information helps the agent give clearer and more accurate answers.
Step 3: Choose the Right AI Model or Platform
Next, choose how you want to build your AI agent.
If you are a beginner, the easiest option is to use a no-code AI agent platform like REVE Chat. These platforms let you build and launch an agent without writing code.
If you need more control or advanced features, you may choose a custom setup using an AI model such as GPT, Claude, or Gemini.
For most beginners and small businesses, a no-code platform is the better starting point because it is faster, simpler, and easier to manage.
Do not choose a tool only because it is popular. Choose the one that fits your use case and budget.
Step 4: Set Clear Instructions for the Agent
This is where you tell the AI agent how it should behave.
Clear instructions help the agent stay focused and give better responses. You can define its role, tone, rules, and limits.
For example, you can tell the agent:
- Answer in a friendly and professional tone.
- Use only the information from the knowledge base.
- Do not guess when you are unsure.
- Ask a follow-up question if the customer’s request is unclear.
- Transfer the conversation to a human for billing, refund, or serious complaints.
Good instructions reduce mistakes and make the agent more reliable.
Step 5: Connect the Right Tools and Channels
After setting the instructions, connect the agent to the places where it will work.
For example, your AI agent may work on your website chat, WhatsApp, Facebook Messenger, Shopify store, Slack, or customer support dashboard.
You may also connect tools that help the agent take action. These tools can help it check order details, book appointments, update customer records, send emails, or create support tickets.
This step is important because an AI agent becomes more useful when it can do more than just answer questions.
Step 6: Test the Agent with Real Scenarios
Before launching your AI agent, test it with real questions and situations.
Do not only test easy questions. Try different types of requests, including simple questions, unclear questions, angry customer messages, and follow-up questions.
For example, test questions like:
- “Where is my order?”
- “Can I return this product?”
- “I want to cancel my order.”
- “I did not receive my refund.”
- “Can I talk to a real person?”
Check whether the agent gives the right answer, uses the correct information, and knows when to hand over the conversation to a human.
If the agent gives a wrong answer, do not ignore it. Fix the instructions, update the knowledge base, or adjust the workflow.
Step 7: Launch, Monitor, and Keep Improving
Once your agent performs well during testing, you can launch it.
But remember, launching is not the final step. You should continue monitoring how the agent performs with real users.
Keep improving the agent based on real conversations. Update the knowledge base, improve the instructions, and adjust the workflow when needed.
A good AI agent becomes better over time when you review and improve it regularly.
My First AI Agent Workflow (Without Coding Knowledge)
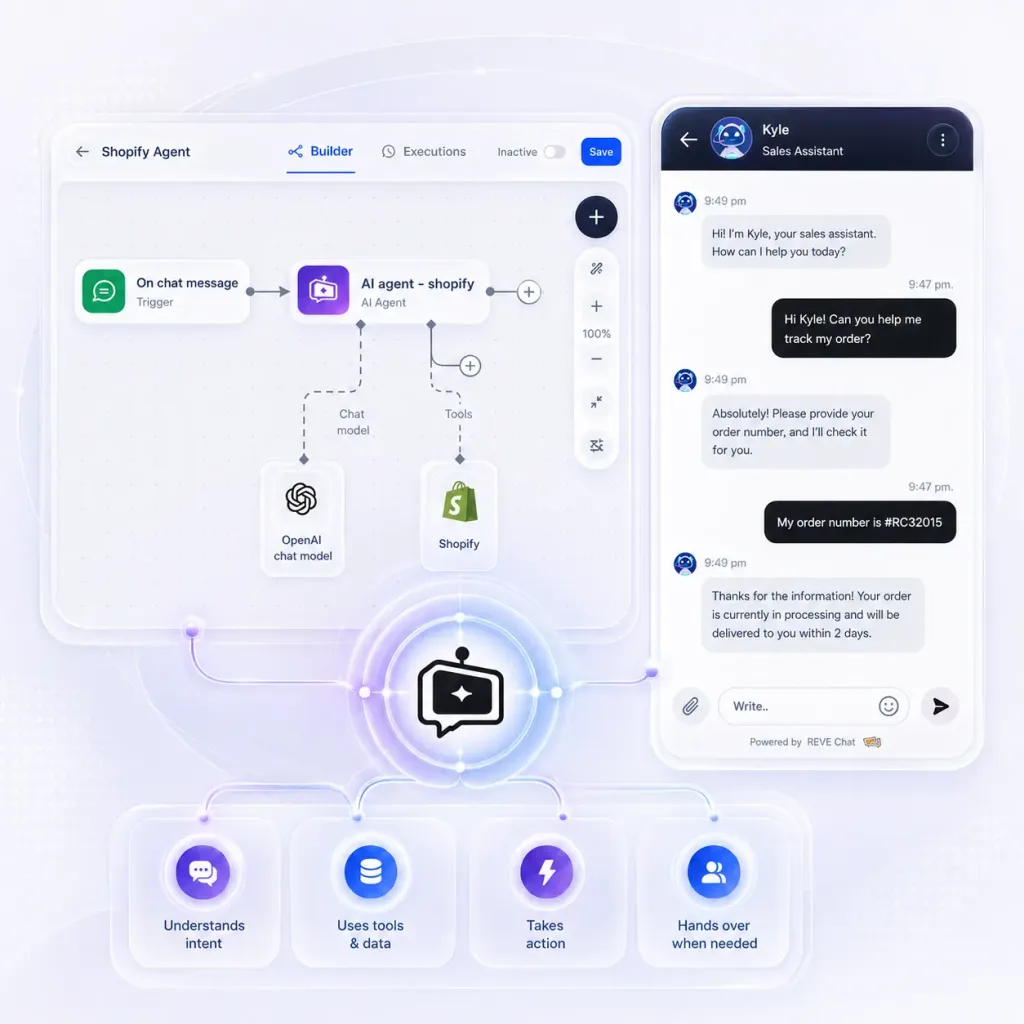
I have already explained how to build an AI agent step by step. Now, I want to show you how an AI agent actually works in a real-world scenario.
Here, I am sharing my experience with a customer support AI agent workflow created using Wize AI Agent inside REVE Chat.
If you are planning to build your own customer support agent workflow or any AI agent designed to turn conversations into outcomes, this example will help you understand how an AI agent thinks, responds, and works behind the scenes to complete tasks efficiently.
Getting Started
I first went to the www.revechat.com website and signed up for a free account. After creating the account, I completed my account profile and explored the dashboard to understand the basic setup.
Before building the AI agent workflow, I also set up the chat widget. This was important because the widget is the place where customers will send messages.
Once the chat widget was ready, I moved toward creating my customer service AI agent workflow using Wize AI Agent.
Setting Up the Customer Support Workflow
Inside the REVE Chat dashboard, I went to the automation area and started creating a new AI agent workflow. This is where I could build the flow visually instead of writing code.
The workflow builder made the process easier because I could see each step clearly. I did not have to imagine how the system worked in the background.
For my first workflow, I kept the goal simple: when a customer sends a message through website chat, the AI agent should understand the message, prepare a helpful response, and send it back to the customer.
Adding the Chat Message Trigger
The first part of the workflow was the trigger.
A trigger is what starts the workflow. Since I wanted the AI agent to respond to website visitors, I selected the chat message trigger. This means the workflow starts when a customer sends a message through the connected chat widget.
Adding the AI Agent
After setting the trigger, I added the AI Agent node.
This is the main part of the workflow.
Inside the AI Agent settings, I connected the customer’s incoming message as the input. Then I selected the AI provider and model that the agent would use to generate responses.
I also added a prompt message. This prompt worked like a set of instructions for the agent. It told the AI agent what role it should play, how it should speak, and how it should respond to customers.
Connecting Business Information
After that, I focused on the information the AI agent would use.
A customer support AI agent should not reply with random or general answers. It should use real business information. In REVE Chat’s Wize AI, this can be done by adding business data to the knowledge base.
This data can include FAQs, product details, pricing information, return policies, shipping details, help articles, website content, or internal documents. Once the data is added and trained, the AI agent can use it to give more accurate and business-specific answers.
Sending the Response Back to the Customer
Once the AI Agent created a response, I needed to send that response back to the customer chat.
For this, I added a Response To Chat node. This node takes the AI-generated answer and displays it in the customer conversation.
KEY TAKEAWAY
So the basic workflow became very simple:
Customer sends a message → AI Agent understands the message → AI Agent prepares a response → Response To Chat sends the answer back to the customer.
Adding Human Handover for Better Support
While building the workflow, I also realized that an AI agent should not handle every situation alone. Some customer issues need human support.
That is why human handover is an important part of customer service, and I also added this.
Testing the Workflow
Before using the workflow with real customers, I tested it with sample messages.
This step is important because even a simple AI agent workflow should be tested before it goes live.
Final Word: What This Experience Taught Me
Creating my first AI agent workflow with REVE Chat’s Wize AI helped me understand that AI agents are not only about answering questions. They are about creating a full support flow.
Most importantly, I did not need coding knowledge to create the basic workflow. Starting with a simple customer support use case made the process easier to understand and manage.
If you want to build an AI agent workflow using REVE Chat’s Wize AI Agent, explore it now and see how it can help you automate customer conversations more efficiently.
Frequently Asked Questions
A chatbot usually answers questions based on fixed rules or simple responses. An AI agent can understand a goal, make decisions, use tools, and complete tasks. In simple words, a chatbot mainly replies, while an AI agent can take action.
An AI agent workflow is the step-by-step path an AI agent follows to complete a task. For example, in a customer support workflow, the customer sends a message, the AI agent understands it, checks the knowledge base, prepares an answer, and sends the response back to the customer.
A customer support AI agent can answer common questions, share product information, explain policies, collect customer details, guide users, summarize conversations, and transfer complex issues to a human support agent when needed.
A knowledge base gives the AI agent the information it needs to answer correctly. It can include FAQs, help articles, product details, pricing information, return policies, shipping details, and internal support documents. A clean and updated knowledge base helps the agent give better answers.
An AI agent can handle many common and repetitive questions, but it should not fully replace human support agents. Human agents are still important for sensitive issues, complaints, refunds, payment problems, and situations where the customer needs personal attention.
Yes, you can build an AI agent without coding. REVE Chat’s Wize AI Agent is designed for this type of setup. You can build customer support workflows using a visual workflow builder, add triggers, connect AI Agent nodes, use a knowledge base, and send replies back to customers.
A basic no-code AI agent can be created quickly if your business information is ready. More advanced workflows may take longer because they need testing, tool connections, conditions, and human handover setup.
With REVE Chat’s Wize AI Agent, you can start with a simple customer support workflow first and then improve it step by step within 1 hour.
Build AI-powered support with Wize AI
Connect business knowledge, automate support conversations, and improve response quality without managing a complex AI stack.
Explore Wize AI Agent Rate the article

Khalid Hassan Emran
Sr. Technical Content Writer
Khalid Hassan Emran is a Senior Technical Content Writer with more than 5 years of experience in technical documentation, content marketing, and blog writing. He specializes in simplifying complex technical concepts into clear, engaging content. In addition, he is an AI Agent Specialist and SEO Expert, helping businesses improve their digital presence through AI-driven solutions and search-optimized content strategies.
View all articles
Turn customer conversations into action with Wize AI
It helps businesses to engage with visitors, answer every question, recommend next steps, qualify leads, and support customers across every conversation.
Learn more