



How to Connect REVE Chat with WooCommerce
- August 30, 2026
- 6 mins read
Table of Content
WooCommerce is one of the most popular e-commerce solutions for WordPress websites. Since WooCommerce runs on WordPress, you can use the REVE Chat WordPress plugin to add the chat widget to your website and connect your WooCommerce store with REVE Chat to access supported ecommerce features.
Connecting your store allows REVE Chat to access relevant WooCommerce data for supported ecommerce use cases, such as product recommendations, product comparisons, checkout assistance, and order tracking.
Note: If your WordPress website already has the REVE Chat plugin installed and connected with an active REVE Chat account, all you need to do is connect your WooCommerce store with our app by providing the necessary details.
Before You Begin
Before setting up REVE Chat for WooCommerce, make sure you have:
- A WordPress website with WooCommerce plugin installed
- Our REVE Chat WordPress plugin is installed and connected.
The REVE Chat WordPress plugin adds the chat widget to your website, while the WooCommerce integration connects your WooCommerce store with REVE Chat. Complete both setups to use REVE Chat with your WooCommerce store for all our ecommerce features and use cases.
If REVE Chat is not installed on your WordPress website yet, follow the Install REVE Chat on WordPress Websites guide first.
Step 1: Navigate to WooCommerce Integration in REVE Chat
You can manage the WooCommerce integration from your REVE Chat dashboard.
To connect WooCommerce:
- Log in to your REVE Chat dashboard.
- From the left sidebar, go to Integrations.
- Select E-Commerce Integration.
- Open the WooCommerce section.
- Click Add account.
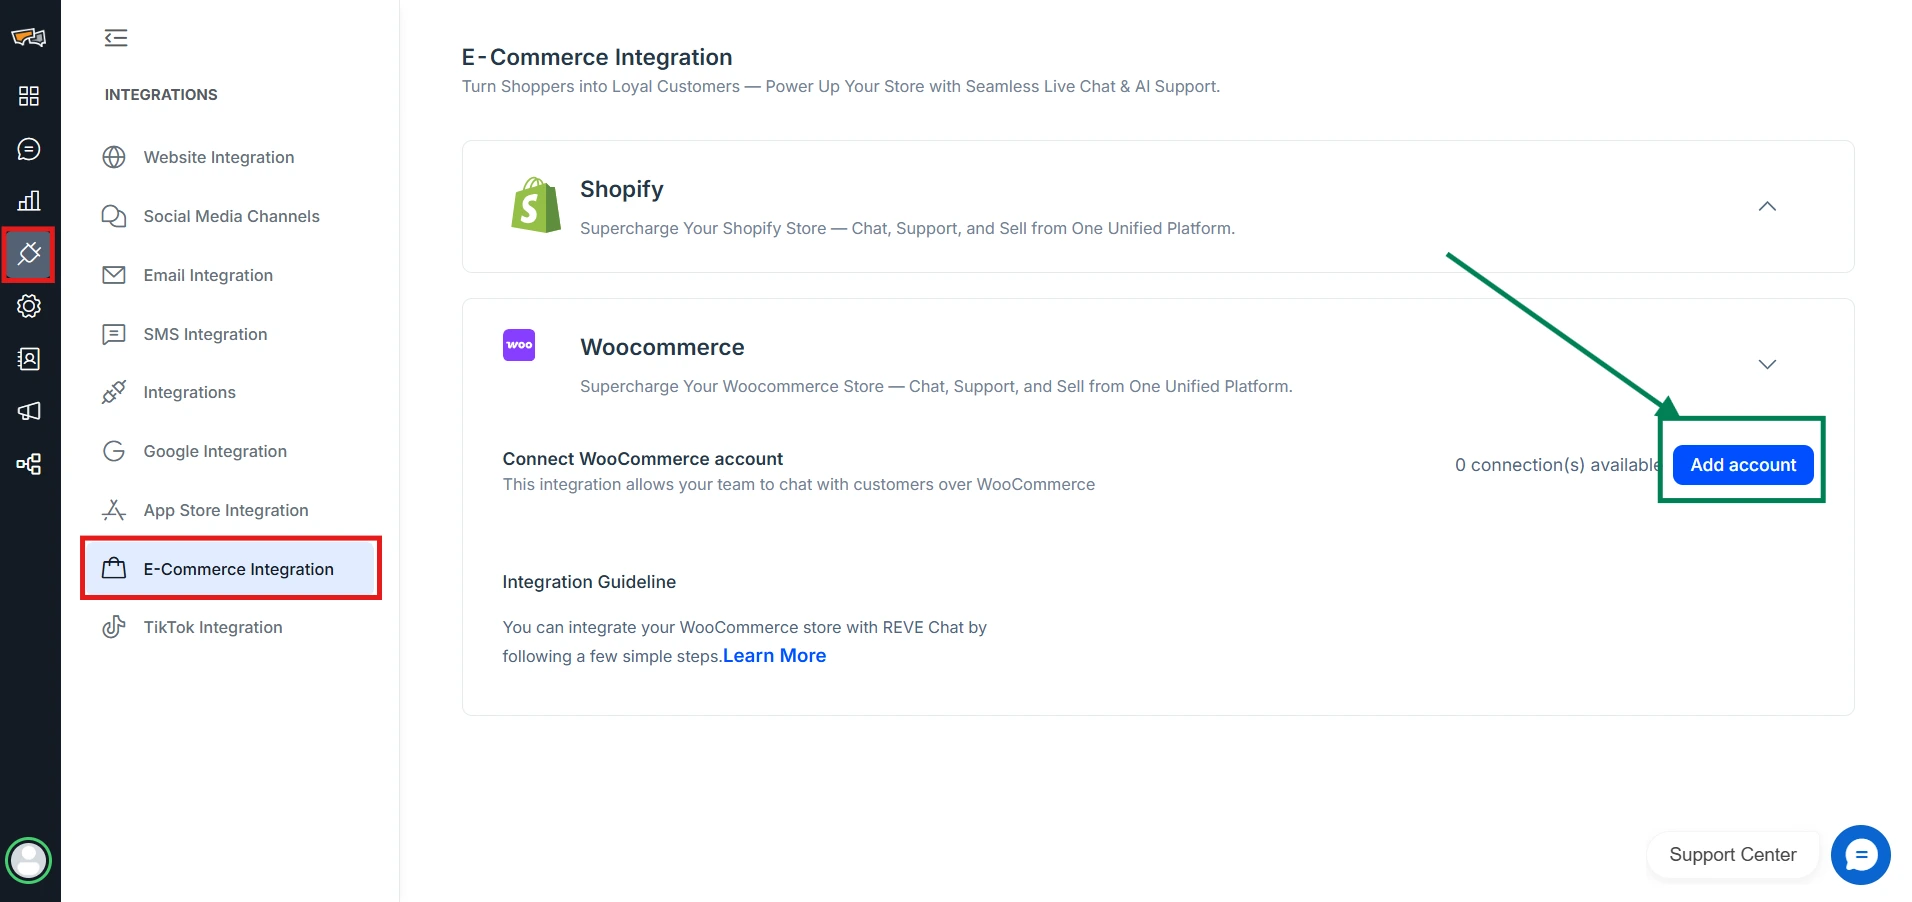
Step 2: Adding your WooCommerce Store to REVE Chat
After clicking add account, you have to enter the following details:
- Store URL: Your WooCommerce Store URL
- Consumer Key: The Consumer API Key generated inside the WooCommerce Plugin
- Consumer Secret Key: The Consumer Secret API Key generated inside the WooCommerce Plugin
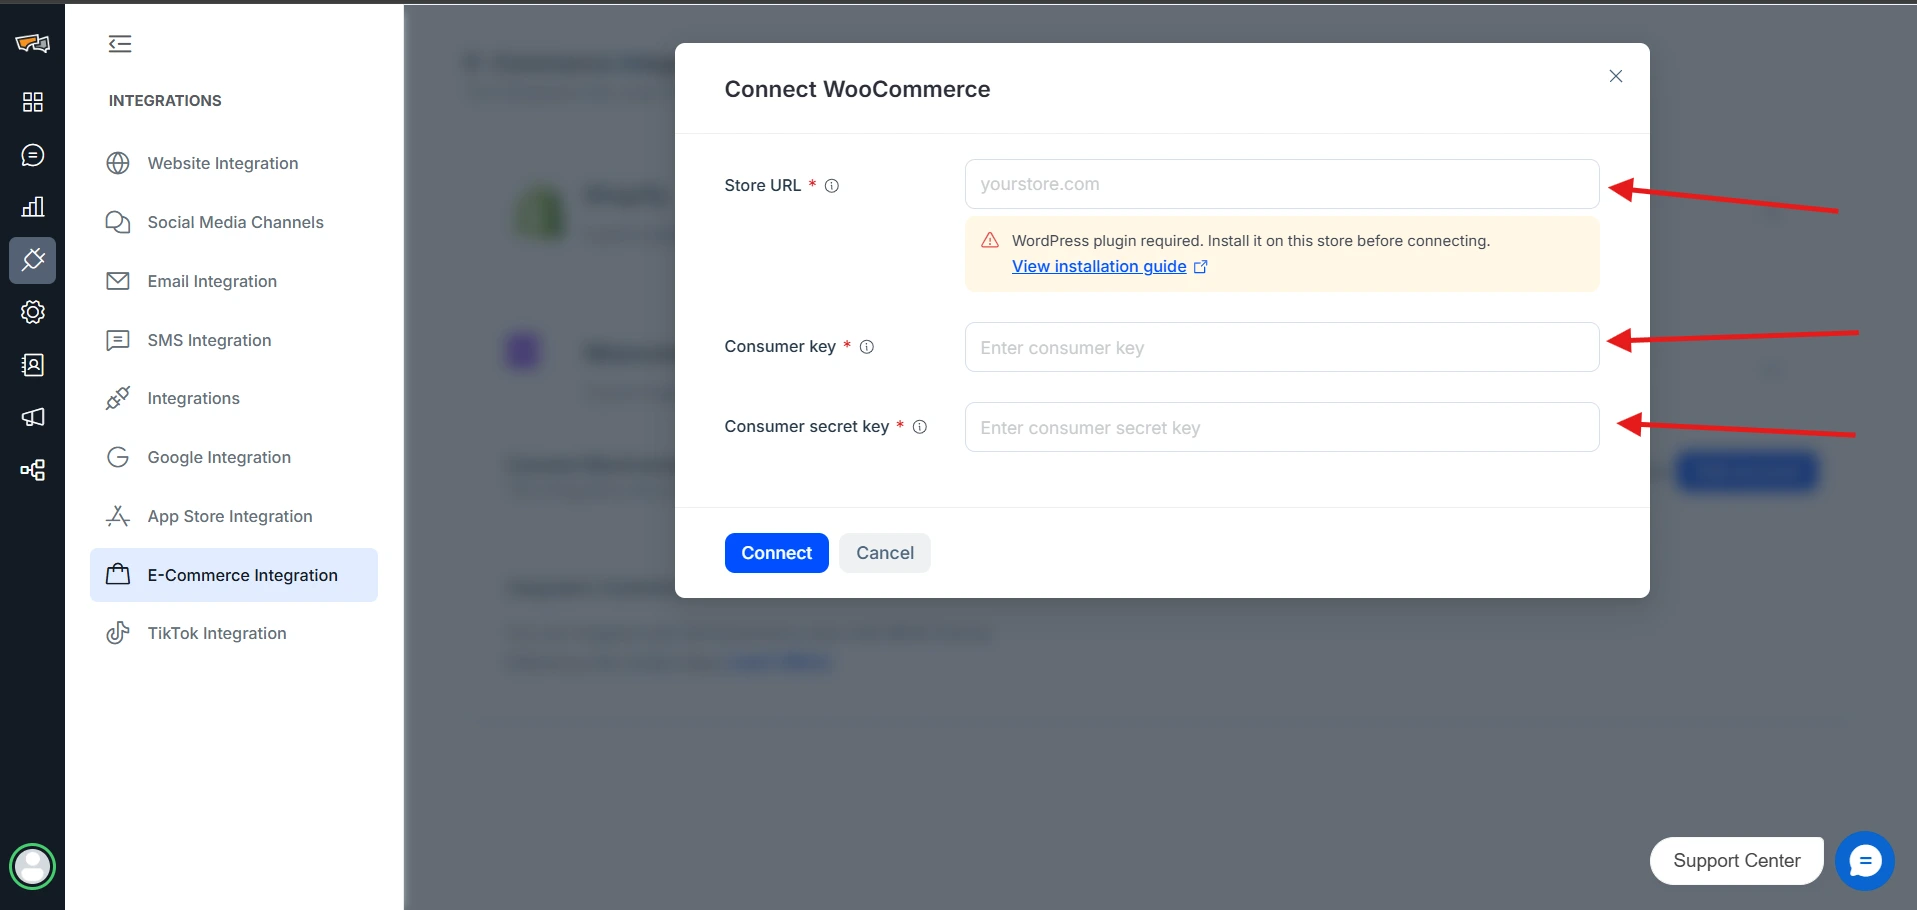
To get the WooCommerce Consumer Keys, you have to generate the API keys using the steps below.
Generate your WooCommerce API Keys
- Open your WordPress Dashboard
- Go to WooCommerce → Settings.
- Select the Advanced tab.
- Open REST API.
- Click Add key.
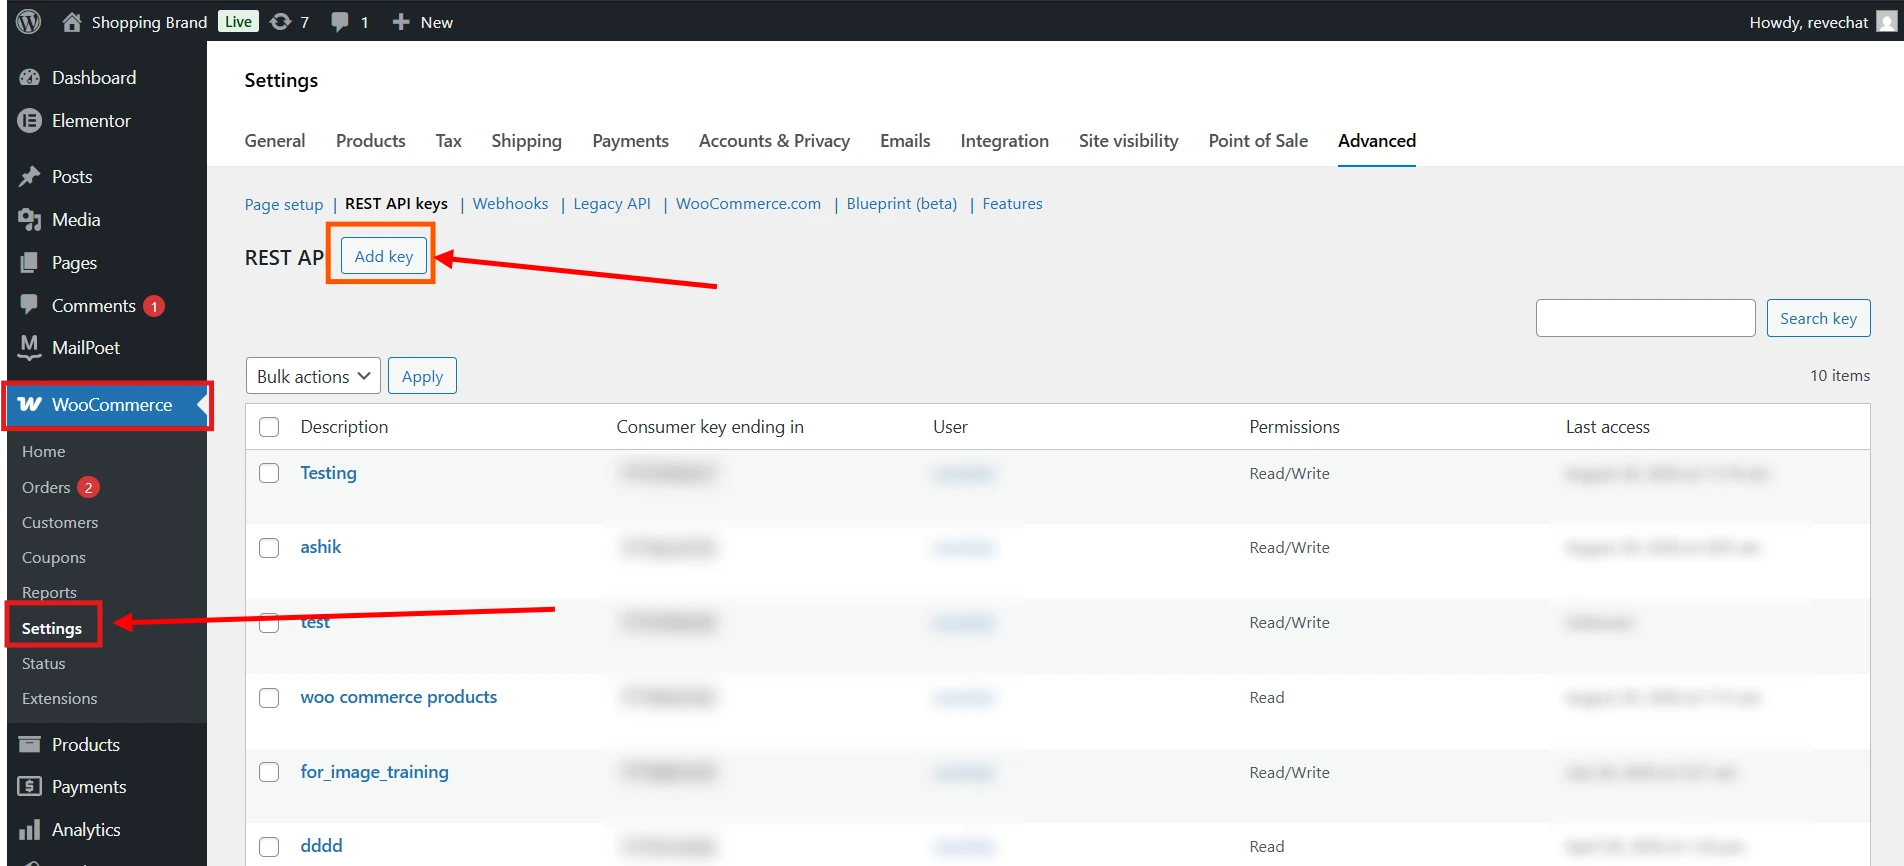
Once you click the button, you will see a screen where the following information is required:
- Description: Adding a name to describe the purpose of the API keys. E.g. REVE Chat WooCommerce Connection
- User: Select the user who is managing or creating these keys for the connection.
- Permissions: What these APIs can be used for. There are three options here.
1. Read: The API only allows product information, customer details, order history, and such to be read. However, it does not allow order creation, editing orders, and other.
2. Write: The API allows data creation, edit, or deletion for orders, products, etc. However, it does not allow the ability to read existing data inside your store.
3. Read/Write: Grants full access to your store through APIs. So, you can read and change product information, orders, customer details, and more via REVE Chat.
Permissions: Select Read/Write to allow REVE Chat to access and perform supported actions with your WooCommerce store data.
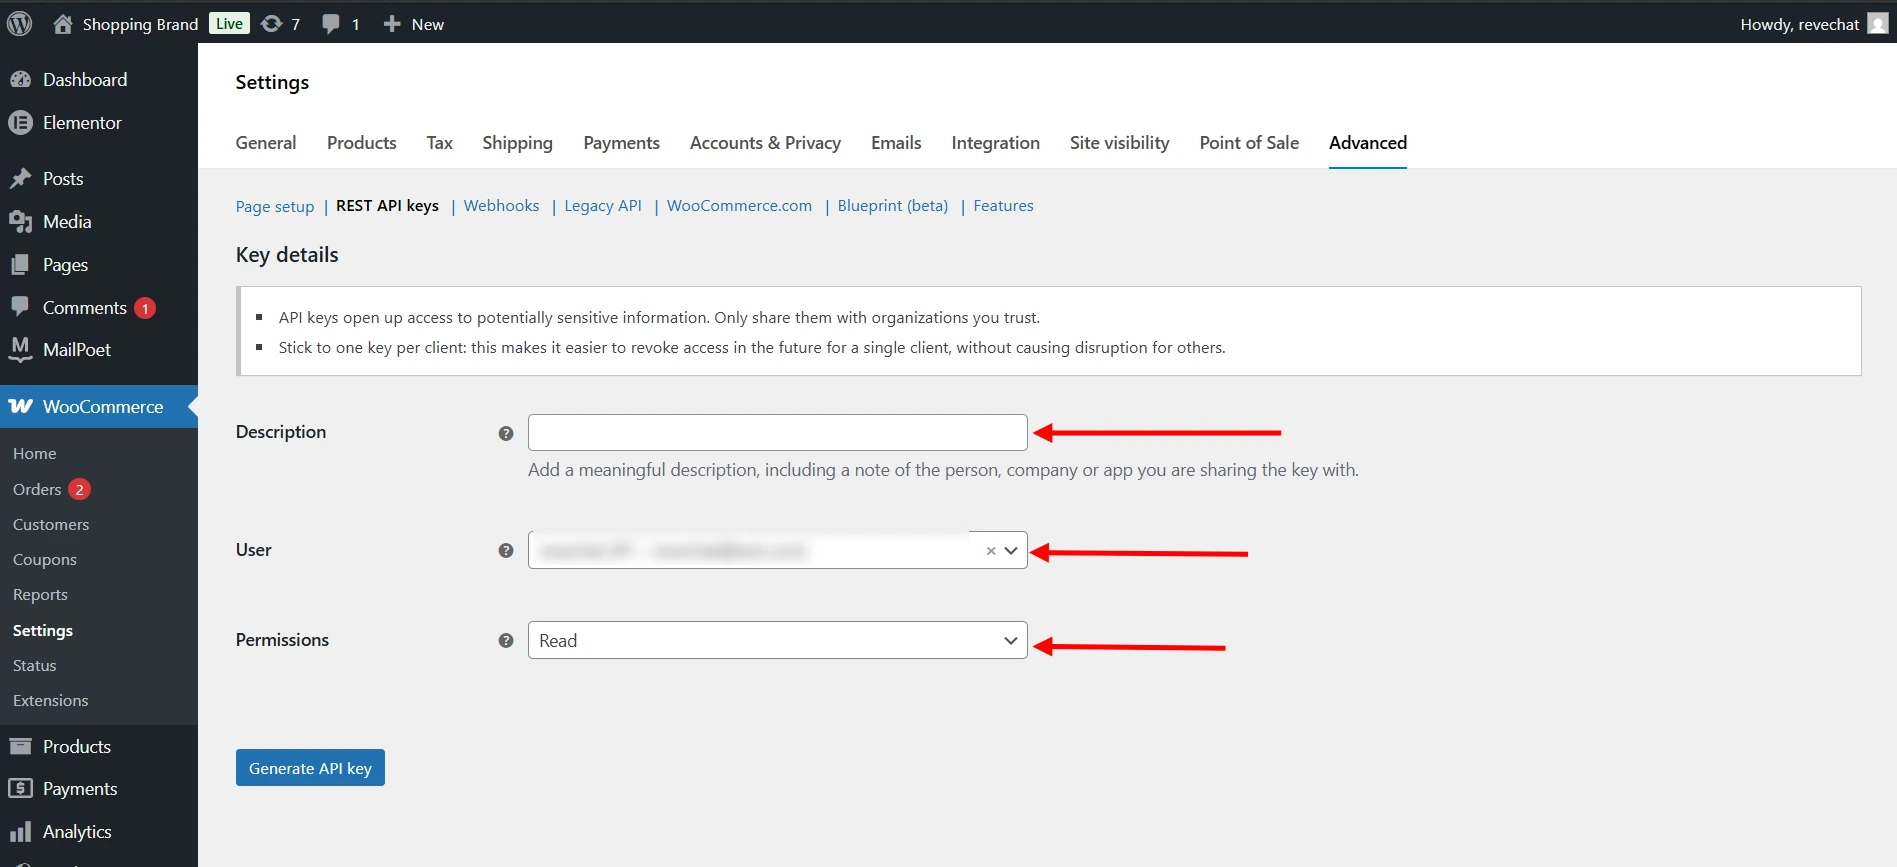
After inserting and selecting the information, you can click the Generate API Key button to generate your API Keys for the connection.
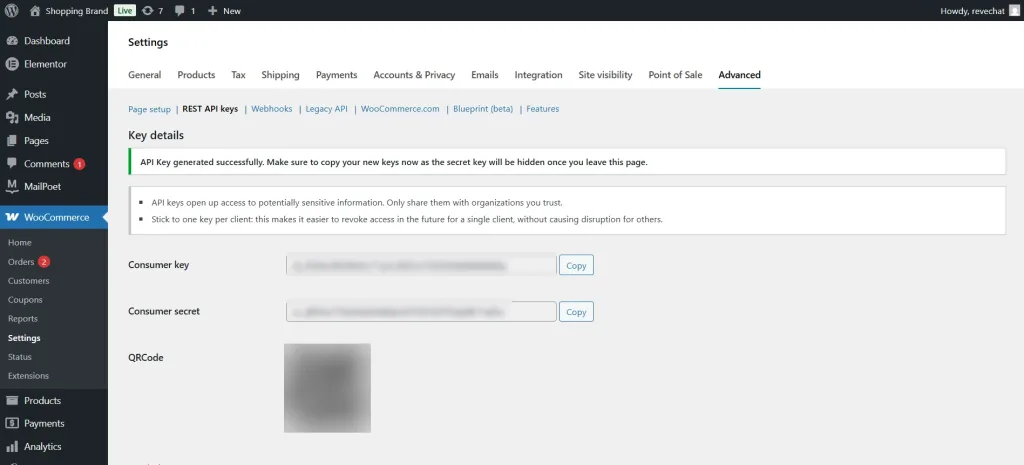
Now, all you have to do is copy the Consumer Keys to insert in the respective fields inside the WooCommerce Store connection form in REVE Chat. After entering the details, click enter to connect your store.
Note: Copy and securely save the Consumer Key and Consumer Secret before leaving this page. WooCommerce will not display the Consumer Secret again.
Step 3: Verify WooCommerce Setup for Your Store
After clicking enter, your store will be connected and you will see the screen as below.
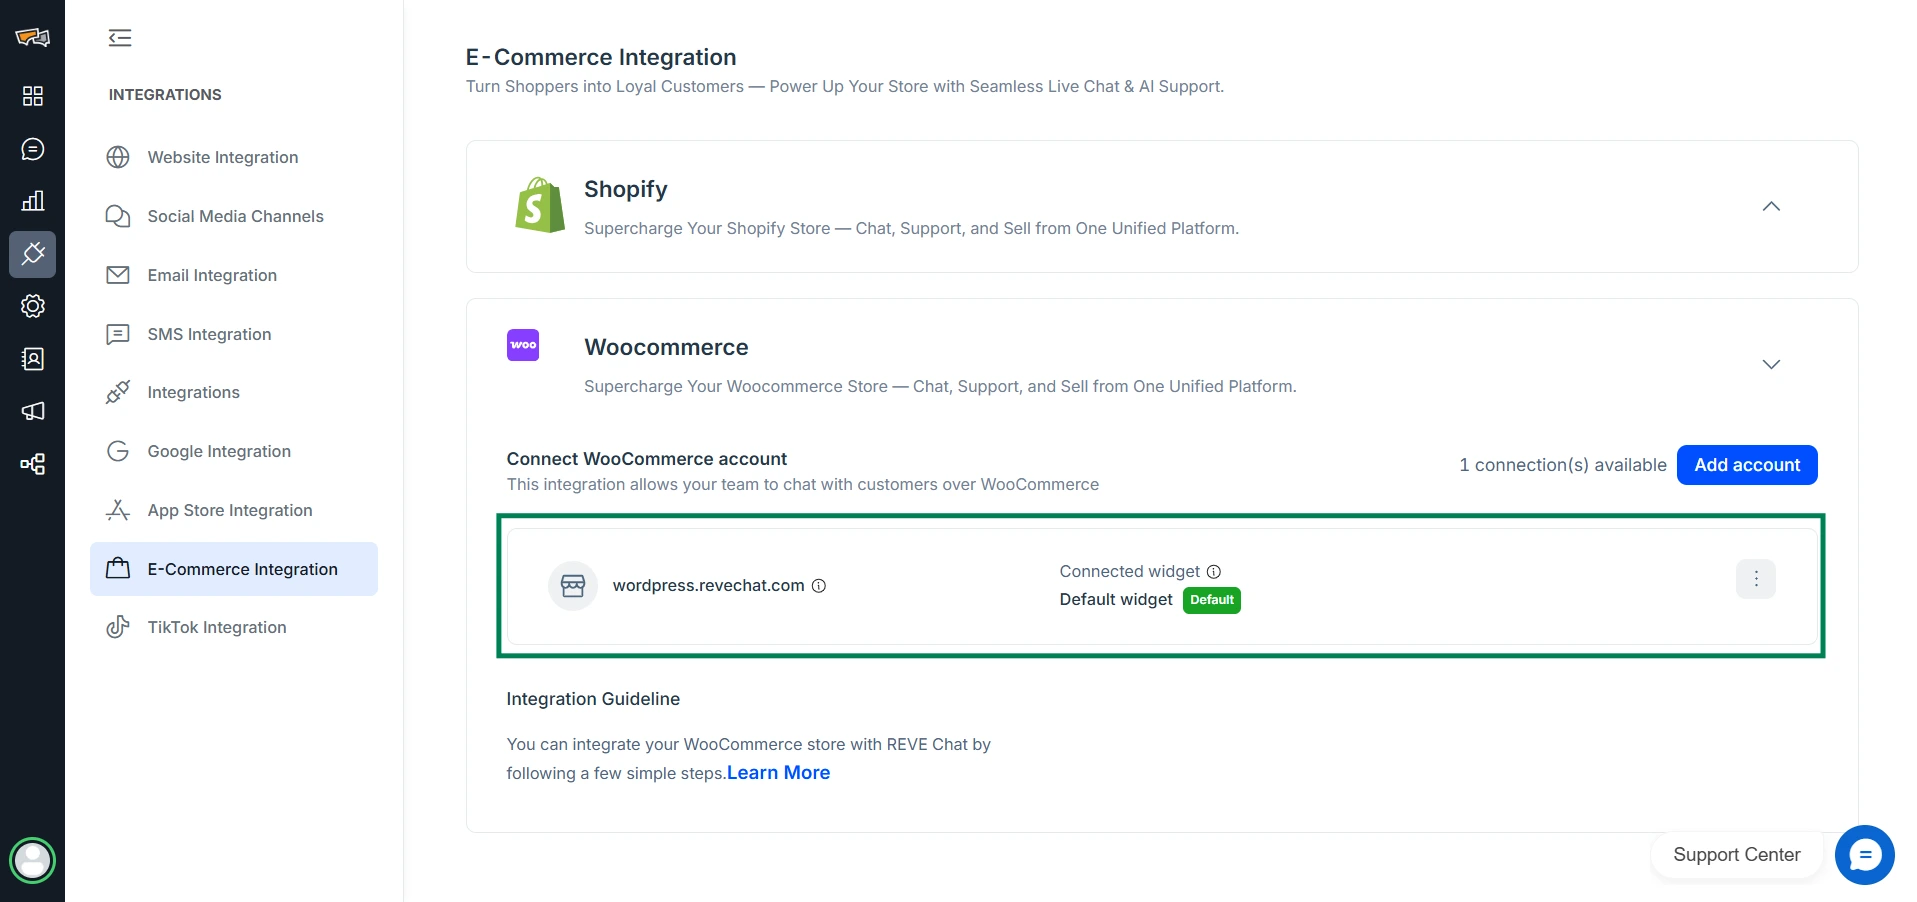
Now you can test our widget on your WooCommerce store pages, including product pages, cart pages, checkout pages, and other website pages.
You should test the widget on important customer journey pages, such as:
- Homepage
- Product pages
- Cart page
- Checkout page
- Order or account pages, if applicable
Test the connected ecommerce features to make sure REVE Chat can access the expected WooCommerce information and perform supported actions, such as recommending products, checking order details or cart information, and generating checkout links.
If the widget appears correctly, customers can start conversations with your team while shopping. Incoming chats will be available inside your REVE Chat dashboard.
Troubleshooting
For issues, you can follow these steps for the following issues
REVE Chat Widget is not appearing on Website/Store
If the REVE Chat widget does not appear on your WooCommerce store, check the following:
- Make sure the REVE Chat WordPress plugin is installed and activated.
- Clear your WordPress cache and browser cache.
- Check whether any caching, security, or optimization plugin is blocking the chat widget script.
- Make sure you are testing the live website, not only a preview or staging version.
- If your theme has custom product, cart, or checkout templates, confirm that third-party scripts are allowed on those pages with our team at [email protected].
WooCommerce Store Connection Is Not Working
If REVE Chat cannot access the expected store information, check the following:
- Check whether your WooCommerce store is still connected to REVE Chat
- Double-check if your API Keys have been accidentally revoked
- Verify if the REVE Chat WordPress Plugin is installed and connected in your WordPress Dashboard
For any further issues and such, please contact our support team at [email protected], the support option inside your app, or from our website.
WooCommerce REST API Keys Were Revoked
For whatever reason, if the REST API Keys are revoked, then you have to do the following steps:
- Disconnect your WooCommerce store connection inside REVE Chat with the three dots

- Regenerate your API keys inside your WooCommerce plugin
- Copy the keys and reconnect your store using the Add Store option for WooCommerce inside REVE Chat.

WooCommerce Connection is Accidentally Removed
If the WooCommerce Connection with REVE Chat is disconnected and you wish to reconnect again, do the following steps:
- Retrieve your saved WooCommerce API Keys. If you forgot your API Keys, please generate new ones through your WooCommerce Plugin (follow steps above)
- Copy the keys and reconnect your store using the Add Store option for WooCommerce inside REVE Chat.
Next Steps
After connecting your WooCommerce store with REVE Chat, you can customize the chat experience for your shoppers by accurately providing product information, comparing items, accessing customer details & order history, creating/editing/removing orders, completing & providing checkout links, and all necessary ecommerce use cases you would like to serve with REVE Chat.
Frequently Asked Questions
Yes. Since WooCommerce runs on WordPress, the REVE Chat WordPress plugin is used to add the REVE Chat widget to your WooCommerce website. Make sure the plugin is installed, activated, and connected to your REVE Chat account before completing the WooCommerce integration.
No. If the REVE Chat WordPress plugin is already installed and connected to your REVE Chat account, you do not need to install it again. You can proceed with connecting your WooCommerce store from the REVE Chat dashboard.
The WordPress plugin adds the REVE Chat widget to your website, while the WooCommerce integration connects your WooCommerce store with REVE Chat. This allows your WooCommerce store and REVE Chat setup to work together.
Once enabled, the widget can appear across your WooCommerce storefront, including the homepage, product pages, cart, checkout, and other website pages where the REVE Chat widget is available.
No manual coding is required for the setup described in this guide. You can install the REVE Chat WordPress plugin and connect WooCommerce through the available WordPress and REVE Chat dashboard settings.
Conversations started through the REVE Chat widget on your WooCommerce store will be available in your REVE Chat dashboard, where your team can view and respond to customer messages for Live Chat or appear in Agent Conversations for Wize AI Agent.

 Start free trial