



How to Create a WhatsApp Campaign Template
- July 27, 2025
- 10 mins read
Table of Content
WhatsApp message templates are pre-approved message formats used to send business-initiated messages such as promotions, order updates, reminders, and announcements. Before you can use a template in a WhatsApp campaign, you must create it in REVE Chat and submit it to Meta for approval. Only approved templates can be selected when creating a campaign.
This article belongs under Campaigns & Customer Engagement in the REVE Chat documentation structure, where approved WhatsApp templates are used to create and send campaigns.
Before You Begin
Make sure that:
- Your WhatsApp Business number is connected to REVE Chat.
- You know the purpose of the message you want to send.
- Your message follows WhatsApp and Meta messaging policies.
- Any image, video, document, website URL, phone number, or offer code you plan to use is ready.
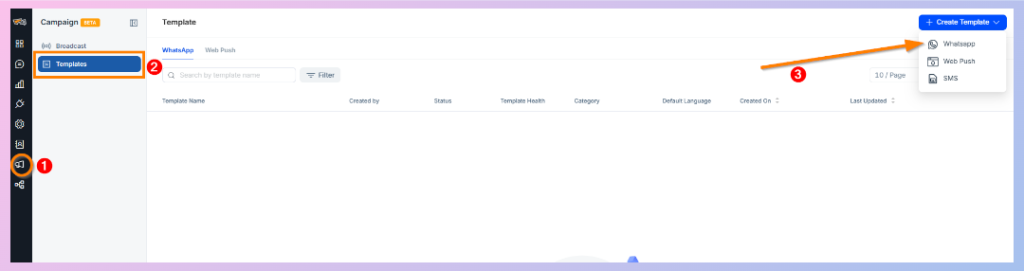
Step 1: Open the WhatsApp Template Section
- Sign in to your REVE Chat account.
- Select the Campaign icon from the left navigation menu.
- Open Templates.
- Select the WhatsApp tab.
- Click Create Template in the upper-right corner.
- Select WhatsApp from the menu.
Step 2: Enter the Basic Template Information
The Create WhatsApp Template window appears. Complete the following fields:
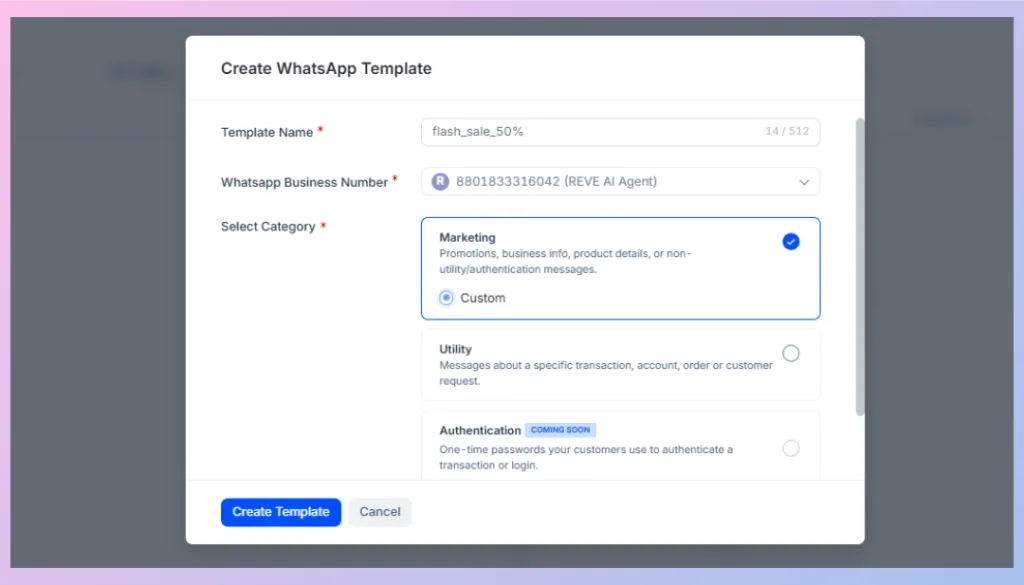
Template Name
Enter a unique and descriptive name that helps you identify the template later.
For example: flash_sale
Use a simple name and follow the naming rules displayed in the field. Lowercase names are recommended for easier management.
WhatsApp Business Number
Select the connected WhatsApp Business number that will be used with the template.
Templates are associated with a specific WhatsApp account. Make sure you select the correct number before continuing.
Category
Choose the category that best matches the purpose of your message.
Marketing: Use this category for:
- Promotions and discounts
- Product announcements
- Special offers
- Event invitations
- Lead-generation messages
- General business information
Select Custom when creating a standard marketing message.
Utility: Use this category for messages related to an existing transaction or customer request, such as:
- Order confirmations
- Delivery updates
- Appointment reminders
- Payment notifications
- Account or service updates
Authentication: Use this category for authentication messages such as one-time passwords and login verification codes.
In the current interface shown, Authentication is marked as Coming Soon.
Default Language
Select the primary language of the template. The message content must be written in the language you select. After completing the required fields, click Create Template.
Step 3: Understand the Template Builder
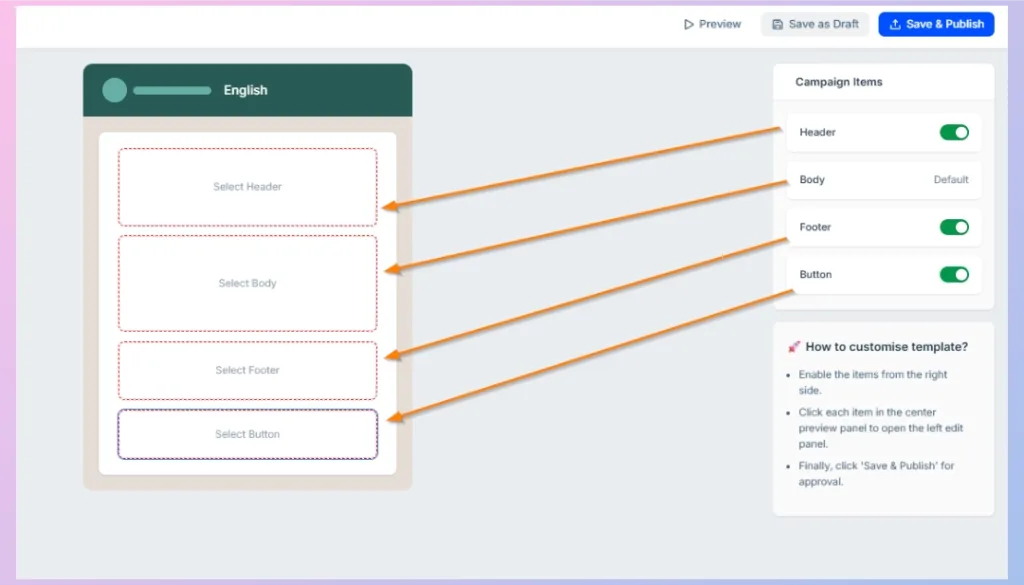
The Template Builder contains three main areas:
- Template Details: Displays the channel, WhatsApp number, template name, category, language, status, and creation information.
- Message Preview: Shows how the template will appear to WhatsApp recipients.
- Campaign Items: Lets you enable and configure the Header, Body, Footer, and Buttons.
The Body is enabled by default because every WhatsApp template must contain message content. The Header, Footer, and Buttons are optional.
Step 4: Configure the Header
Enable the Header switch from the Campaign Items panel. Then select the header area in the message preview to open Header Settings.
The header appears at the top of the WhatsApp message and can be used to highlight the most important part of your campaign.
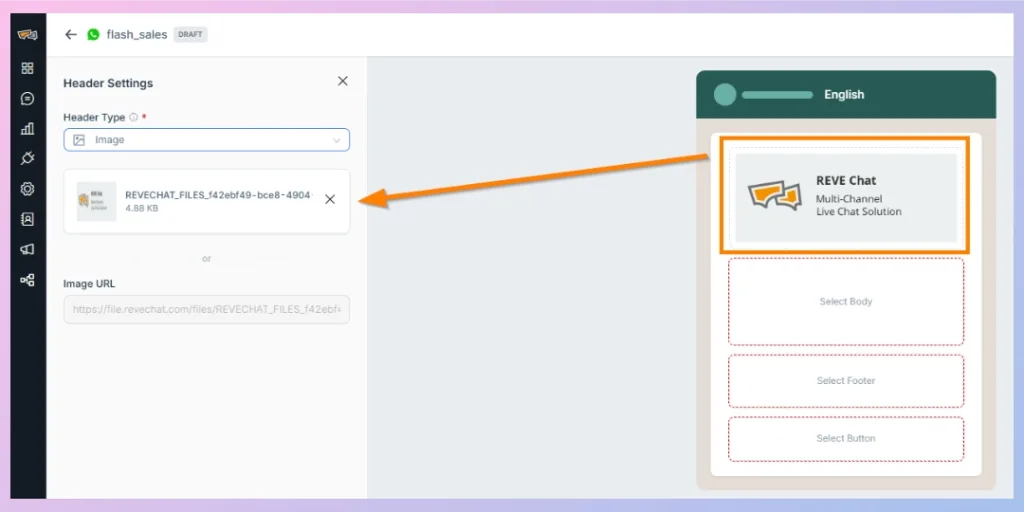
Available header types include:
Image: Add a product image, promotional banner, company logo, or other supporting visual.
You can add an image in either of the following ways:
- Upload an image from your device.
- Add the image using a publicly accessible image URL.
Make sure the image URL can be opened without requiring a login.
Video: Add a short promotional, product, or informational video.
Text: Add a short heading at the top of the message.
For example: Limited-Time Offer
File: Attach a document such as a brochure, quotation, menu, or PDF.
Location: Add a business, store, office, or event location.
The Header is optional. Disable the Header switch when it is not needed. REVE Chat supports text, image, video, file, and location headers.
Step 5: Add the Message Body
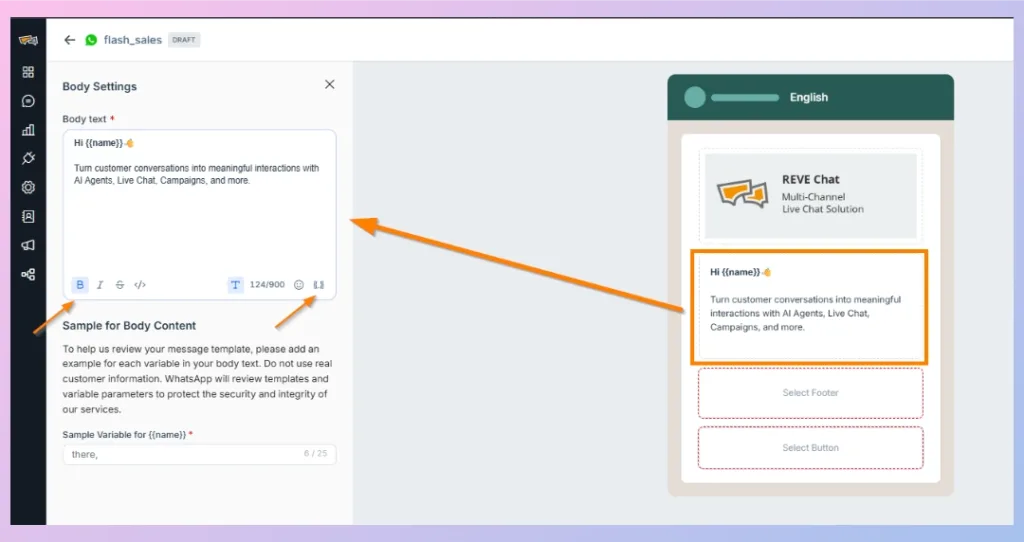
Select the Body section in the message preview. The Body Settings panel opens on the left.
Enter the main content of your WhatsApp message. The Body should clearly explain:
- Why the customer is receiving the message
- What information or offer is being shared
- What action the customer should take
For example:
Hi {{name}} 👋
Introducing Wize AI, an AI-powered customer engagement Agent for smarter conversations.
Explore how Wize AI can answer questions, recommend next steps, qualify leads, and support customers across every conversation.
Format the Body Text
The editor provides formatting options such as:
- Bold
- Italic
- Strikethrough
- Code formatting
- Emojis
- Variables
The Body supports up to 900 characters in the current interface.
Add Variables for Personalization
Variables allow you to personalize the message for each recipient.
For example: Hi {{name}}
The {{name}} value can be replaced with the customer’s actual name when the campaign is sent.
When you add a variable, enter a sample value in the corresponding Sample Variable field.
For example:
- Variable: {{name}}
- Sample value: Sarah
Sample values help Meta understand how the final message will appear during the approval review. Do not use real or sensitive customer information as sample data.
The existing REVE Chat template documentation supports body variables and requires sample values when variables are included.
Tip: Keep the message direct and easy to scan. Avoid unnecessary capital letters, repeated punctuation, or misleading promotional language.
Step 6: Add Footer Text
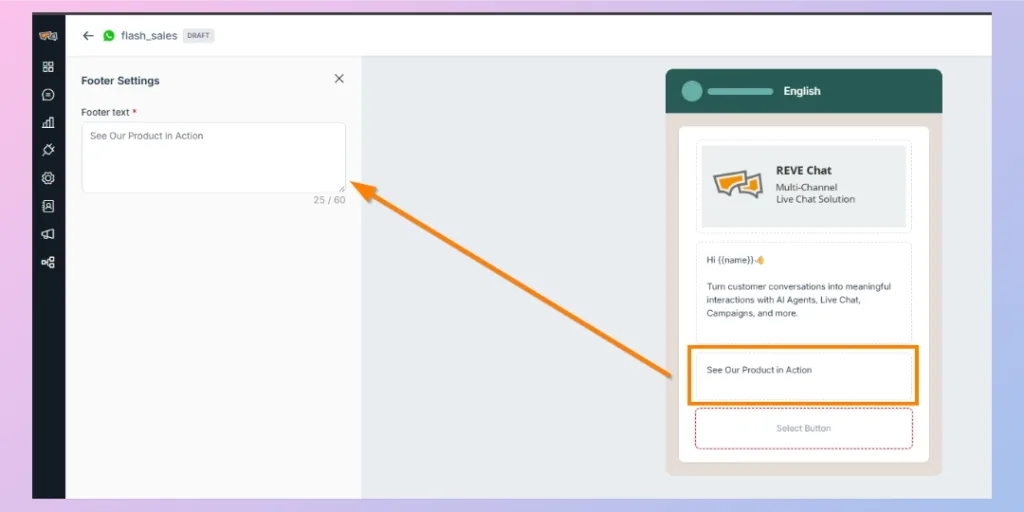
Enable the Footer switch and select the Footer section in the message preview.
Enter a short supporting message. The Footer can contain up to 60 characters in the current interface.
You can use it for:
- A short disclaimer
- A campaign condition
- A reminder
- An opt-out instruction
- Additional brand information
For example: See Our Product in Action
The Footer is optional and supports text only.
Step 7: Add Buttons
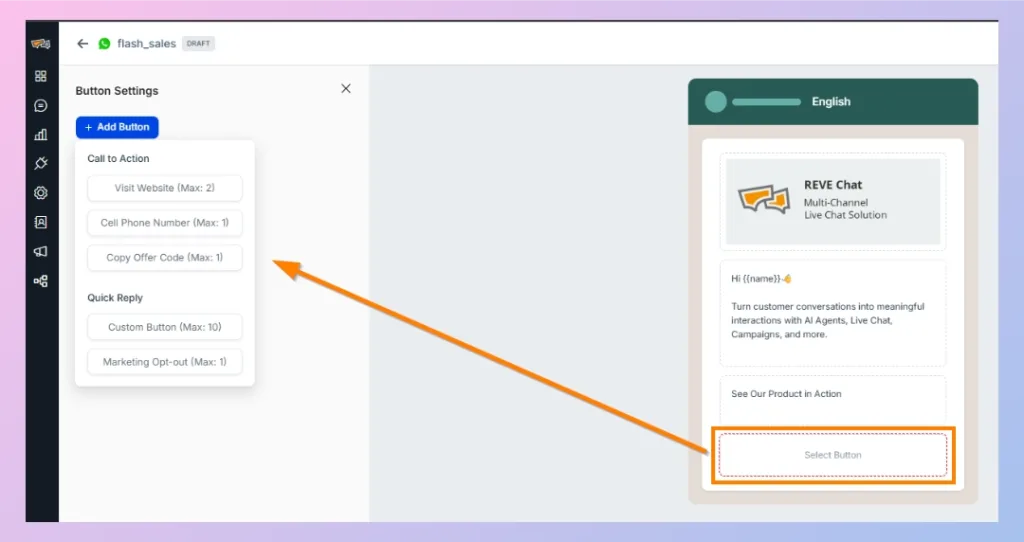
Enable the Button switch and select the Button section in the preview.
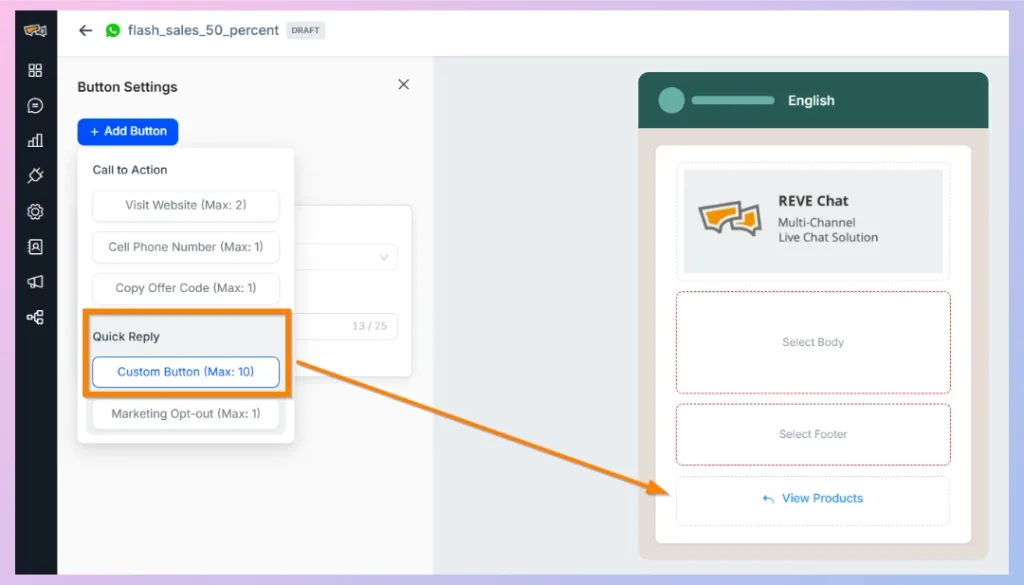
Click Add Button to view the available button types.
Buttons give recipients a clear next action. You can add multiple buttons to the same template, subject to the maximum number allowed for each button type.
The available buttons are divided into two groups:
- Call to Action
- Quick Reply
Call-to-Action Buttons
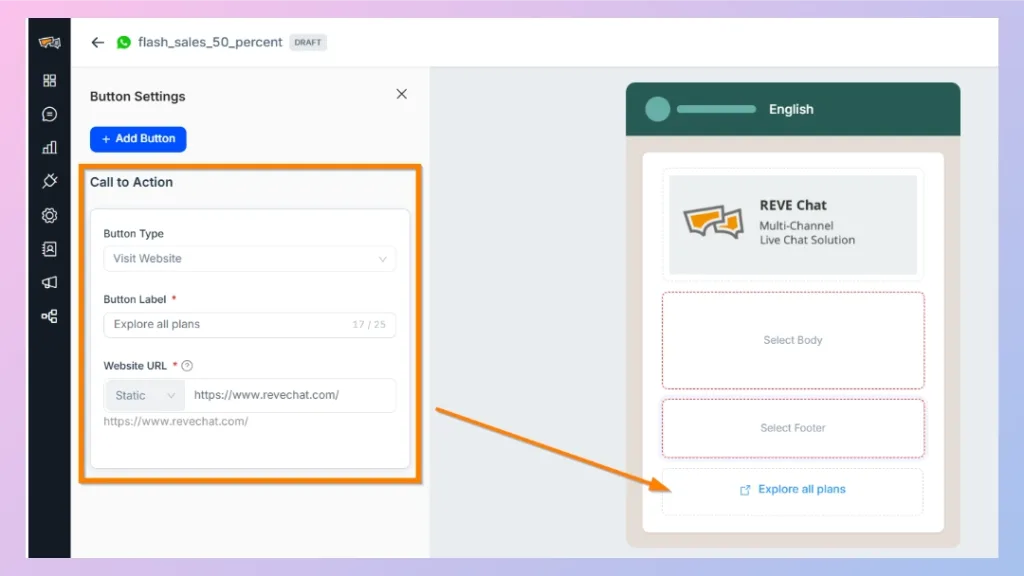
1. Visit Website
Use this button to direct customers to a website or landing page.
You must enter:
- Button Label: The text customers see, such as Shop Now, Book a Demo, or View Plans.
- Website URL: The page that opens when the customer selects the button.
The Website URL can be:
- Static: Every recipient opens the same URL.
- Dynamic: The URL contains a variable or customer-specific value, when supported.
You can add up to two Visit Website buttons.
Example
- Button label: Explore all plans
- Website URL: https://www.revechat.com/
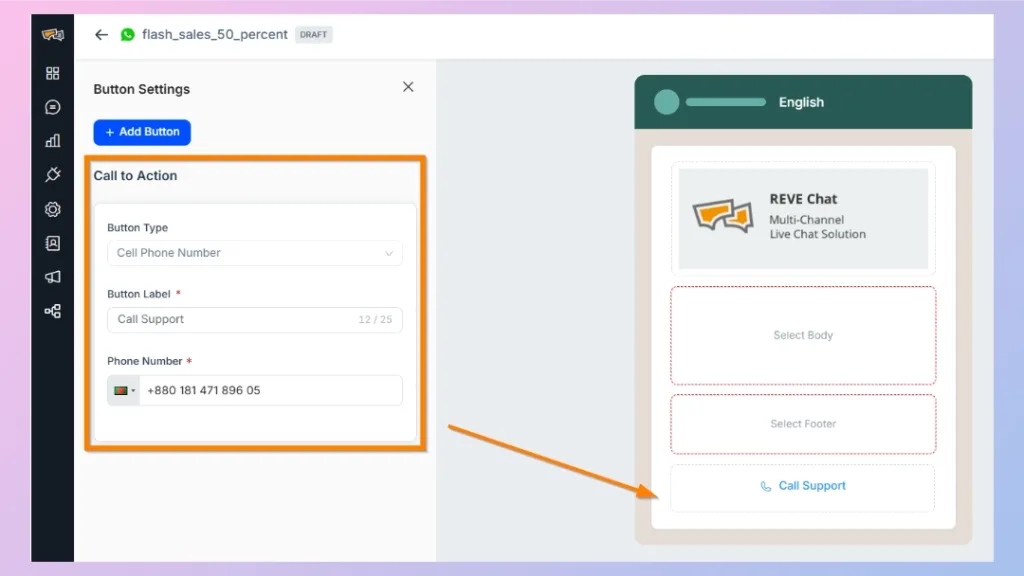
2. Call Phone Number
Use this button to let customers call your business directly from the WhatsApp message.
You must enter:
- A clear button label
- The business phone number
You can add up to one Call Phone Number button.
Suitable labels include:
- Call Support
- Speak to Sales
- Call Our Office
3. Copy Offer Code
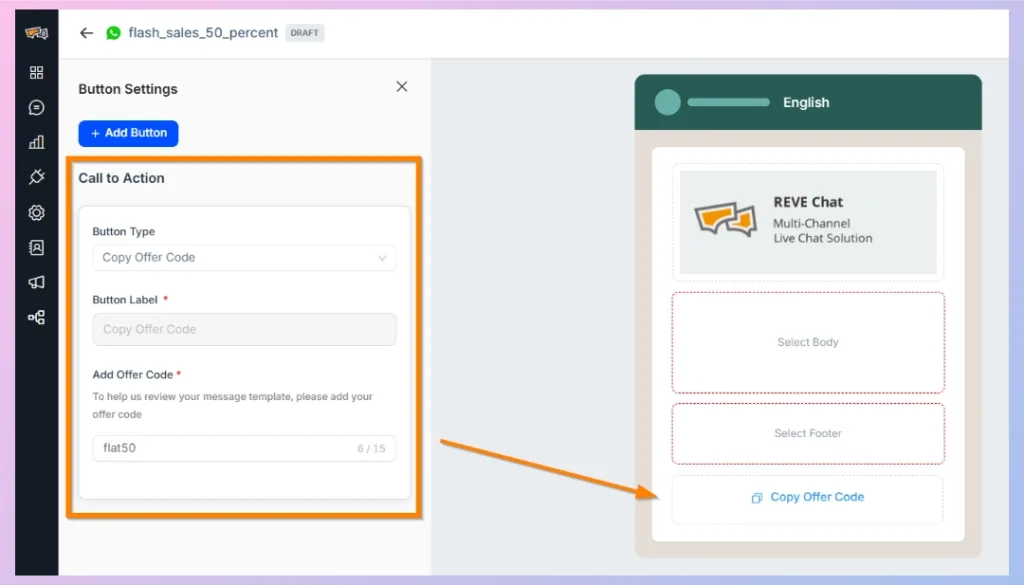
Use this button to provide a discount, coupon, or promotional code that customers can copy with one tap.
You must enter the offer code that customers will receive.
For example:
- Button label: Copy Offer Code
- Offer code: FLAT50
You can add up to one Copy Offer Code button.
Quick Reply Buttons
1. Custom Button
A Custom Button sends a predefined selection back to your business when the customer taps it. Custom Buttons can be used for actions such as:
- View Products
- Talk to Sales
- Need Help
- Confirm Booking
- Not Now
They can also be connected to a chatbot or automation flow when the corresponding workflow is configured.
You can add up to 10 Custom Buttons.
2. Marketing Opt-out
The Marketing Opt-out button allows recipients to stop receiving future marketing messages from your business.
When you add this button:
- The button label is displayed as an opt-out action, such as Stop Promotions.
- Add clear supporting Footer text, such as: Not interested? Tap Stop Promotions.
- Select the confirmation checkbox acknowledging that your business is responsible for stopping marketing messages for customers who opt out.
You can add up to one Marketing Opt-out button.
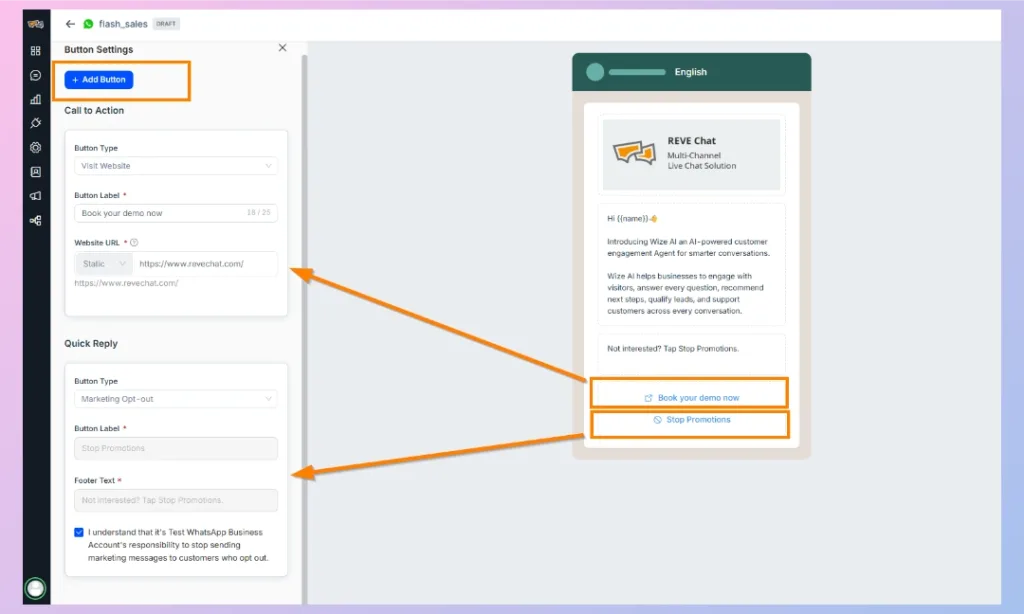
Important: When a customer selects the Marketing Opt-out button, make sure your contact management and campaign processes prevent further promotional messages from being sent to that customer.
Step 8: Add Multiple Buttons
You can combine different buttons in one WhatsApp template.
For example, a marketing message could include:
- Copy Offer Code
- Explore all plans
- Stop Promotions
Another template could include:
- Shop Now
- View Details
- Talk to Sales
The exact number of buttons you can add depends on the limit shown beside each button type in the Add Button menu.
Step 9: Rearrange the Button Order
Buttons appear to customers in the same order shown in the template preview.
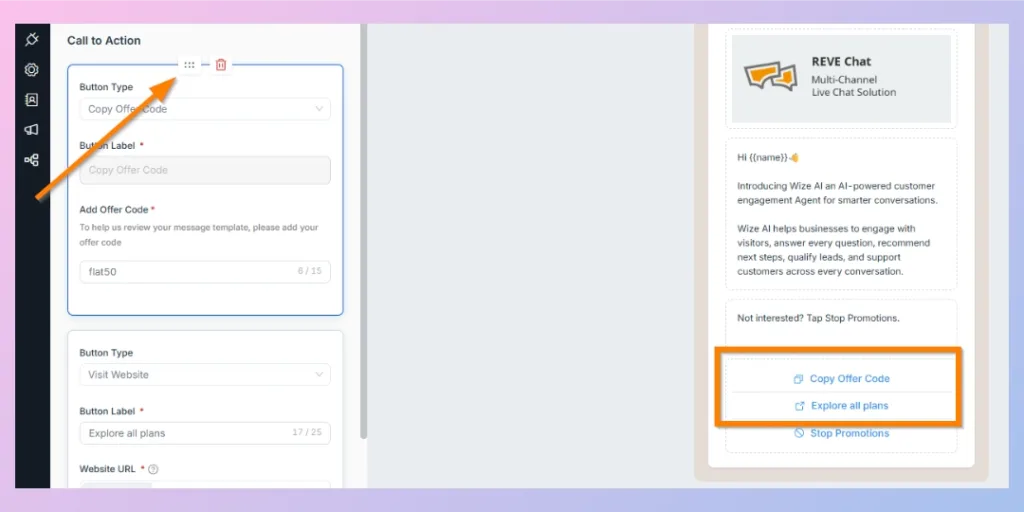
To rearrange them:
- Open the Button Settings panel.
- Move your pointer over the button you want to reposition.
- Select and hold the drag handle at the top of the button card.
- Drag the button upward or downward.
- Release it in the preferred position.
The message preview updates automatically.
Use the delete icon beside a button to remove it.
Step 10: Preview the Template
The central message panel provides a live preview while you build the template.
For a more complete view:
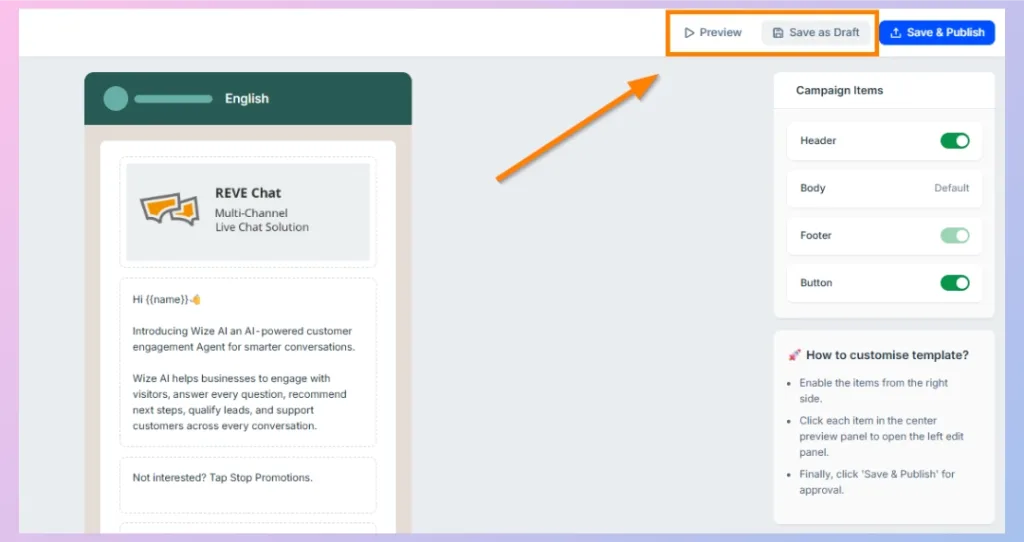
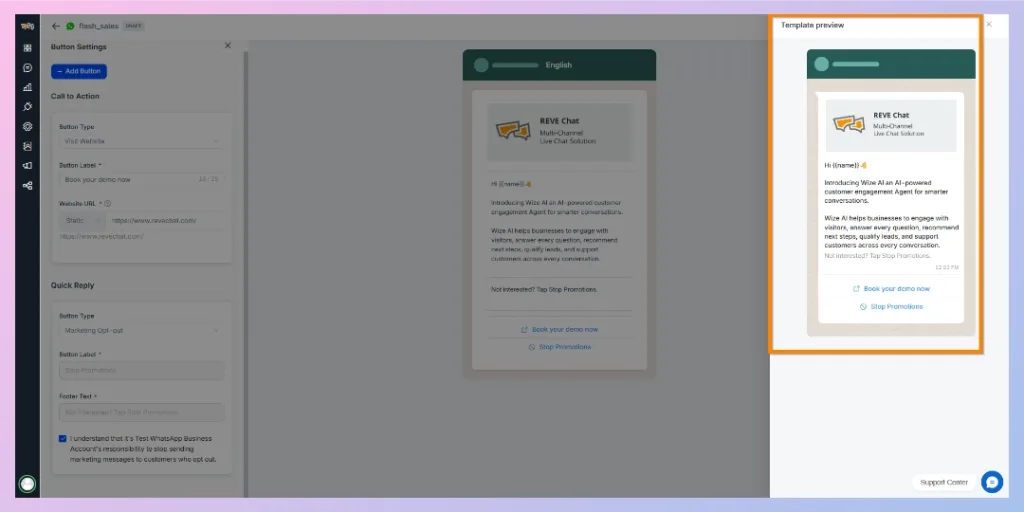
- Click Preview in the upper-right corner.
- Review how the Header, Body, Footer, variables, and Buttons will appear inside WhatsApp.
- Close the preview panel to continue editing.
Check the following before submitting:
- The message is clear and free from spelling errors.
- Variables are placed correctly.
- Sample variable values are provided.
- Images and media load correctly.
- Website links open the correct page.
- Phone numbers and offer codes are correct.
- Buttons appear in the preferred order.
- Marketing messages include an opt-out option when required.
REVE Chat provides template preview functionality so users can review campaign templates before finalizing them.
Step 11: Save the Template as a Draft
Click Save as Draft when you want to save your progress without submitting the template to Meta.
Use this option when:
- The content is not final.
- You are waiting for an image, URL, or campaign offer.
- Another team member needs to review the message.
- You want to continue editing later.
A draft cannot be used in a WhatsApp campaign until it has been published and approved.
Step 12: Save and Publish the Template
After reviewing the complete template:
- Click Save & Publish.
- REVE Chat saves the template.
- The template is submitted to Meta for approval.
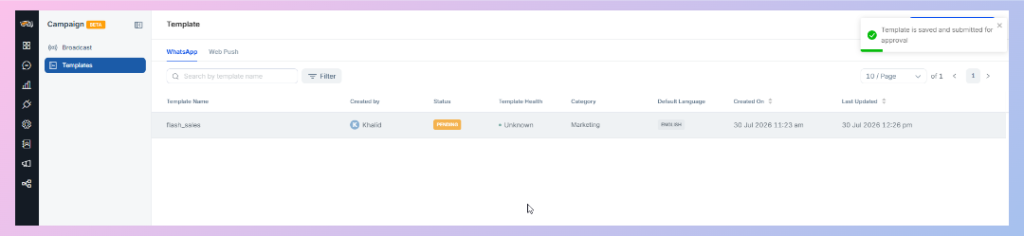
- You are returned to the WhatsApp Templates list.
Step 13: Wait for Meta Approval
After submission, the template status appears as Pending.
Pending means that Meta is reviewing the template content, category, formatting, variables, media, and buttons.
The approval time can vary. Do not attempt to use the template in a campaign while it is still pending.
Step 14: Confirm the Approved Status
When Meta approves the template:
- The yellow Pending status changes.
- A green Approved status appears in the Templates list.
- The template becomes available for use when creating a WhatsApp campaign.
Once the status shows Approved, the WhatsApp template creation process is complete. REVE Chat’s campaign workflow submits templates for WhatsApp approval before they can be sent to customer segments.
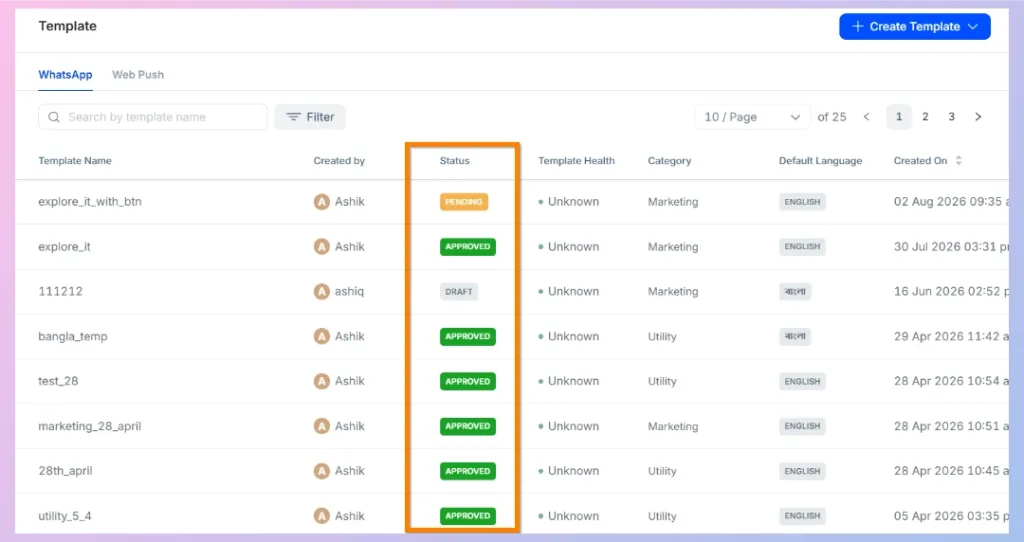
Template Statuses
| Status | Meaning |
|---|---|
| Draft | The template has been saved but has not been submitted to Meta. |
| Pending | The template has been submitted and is waiting for Meta’s review. |
| Approved | Meta has approved the template, and it can be used in a WhatsApp campaign. |
Best Practices for Faster Template Approval
- Select the category that accurately matches the message.
- Clearly explain the purpose of the message.
- Avoid misleading claims or unclear offers.
- Use sample values for every variable.
- Check that media URLs are publicly accessible.
- Make sure buttons match the message content.
- Add clear opt-out instructions to promotional messages.
- Review the complete message using the Preview option.
- Check spelling, links, phone numbers, and offer codes before publishing.
Next Step
Your WhatsApp message template is now ready after receiving Meta approval. You can select the approved template, choose an audience segment, and send or schedule your campaign.
👉 Continue to: How to Create and Send a WhatsApp Campaign in REVE Chat

 Start free trial