



How to Connect API in Your AI Agent
- July 21, 2026
- 7 mins read
Table of Content
The API Tool in Wize AI Agent allows your AI Agent to collect information from an external system and use that information while answering customers.
For example, you can connect an API to let your AI Agent check:
- Product inventory
- Order status
- Customer account balance
- Subscription details
- Package information
- Ticket status
- Payment or recharge history
- Any other data available through your business system
This helps your AI Agent move beyond simple answers. Instead of only replying from a fixed knowledge base, the AI Agent can call an API, retrieve live data, understand the result, and then send a helpful response to the customer.
How API works inside an AI Agent workflow
A basic API-connected AI Agent workflow works like this:
Customer message
→ AI Agent
→ API Tool
→ AI Agent processes the API result
→ Response To Chat
When a customer sends a message, the AI Agent decides whether it needs information from the API. If the API is needed, the AI Agent calls the connected API Tool, receives the result, and uses that result to prepare the final customer response.
Before you start
Before connecting an API, make sure you have:
- An existing Wize AI Agent workflow
- The API endpoint URL
- The required API method, such as GET or POST
- Any required API key, token, or authentication details
- Required headers or parameters
- A basic idea of what data the API returns
If you do not know how to create an AI Agent workflow, first create a basic Wize AI Agent with a trigger, AI Agent node, and Response To Chat node.
Step 1: Open your AI Agent workflow
From the REVE Chat dashboard, go to: Automation > AI Agent
Open the workflow where you want to connect the API.
In the workflow builder, make sure your basic flow is already available.
For example: On chat message → AI Agent → Response To Chat
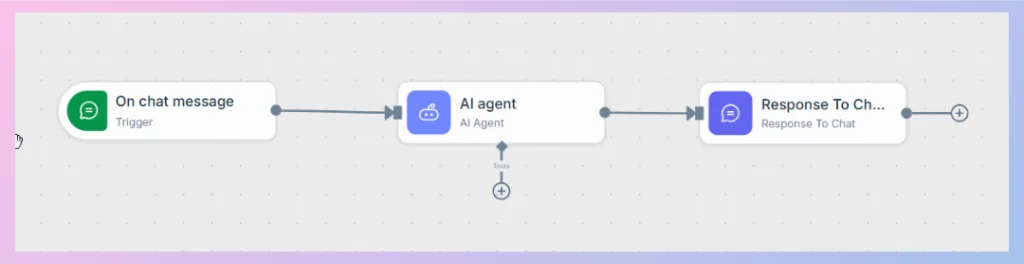
Step 2: Add the API Tool under the AI Agent
To add an API Tool:
- Go to the Builder canvas.
- Find the AI Agent node.
- Click the ‘’+’’ button under the AI Agent node.
- From the tool list, select API Tool.
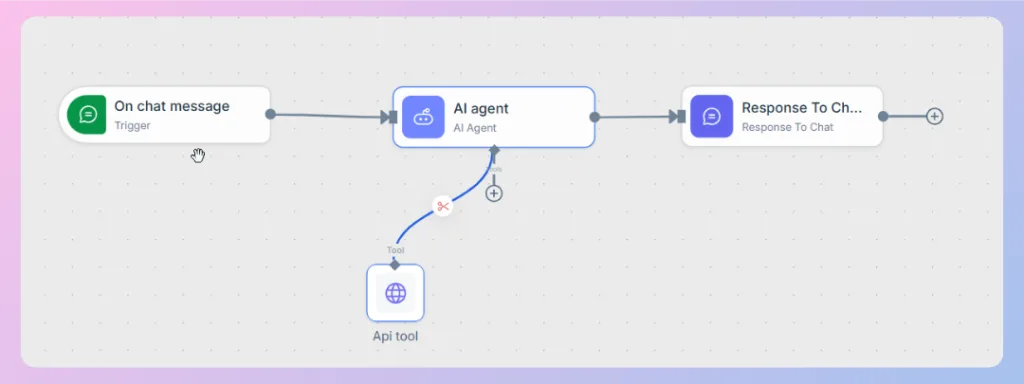
The API Tool will be added under the AI Agent. This means the AI Agent can use this tool whenever it needs to collect information from the connected API.
Step 3: Open the API Tool configuration
Double-click the API Tool node to open the configuration panel.
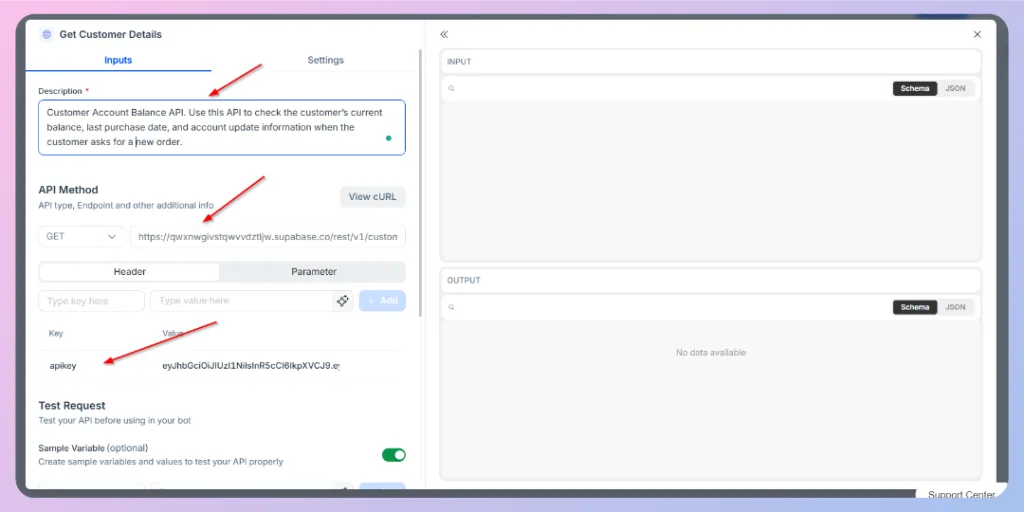
You will see the API Tool settings where you can configure:
- Description
- API method
- Endpoint URL
- Headers
- Parameters
- Test request
- Sample variables
- Test response
Step 4: Add a clear API Tool description
In the Description field, explain what this API does and when the AI Agent should use it.
The description is important because it helps the AI Agent understand the purpose of the API Tool.
Example description:
Customer Account Balance API. Use this API to check the customer’s current balance, last purchase date, and account update information when the customer asks for a new order.
A good description should clearly explain:
- What data the API provides
- When the AI Agent should use this API
- What type of customer question this API can help answer
Step 5: Select the API method
In the API Method section, select the method your API requires.
Common API methods include:
| Method | What it does | Example use case |
|---|---|---|
| GET | Retrieves data from a system | Check product list, order status, customer balance, ticket status |
| POST | Sends new data to a system | Create a ticket, submit a form, create a new order |
| PUT | Updates an existing record completely | Update a customer profile or replace existing order information |
| PATCH | Updates part of an existing record | Update only the delivery address or ticket priority |
| DELETE | Deletes a record from a system | Remove a saved item or delete a test record |
For most lookup-based use cases, such as checking inventory or customer information, you will usually use GET.
Step 6: Enter the API endpoint URL
Next, enter the API endpoint URL.
Example: https://dummyjson.com/products
The endpoint URL is the address where REVE Chat will send the API request.
Make sure the URL is correct and accessible. If the endpoint is private or protected, you may also need to add an API key or authorization token in the header section.
Step 7: Add headers if required
Some APIs require headers for authentication or content format.
To add a header:
- Select the Header tab.
- Enter the header key.
- Enter the header value.
- Click Add.
Common header examples:
| Header key | Example value | Purpose |
|---|---|---|
| apikey | Your API key | Used to authenticate the API request |
| Authorization | Bearer token | Used for token-based authentication |
| Content-Type | application/json | Tells the API that the request body is in JSON format |
Example: Key: apikey || Value: your_api_key_here
📌Important: Do not expose API keys or secret tokens publicly. Only use trusted APIs and keep sensitive credentials secure.
Step 8: Add parameters if required
Some APIs use parameters to filter or search data.
To add a parameter:
- Select the Parameter tab.
- Enter the parameter key.
- Enter the parameter value.
- Click Add.
Example parameters:
| Parameter | Example value | Purpose |
|---|---|---|
| product_name | headphone | Search for a specific product |
| customer_id | 12345 | Find information for a specific customer |
| order_id | ORD-1001 | Check a specific order |
| status | active | Filter results by status |
Parameters help the API return only the information needed for the customer’s question.
Step 9: Use sample variables for testing
The Sample Variable option allows you to test your API using sample input values before using it in a live workflow.
This is helpful when your API needs dynamic values such as:
- Customer phone number
- Customer ID
- Order ID
- Product name
- Ticket ID
For example, if your API checks customer balance using a mobile number, you can create a sample variable and test whether the API returns the correct balance data.
Step 10: Test the API request
Before using the API Tool in a live workflow, test the request.
Click the test option inside the API Tool configuration panel. If the API is configured correctly, you will see a successful response.
A successful response may show a status code such as: 200 OK
This means the API returned data successfully.
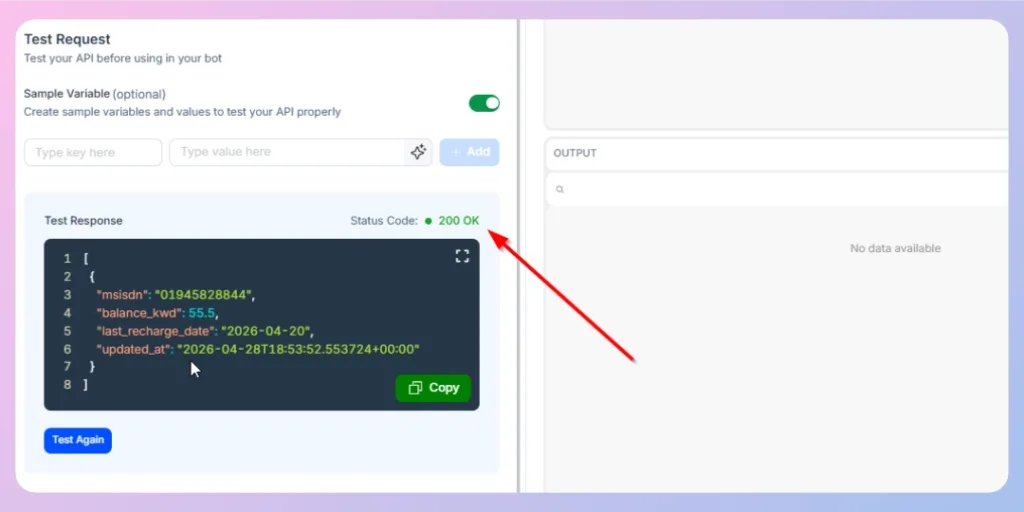
If the test fails, check the endpoint URL, method, headers, parameters, and authentication details.
Step 11: Save the API Tool configuration
After testing the API successfully:
- Review the API description.
- Confirm the method and endpoint URL.
- Check headers and parameters.
- Confirm the test response.
- Close the configuration panel.
- Save the workflow.
The API Tool is now available for the AI Agent to use.
Step 12: Update the AI Agent prompt
After connecting the API Tool, update the AI Agent prompt so the AI Agent understands when and how to use the API.
Example prompt instruction:
You are a professional e-Commerce Store Support Agent. Your primary responsibility is to help customers use information retrieved from the store. Always keep your response professional, friendly, and concise.
Connect with the “Customer Account Balance API” If the customer asks for the current balance, last purchase date, and account update information.
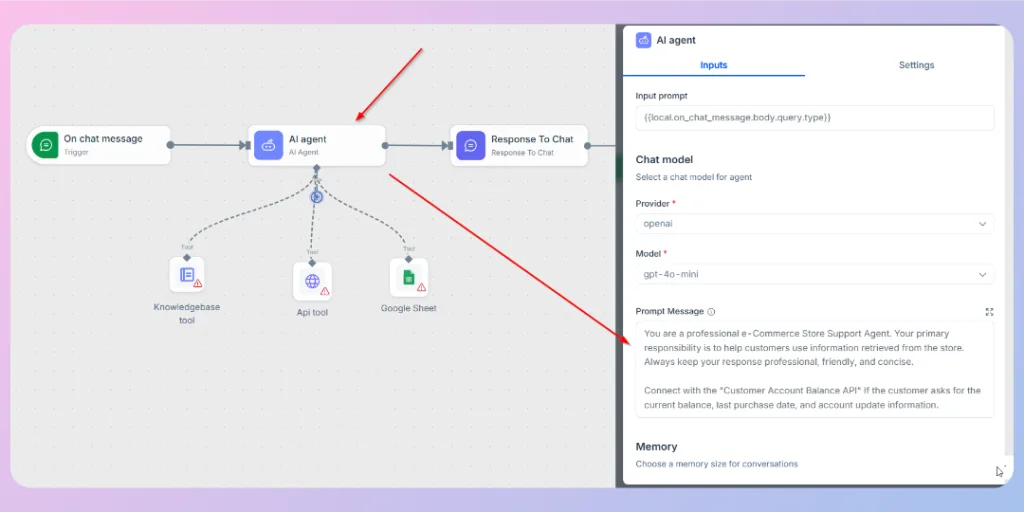
The prompt should tell the AI Agent:
- When to call the API
- What information to collect
- How to use the API response
- What to do if no data is found
After configuring the API Tool and updating the prompt, test the full workflow.
Using multiple API Tools in one workflow
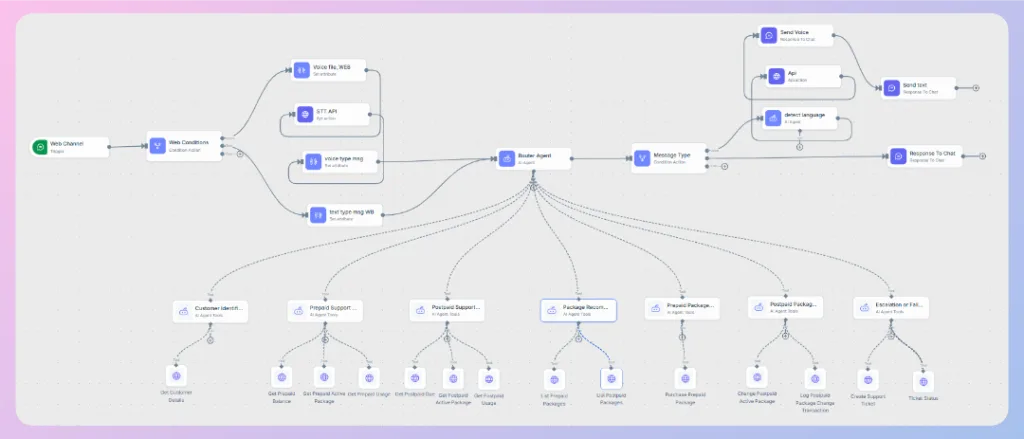
You can add multiple API Tools under one AI Agent if your workflow needs to connect with different systems.
For example, a telecom support workflow may include APIs for:
- Customer identification
- Prepaid balance
- Active package
- Data usage
- Postpaid due amount
- Package recommendation
- Package purchase
- Ticket creation
- Ticket status
In this type of workflow, the AI Agent works like a router. It understands the customer’s message, decides which API Tool is needed, calls the correct API, and prepares the final response.
Best practices
- Write a clear description for every API Tool.
- Use the correct API method based on what the API needs to do.
- Test every API before activating the workflow.
- Keep API keys and tokens secure.
- Use parameters when the API needs customer-specific or product-specific data.
- Update the AI Agent prompt so it knows when to call each API.
- Review the test response to make sure the API returns useful data.
- Use simple and clear response instructions so the AI Agent can explain API data to customers properly.
- For complex workflows, use separate API Tools for separate tasks instead of putting everything into one API Tool.
Troubleshooting
| Issue | Possible reason | What to check |
|---|---|---|
| API response is not showing | Endpoint URL may be incorrect | Check the API URL and method |
| Status code is not 200 OK | API request failed | Check headers, parameters, and authentication |
| API says unauthorized | API key or token is missing or incorrect | Check the header value and authorization format |
| AI Agent is not using the API | Prompt does not clearly tell the AI Agent when to use the API | Add clear API usage instructions in the AI Agent prompt |
| API returns too much data | Missing filter or parameter | Add required parameters such as product name, customer ID, or order ID |
| Customer receives a confusing answer | AI Agent prompt does not explain how to format the API result | Add response formatting instructions in the prompt |
| API works in test but not in workflow | Dynamic values may not be connected properly | Check input variables and sample variable mapping |

 Start free trial