



How to Apply Conditions in your AI Agent workflow
- June 25, 2026
- 8 mins read
Table of Content
Conditions help you control how an AI Agent workflow continues based on specific information collected during a conversation. It works like decision rules: when the defined requirement is met, the workflow follows one path; when it is not met, the workflow can continue through a different path.
For example, you can use conditions to:
- Transfer a conversation to a human agent when the customer requests human assistance
- Route customers to different departments based on their issue
- Continue a workflow only after required information has been collected
- Trigger an action when an order status, customer type, location, or other value matches a defined rule
Conditions allow you to create flexible, decision-based workflows instead of sending every customer through the same conversation path.
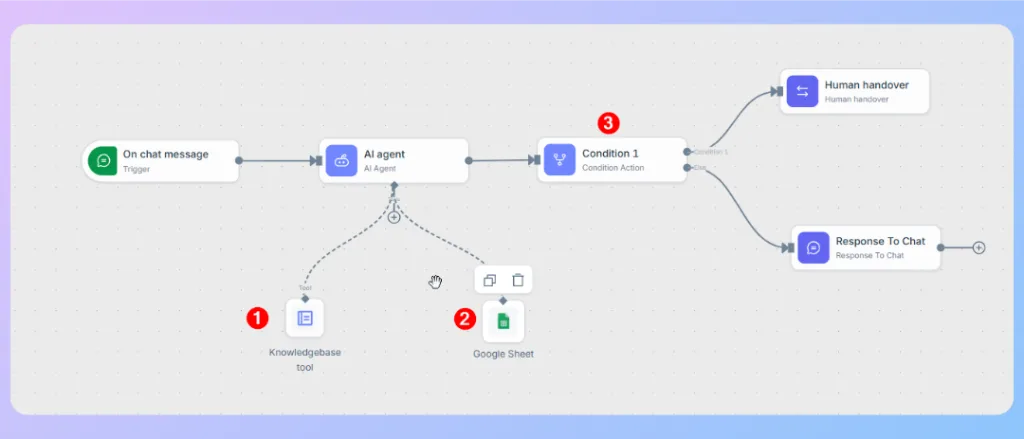
📌 Before applying a condition in a Wize AI Agent workflow, you need to understand two things:
1. Attribute
2. JSON Schema
Understanding Attributes
An attribute is a pre-defined value that the Wize AI Agent identifies from the customer’s message and stores during the conversation. The condition node then checks the value of that attribute to decide which workflow path should run next.
For example, Wize AI Agent may identify the customer’s intent as requesting human support and store it in an attribute such as:
- Attribute: requested_humanhandover
- Value: true
The condition node can then check whether ‘’requested_humanhandover’’ equals to ‘’true’’. When the condition matches, the workflow moves to the ”Human handover” path. When it does not match, Wize AI Agent continues the conversation through the alternative ”Response To Chat” path.
Note: Attributes are required when you want to apply conditions and create decision-based workflow paths. However, Wize AI Agent can still understand customer messages, respond using its instructions and knowledge, and complete regular conversational tasks without attributes. You only need to define attributes when the workflow must capture a specific value and use it as part of a condition.
An attribute generally includes:
- Attribute name: Identifies the information being checked, such as requested_humanhandover, customer_type, issue_category, or order_status.
- Attribute value: The information stored in that attribute, such as true, false, premium, refund, or delivered.
- Operator: Defines how the workflow compares the stored value with the condition, such as equals, Not equals to, contains, or is Starts with.
Important: The attribute must receive a value before the workflow reaches the condition node. If the attribute is empty, incorrectly named, or contains an unexpected value, the condition may not follow the intended path.
What Is JSON Schema?
JSON Schema is a structured format used to define what information Wize AI Agent should identify and return from a customer conversation. It tells the AI Agent which attributes to collect, what type of value each attribute should contain, and which fields are required.
For example, a JSON Schema can instruct Wize AI Agent to identify whether a customer wants human support:
{
“type”: “object”,
“properties”: {
“requested_humanhandover”: {
“type”: “string”,
“description”: “Identifies whether the customer wants to speak with a human agent.”
}
},
“required”: [“requested_humanhandover”]
}
Where JSON Schema Works
When a customer sends a message, Wize AI Agent analyzes the conversation and fills the attributes defined in the JSON Schema. These attribute values can then be checked by a condition node.
For example:
- Customer message: “I want to speak with a support agent.”
- Extracted attribute: requested_humanhandover
- Attribute value: true
The condition node can check whether requested_humanhandover equals true. If the condition matches, the workflow moves to the human handover path. Otherwise, Wize AI Agent continues the automated conversation.
JSON Schema is mainly needed when you want to capture structured information and use it in conditions. Wize AI Agent can still respond and complete regular conversational tasks without a JSON Schema.
How Conditions Work in a Workflow
A condition normally creates two or more possible workflow paths:
- Condition matched: The attribute value meets the rule, so the workflow follows the matching path.
- Condition not matched: The attribute value does not meet the rule, so the workflow follows the alternative path.
This allows the AI Agent to respond differently based on the context of each conversation.
For a clearer understanding, the following steps demonstrate how to configure human handover using a condition and a single attribute.
Example: Configure the Human Handover Condition
In this example, the workflow checks whether the AI Agent output includes a value called “requested_humanhandover”. If the value is “true”, the workflow routes the conversation to a human agent.
You can apply the same approach to create other handover conditions based on your business requirements, such as:
- The customer directly asks to speak with a human
- The AI Agent cannot resolve the request
- The issue is related to a refund, complaint, or cancellation
- The customer belongs to a priority segment
- The conversation contains a high-risk or sensitive request
Step 1: Create the required attribute
Before using the condition, create the attribute that will store the handover request.
Go to: Settings > General Settings > Attributes
Create an attribute named: requested_humanhandover, Value: true
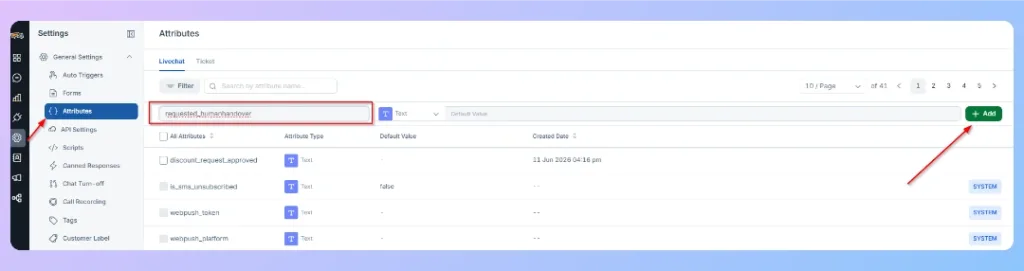
This attribute will be used to check whether the customer should be transferred to a human agent.
Step 2: Add the output schema to the AI Agent
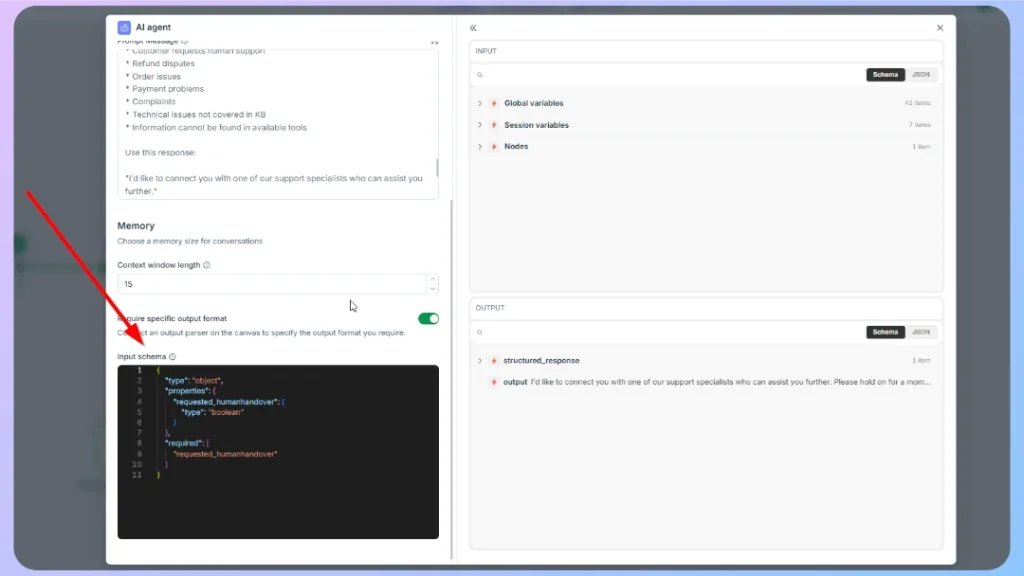
Open the AI Agent node and enable the option to require a specific output format.
In the Input schema section, add the following JSON schema:
{
“type”: “object”,
“properties”: {
“response”: {
“type”: “string”,
“description”: “The response that will be shown to the customer.”
},
“requested_humanhandover”: {
“type”: “boolean”,
“description”: “Set to true if the customer requests a human agent, has refund disputes, order issues, payment problems, complaints, technical issues not covered in the knowledge base, or asks for information unavailable in the available data sources.”
},
“handover_reason”: {
“type”: “string”,
“description”: “Short explanation of why human handover is required. Leave empty if not needed.”
},
“confidence”: {
“type”: “string”,
“enum”: [
“high”,
“medium”,
“low”
],
“description”: “Confidence level that the AI has enough information to answer correctly.”
}
},
“required”: [
“response”,
“requested_humanhandover”
],
“additionalProperties”: false
}
This schema tells the AI Agent to return a structured value for requested_humanhandover.
Step 3: Update the AI Agent prompt
In the AI Agent prompt, clearly explain when the AI Agent should request human handover.
Example instruction:
You are an “ABC IT” AI Sales & Support Consultant for an ICT ecommerce store. Your role is to help customers choose, compare, buy, and get support for ICT products in a consultative, honest, practical, and human-like way. (others prompt part).
If the customer asks for human support, refund disputes, order issues, payment problems, complaints, technical issues not covered in the knowledge base, or information that cannot be found in the available tools, set requested_humanhandover to true.
When human handover is required, use this response:
“I’d like to connect you with one of our support specialists who can assist you further.”
This helps the AI Agent decide when the workflow should continue to human handover.
Step 4: Add a Condition node
To apply the handover logic:
- Click the + button after the AI Agent node.
- Select Condition.
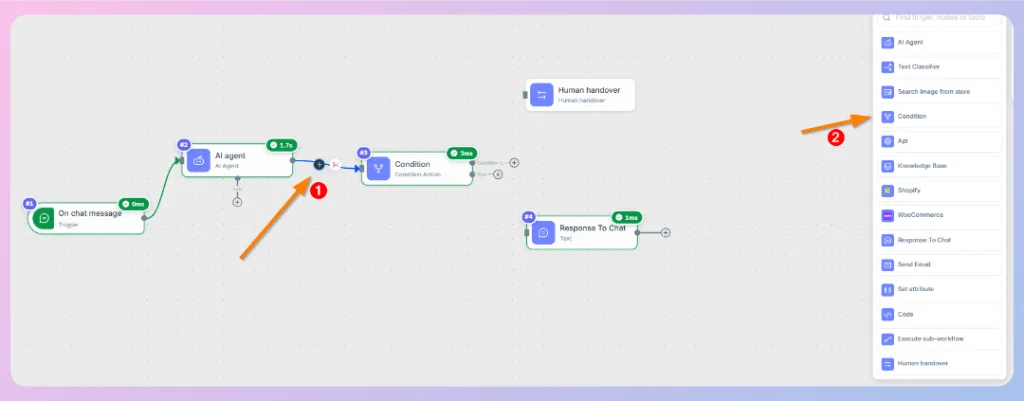
- Now add Condition 1” Human handover”, and Else “Previous “Response To Chat”
- Open the Condition node.
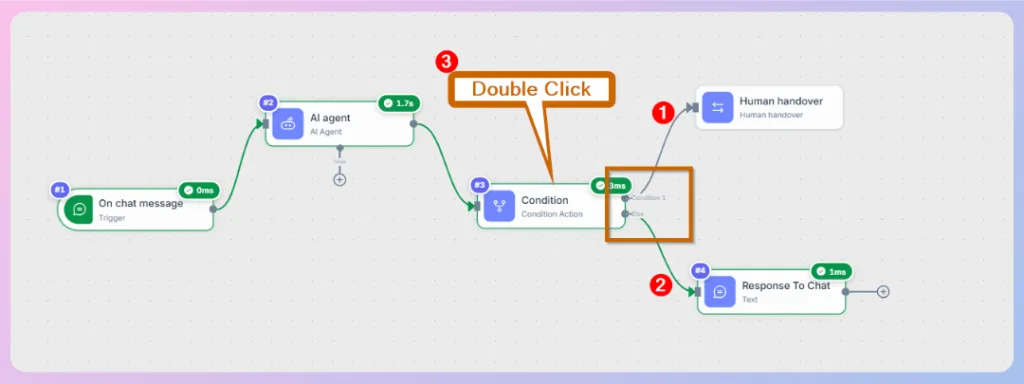
- In the right-side data panel, go to Nodes > AI Agent > structured_response.
- Drag requested_humanhandover into the condition field.
- Set the comparison rule to Equals to.
- Enter the value: true
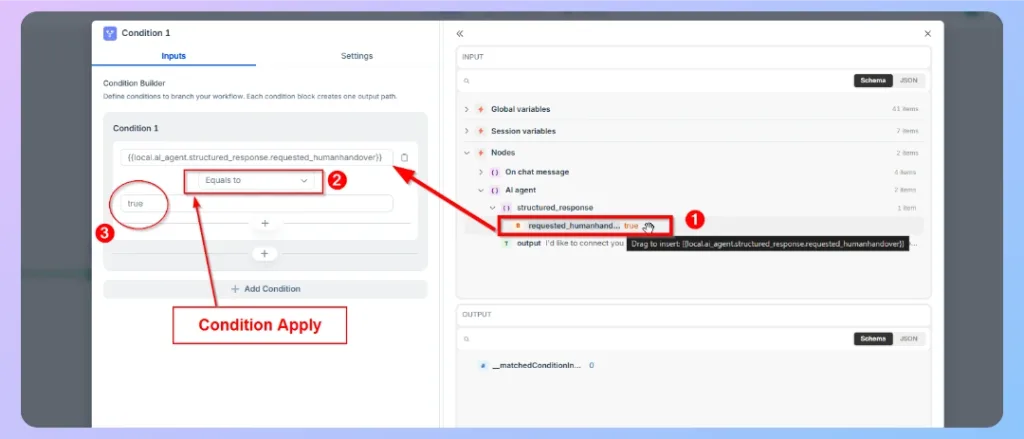
The condition should check whether the AI Agent returned requested_humanhandover as true.
Step 5: Connect the condition paths
After configuring the condition, connect the workflow paths:
| Condition result | Workflow action |
|---|---|
| True | Connect to the Human handover node. |
| False | Connect to the Response To Chat node. |
This means that when the customer needs human support, the workflow transfers the conversation to a live agent. Otherwise, the AI Agent response is sent directly to the customer.
Test the advanced workflow
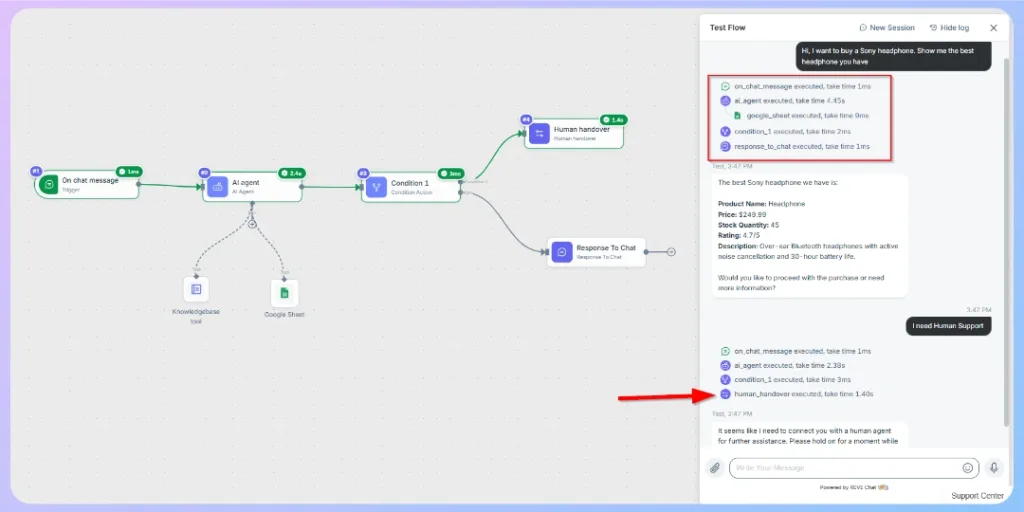
After adding the Knowledge Base tool, Google Sheet tool, condition logic, and human handover, test the workflow before activating it.
Use the Test Flow panel and try different customer messages.
Expected result:
- The workflow starts from the On chat message trigger.
- The AI Agent detects that the customer wants human support.
- The condition checks requested_humanhandover.
- If the value is true, the workflow executes the Human handover node.
- The customer is routed to a human agent.
Recommended advanced workflow structure
A typical advanced Wize AI Agent workflow may include the following flow:
→On chat message
→ AI Agent
→ Knowledge Base tool / Google Sheet tool
→ Condition
→ Human handover or Response to Chat
This structure allows the AI Agent to understand the customer message, check available business data, decide whether human support is needed, and respond or transfer the conversation accordingly.
Best practices
- Use the Knowledge Base tool for support policies, FAQs, help articles, and general business information.
- Use Google Sheets for structured data such as product inventory, prices, stock status, ratings, and order records.
- Write a detailed prompt that defines the AI Agent’s role, tone, available sources, and response rules.
- Use structured output when your workflow depends on conditions.
- Keep attribute names consistent across the AI Agent schema, condition node, and system attributes.
- Always test both successful AI responses and human handover scenarios before activating the workflow.
- Review execution logs to confirm each node runs correctly.
Next Step
You have now learned how to use conditions to build intelligent decision-making into your AI Agent workflow. Next, we will show you how to add multiple AI Agents within a single workflow, allowing each agent to specialize in different tasks or knowledge domains while working together to handle complex customer conversations.
👉 Continue to: How to Add Multiple AI Agents in a Single Workflow

 Start free trial