



How to Install REVE Chat in WordPress
- September 24, 2025
- 7 mins read
Table of Content
You can easily add REVE Chat to your WordPress website using the REVE Chat plugin. After installing the plugin, you can create a new REVE Chat account or connect your existing account directly from your WordPress dashboard.
Once connected, you can manage your REVE Chat settings from the web app and preview the chat widget on your website.
Before you start make sure you have:
- Access to your WordPress Admin Dashboard
- Permission to install and activate WordPress plugins
- Access to an email address for account verification
A REVE Chat account is not required beforehand. You can create a new account during the plugin setup.
Now, In the Beginning: Install the REVE Chat Plugin
You can install the REVE Chat plugin in two ways.
Method 1: Install from the WordPress Plugin Directory
- Log in to your WordPress Admin Dashboard.
- From the left sidebar, go to Plugins.
- Click Add New Plugin.
- Search for REVE Chat.
- Click Install Now.
- After installation is complete, click Activate.
Method 2: Install by Uploading the Plugin ZIP File
If you already have the REVE Chat plugin ZIP file:
- Log in to your WordPress Admin Dashboard.
- Go to Plugins > Add New Plugin.
- Click Upload Plugin.
- Click Choose File and select the REVE Chat plugin .zip file from your computer.
- Click Install Now.
- Once the installation is complete, click Activate Plugin.
After activation, REVE Chat will appear as a separate option in the WordPress sidebar.
After That, Open Your REVE Chat Plugin
From your WordPress sidebar, click REVE Chat.
The Get Started with REVE Chat page will appear with two options:
1. Create a new account – Create a new REVE Chat workspace and connect the WordPress website.
2. Connect existing account – Sign in with an existing REVE Chat account and connect the website.
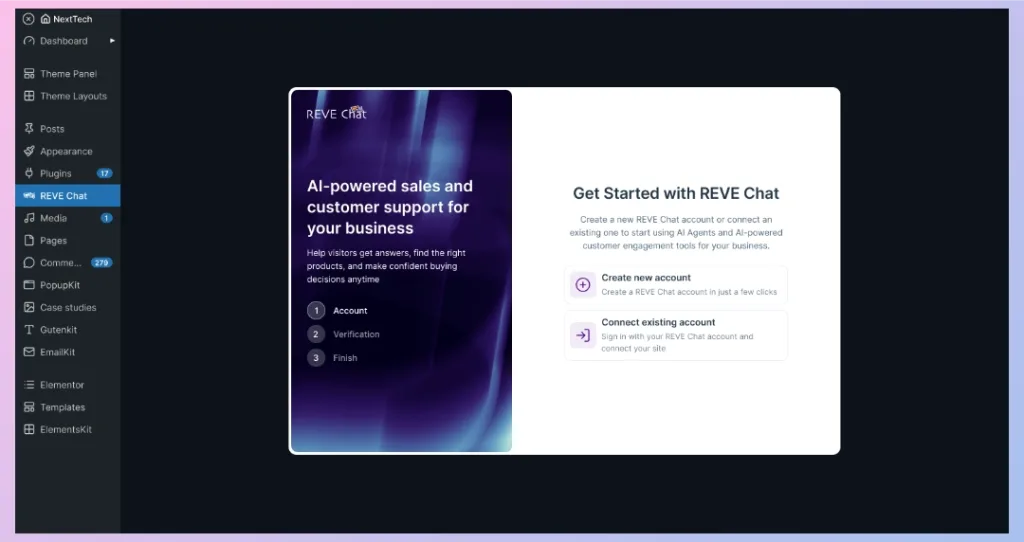
Start with Option 1 if you don’t have a REVE Chat account. If you already have an account, skip this section and continue with Option 2.
Option 1: Create a New REVE Chat Account
In this section, we’ll create a new REVE Chat account using your email address and complete the verification process. You can then finish the setup in just three simple steps.
Step 1: Create Your Workspace
- Click Create new account.
- The Set up your workspace form will appear.
- Enter the information requested on the form, including:
- Full name
- Email address
- Phone number
- Password
- Any additional workspace information displayed on your setup form
- Click Create workspace & connect plugin.
Depending on the signup form displayed, additional fields such as Company name and Website URL may also be requested.
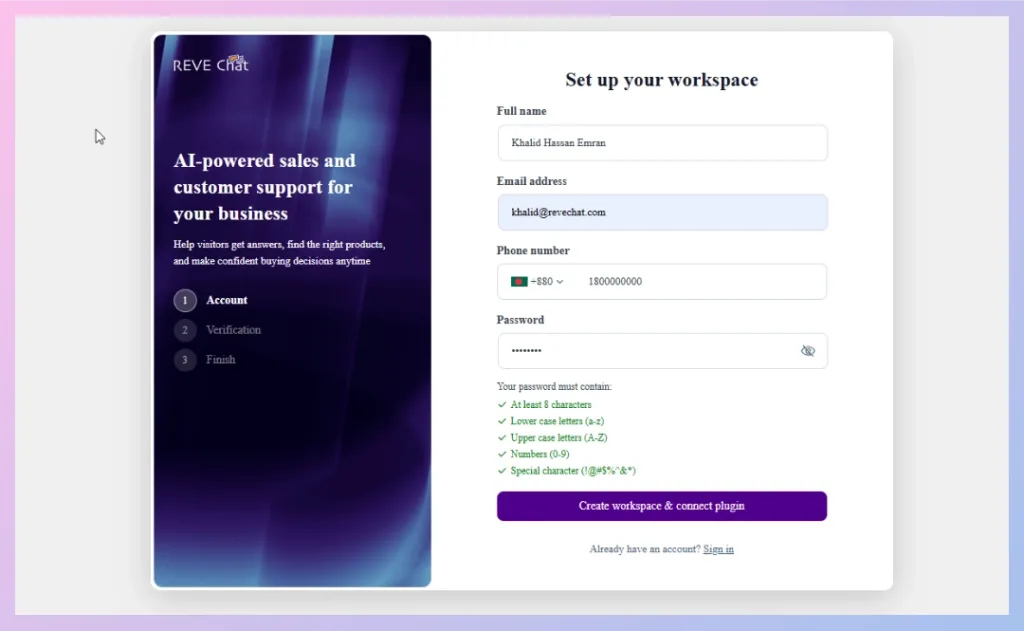
Important: You must follow all of these password requirements to create your password successfully.
- At least 8 characters
- At least one lowercase letter (a–z)
- At least one uppercase letter (A–Z)
- At least one number (0–9)
- At least one special character (!@#$%^&*)
Make sure your password meets all of the requirements.
Step 2: Verify Your Email
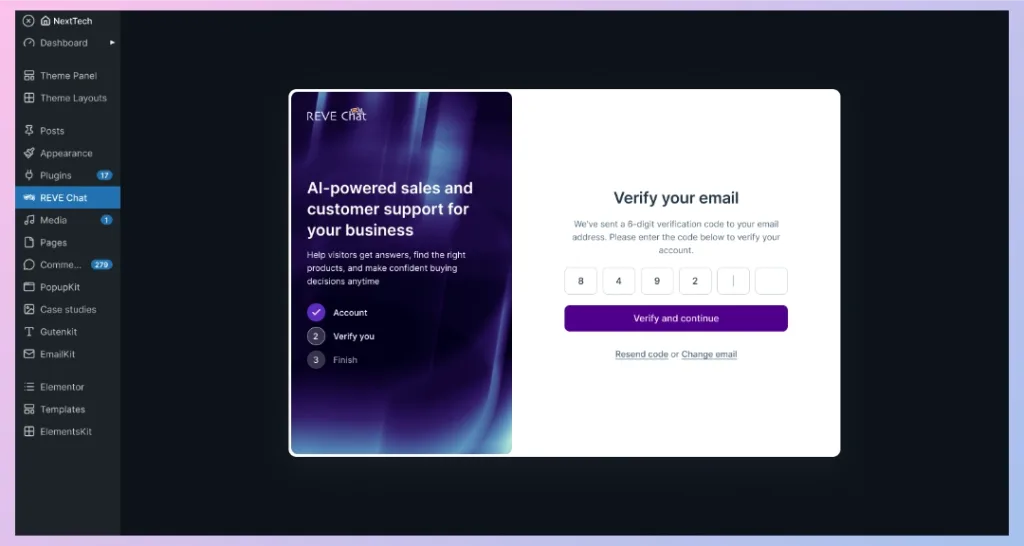
REVE Chat will send a 6-digit verification code to the email address you entered.
- Open your email and find the verification code.
- Enter the code in the verification fields.
- Click Verify and continue.
If you do not receive the email, click Resend code. You can also select Change email if the email address is incorrect.
Step 3: Complete the Connection
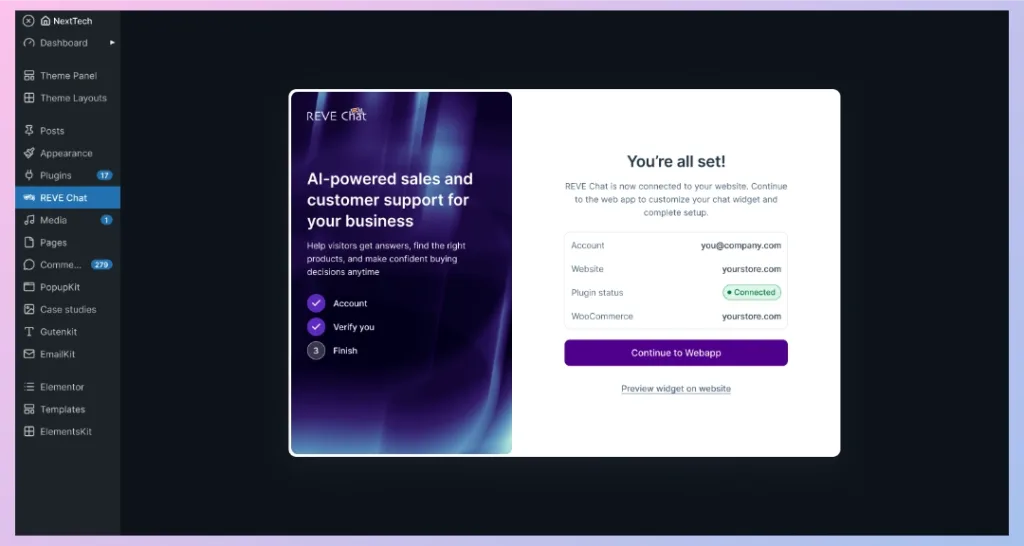
After successful verification, you will see the You’re all set! page.
The setup summary shows information such as:
- Connected REVE Chat account
- Website
- Plugin connection status
- WooCommerce store, when applicable
You can then:
- Click Continue to Webapp to open REVE Chat.
- Click Preview widget on website to check the chat widget on your website.
Option 2: Connect an Existing REVE Chat Account
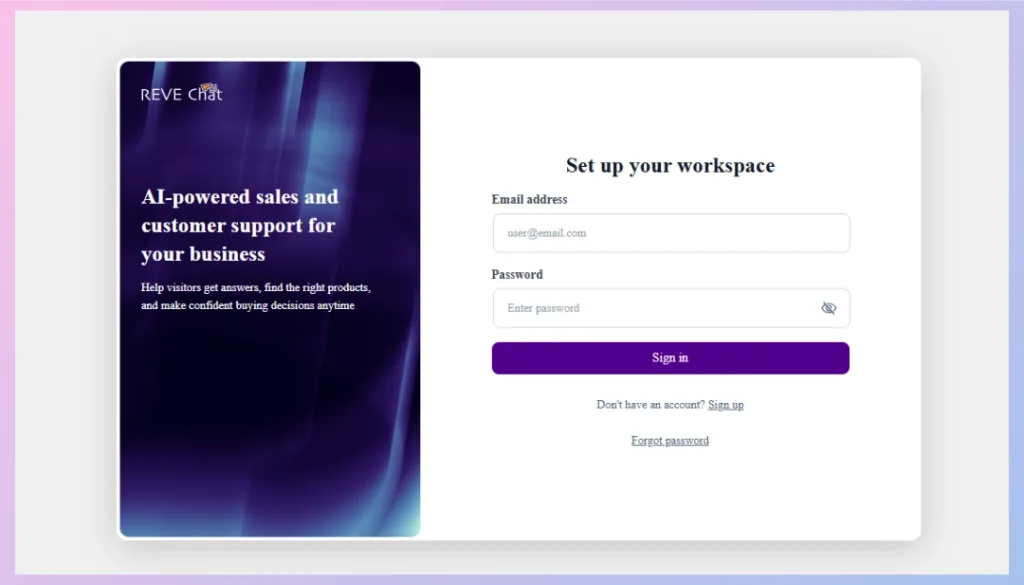
You’re in this section because I assume you already have a REVE Chat account and clicked on the second option. Here, you only need to follow two steps to complete the setup.
Step 1: Sign in to Your Account
- From the Get Started with REVE Chat page, click Connect existing account.
- Enter your REVE Chat:
- Email address
- Password
- Click Sign in.
If you cannot remember your password, use the Forgot password option.
Step 2: Confirm the Connection
After signing in successfully, REVE Chat connects the WordPress website with your account.
The final setup screen shows the connected account and website information.
Click:
- Continue to Webapp to continue configuring REVE Chat.
- Preview widget on website to check the widget on the live website.
Manage Your REVE Chat Connected WordPress Website
After setup, return to WordPress Admin Dashboard > REVE Chat.
The page will show that your website is connected to REVE Chat. From here, you can:
- View the connected website information
- Check the WordPress site name and admin email
- Open the REVE Chat dashboard
- Disconnect the website when required
- Continue with WooCommerce setup if WooCommerce is available on the website
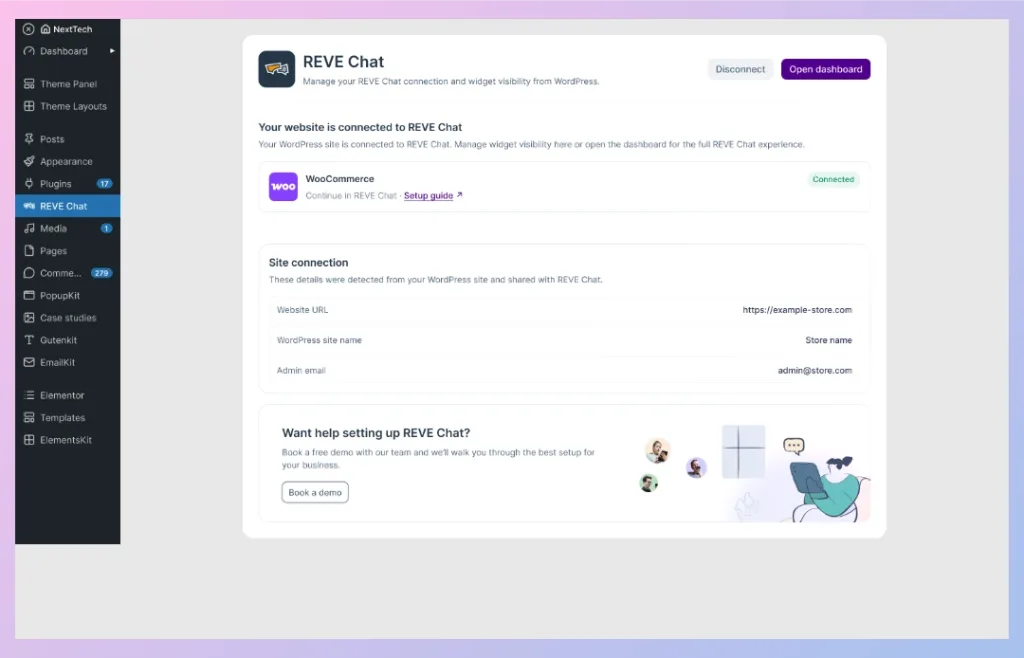
Available Options
1. Open dashboard
Opens the REVE Chat web app so you can manage your account, chat widget, agents, and other REVE Chat features.
2. Disconnect
Disconnects the current WordPress website from the connected REVE Chat account.
3. WooCommerce (Only shown if it installed)
If WooCommerce is already installed on your WordPress website, you can continue with the WooCommerce integration setup by clicking “Setup Guide.”
After installation, you can connect or disconnect WooCommerce from here .
4. Book a Demo
This is where you can get instant help if you face any issues setting up your business.
Troubleshooting REVE Chat Plugin Installation
If you have trouble installing or activating the REVE Chat WordPress plugin, try the following checks.
REVE Chat Does Not Appear in Plugin Search
- Make sure you are searching for REVE Chat from Plugins > Add New Plugin.
- Check that your WordPress website has an active internet connection.
The Plugin ZIP File Does Not Install
- Make sure you are uploading the original REVE Chat
.zipfile. - Do not unzip the file before uploading it.
- Go to Plugins > Add New Plugin > Upload Plugin, select the ZIP file, and click Install Now again.
The Install Now Button Fails or Shows an Error
- Confirm that your WordPress user account has permission to install plugins.
- Refresh the WordPress dashboard and try again.
The Plugin Is Installed but Not Active
Go to Plugins > Installed Plugins, find REVE Chat, and click Activate.
After activation, REVE Chat should appear in the WordPress sidebar.
REVE Chat Does Not Appear in the WordPress Sidebar
- Go to Plugins > Installed Plugins and confirm that REVE Chat is Active.
- Refresh the WordPress Admin Dashboard.
- If necessary, deactivate and activate the plugin again.
The Plugin Is Already Installed
If WordPress indicates that the plugin already exists, go to Plugins > Installed Plugins and check whether REVE Chat is already installed. Activate the existing plugin instead of installing another copy.
Still Having Trouble?
If the plugin still cannot be installed or activated, contact the REVE Chat support team and share the error message shown in your WordPress dashboard.
FAQs
1. Do I need a REVE Chat account before installing the WordPress plugin?
No. You can create a new REVE Chat account directly from the plugin setup page after installation. You can also connect an existing REVE Chat account.
2. Can I install the REVE Chat plugin using a ZIP file?
Yes. Go to Plugins > Add New Plugin > Upload Plugin, select the REVE Chat ZIP file, and click Install Now. After installation, activate the plugin.
3. Can I connect an existing REVE Chat account?
Yes. Open REVE Chat from the WordPress sidebar, choose Connect existing account, and sign in using your REVE Chat email address and password.
4. What information is required to connect WooCommerce?
You need your Store URL, Consumer key, and Consumer secret key. Enter these details in the Connect Woo Commerce window and click Connect.
5. How do I disconnect REVE Chat from my WordPress website?
Go to WordPress Admin Dashboard > REVE Chat and click Disconnect. This removes the connection between the website and the current REVE Chat account.

 Start free trial