



How to Create an Audience Segment
- July 31, 2025
- 5 mins read
Table of Content
Create a segment to group contacts based on specific conditions, such as channel, customer label, tags, or other contact information. Once created, you can use the segment as the target audience for your WhatsApp, Web Push, or SMS campaigns.
Follow the steps below to create an audience segment in REVE Chat.
Step 1: Open the Contacts Section
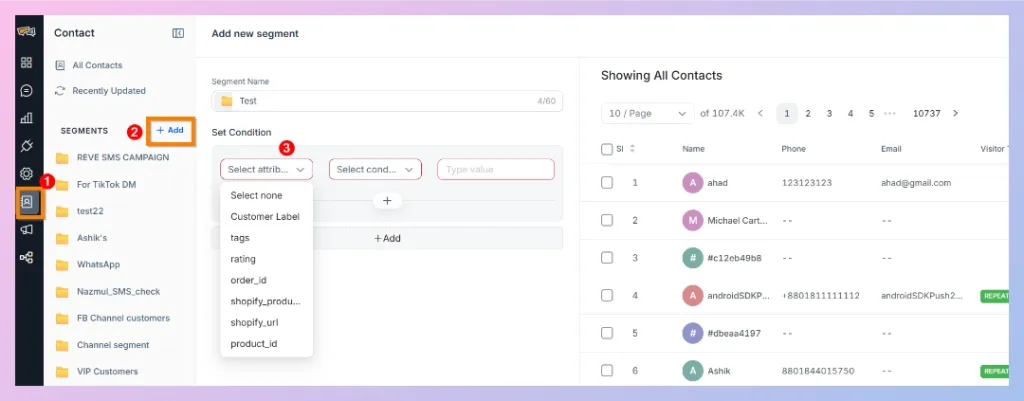
From the main REVE Chat dashboard, select the Contacts icon from the left navigation menu.
The All Contacts page opens.
Step 2: Select Add Under Segments
In the left panel, locate Segments and select ‘’+ Add’’.
The Add new segment page opens.
Step 3: Enter a Segment Name
Enter a clear name in the Segment Name field.
Use a name that explains the audience and its intended campaign. For example:
- WhatsApp VIP Customers
- SMS Delivery Updates
A descriptive name helps other team members understand the segment without opening its conditions.
Step 4: Configure the First Condition
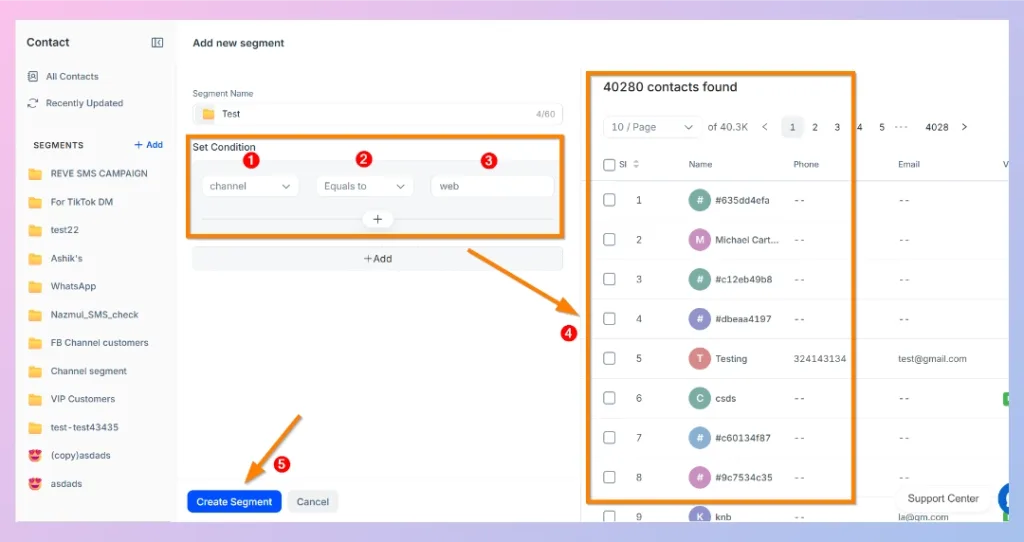
Under Set Condition, configure the three parts of the rule:
Select an Attribute
The attribute identifies which contact information REVE Chat should check.
Available attributes may include system attributes and custom attributes, such as:
- Name
- Customer Label
- Tags
- Channel
The available list depends on the contact attributes configured and collected in your account.
Select a Condition
The condition determines how REVE Chat compares the selected attribute with the value you enter.
For example:
- Equals to
- Other operators available for the selected attribute
The available conditions may change depending on the attribute type.
Enter or Select a Value
Enter the value that contacts must match. For example:
| Attribute | Condition | Value |
|---|---|---|
| Channel | Equals to | web |
| Browser | Equals to | chrome |
| Customer Label | Equals to | VIP |
| Web Push subscribed | Equals to | true |
REVE Chat uses the complete rule to find matching contacts.
Step 5: Add More Conditions
You can add multiple conditions when one rule is not enough to identify the required audience.
Use:
- The + button inside a condition area to add another rule.
- The + Add option below the condition area to create another condition block.
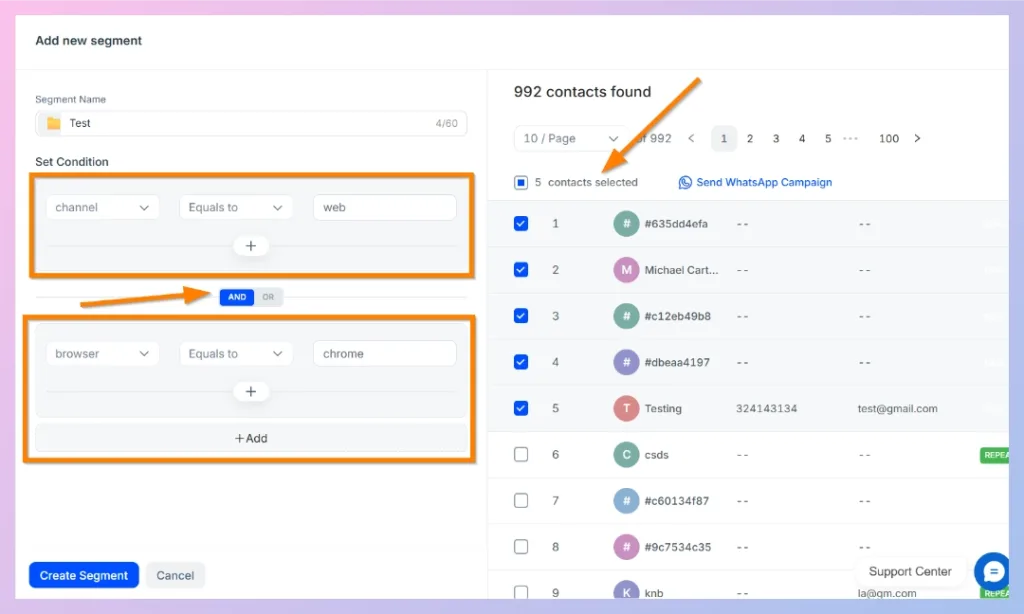
- The AND/OR control to define how the condition blocks work together.
REVE Chat supports multiple conditions and logical operators for creating more specific contact lists.
Use AND When All Conditions Must Match
With AND, a contact must satisfy every connected condition.
Example:
Channel Equals to web
AND
Browser Equals to chrome
This segment contains only contacts who came through the Web channel and used Chrome.
AND conditions usually reduce the number of matching contacts.
Use OR When Any Condition Can Match
With OR, a contact can satisfy either of the connected conditions.
Example:
Customer Label Equals to VIP
OR
Tags Equals to Interested
This segment can include contacts who have the VIP label, the Interested tag, or both.
OR conditions usually increase the number of matching contacts.
Step 6: Review Individual Contacts
Use the checkboxes in the result panel to review or select individual matching contacts.
When contacts are selected, the interface may show:
- The number of selected contacts
- A Send WhatsApp Campaign shortcut
The shortcut lets you begin a WhatsApp campaign with the selected contacts when this option is available in your account.
Selecting contacts is separate from creating the complete condition-based segment.
Step 7: Create the Segment
After confirming the segment name, conditions, logic, and contact count, select Create Segment.
The new segment appears under Segments in the left panel.
Select Cancel when you want to leave the page without saving it.
Filters and Segments: What Is the Difference?
| Filter | Segment |
|---|---|
| Temporarily narrows the All Contacts table | Creates a reusable audience |
| Useful for quickly finding contacts | Useful for campaign targeting |
| Does not require a segment name | Requires a segment name |
| Applied from the Filter panel | Created from Segments → + Add |
| Intended for reviewing contact data | Intended for repeatedly using a condition-based group |
Use a filter when you only need to find or inspect contacts. Use a segment when you need to save an audience for a campaign.
Troubleshooting Audience Segments
If no contacts are found
Check the following:
- The selected attribute contains data for your contacts.
- The entered value matches the stored value.
- The correct condition has been selected.
- The imported fields were mapped correctly.
- The AND conditions are not too restrictive.
- The contact channel matches the intended campaign.
- Web Push contacts have webpush_subscribed set to true.
Try removing one condition at a time to identify which rule is excluding the contacts.
If too many contacts are found
Confirm that:
- You selected AND rather than OR, when every condition should be required.
- The condition value is specific enough.
- The correct customer label, tag, channel, or location has been selected.
- A broad condition is not including contacts with incomplete information.
If an attribute does not appear
The attribute may not be available or configured in your workspace.
Check whether:
- It is a system or custom contact attribute.
- The attribute has been created.
- Contact data has been saved under that attribute.
- You are searching for the correct attribute name.
Frequently Asked Questions
Can I add more than one condition to a segment?
Yes. You can add multiple conditions and connect them using AND or OR logic.
What happens when I use AND?
Contacts must match every connected condition.
What happens when I use OR?
Contacts need to match at least one of the connected conditions.
Can I import contacts before creating a segment?
Yes. Use Import to upload a CSV or XLS file, map its fields, and preview the data before completing the import.
Can I add a single contact manually?
Yes. Select Create Contact, enter the required information, and save the contact.
Why does the contact count change while I configure the segment?
The result panel updates as conditions are added or changed, allowing you to preview the matching audience before saving the segment.
Is the Web Push subscription condition required?
Yes. For Web Push audiences, use: webpush_subscribed Equals to true
This ensures that the segment contains visitors who accept Web Push notifications.
Can I select individual contacts from the result?
Yes. You can use the checkboxes beside the matching contacts. When supported, selecting contacts also displays a shortcut for starting a WhatsApp campaign.
Next Step
Your audience segment is now ready. Create or select the appropriate WhatsApp, Web Push, or SMS template, choose the saved segment as your campaign audience, and then send the campaign immediately or schedule it for later.

 Start free trial