


How to Create a Voice Call Campaign with AI
- November 17, 2026
- 12 mins read
Table of Content
REVE Chat allows businesses to create AI-powered outbound voice campaigns to reach customers with promotional messages, reminders, follow-ups, and other important communications.
You can select your target audience, configure an AI voice, prepare a calling script, and control when calls are delivered.
This guide explains how to create a Bulk Voice AI Campaign, configure its settings, and manage it from the Marketing Campaign dashboard. It also introduces the separate Automation Campaign workflow.
Before You Begin
Before creating your campaign, make sure you have:
- Access to the REVE Chat dashboard.
- A SIP caller number configured with outgoing calls enabled in Phone integrations.
- A prepared audience, such as an existing contact segment or contact list containing valid phone numbers.
- A calling script or prerecorded audio message.
- An understanding of applicable consent, AI disclosure, recording, and outbound calling requirements.
Once these are ready, you can begin creating your campaign.
Step 1: Open the Marketing Campaign Section
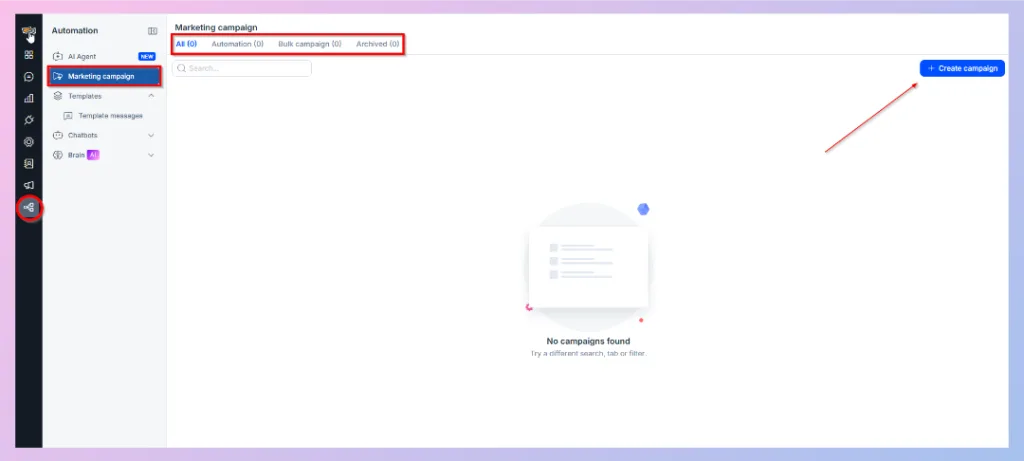
- Log in to your REVE Chat account.
- From the left navigation menu, open Automation.
- Select Marketing campaign.
- The Marketing Campaign dashboard will open.
- Click + Create campaign in the upper-right corner.
The Marketing Campaign dashboard contains four tabs:
| Tab | Description |
| All | Displays the campaign list. |
| Automation | Displays automation campaigns. |
| Bulk campaign | Displays bulk campaigns. |
| Archived | Displays archived campaigns. |
You can also search for campaigns using the search field.
If you have not created any campaigns, the dashboard displays a “No campaigns found” message.
Step 2: Enter the Basic Campaign Information
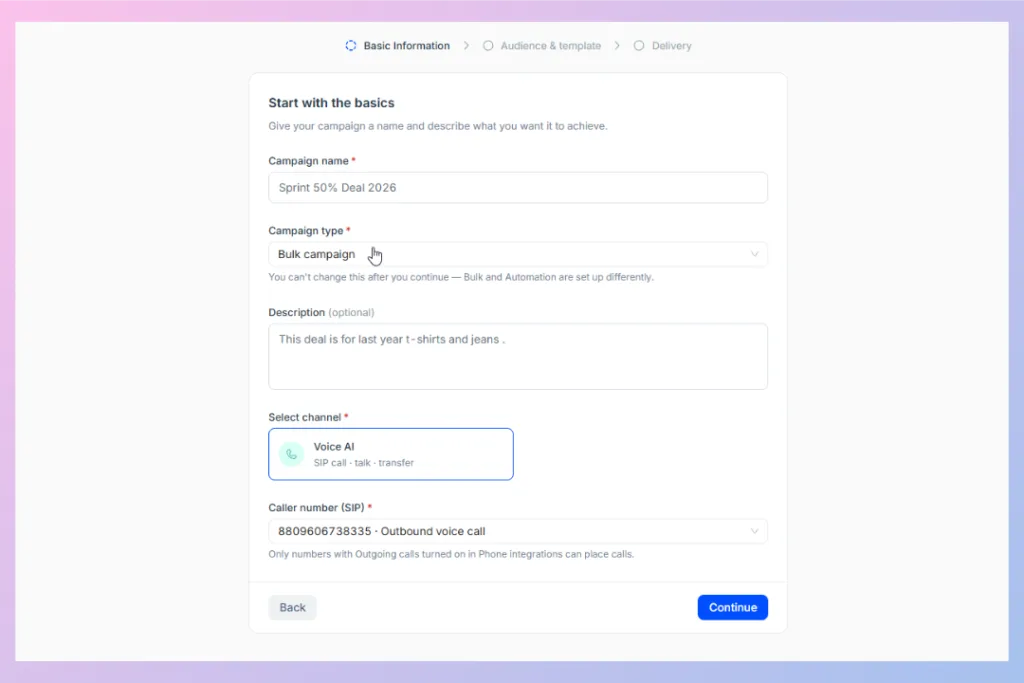
After clicking Create campaign, you will see the campaign setup wizard.
The wizard contains three stages:
Basic Information → Audience & template → Delivery
The first stage is where you define your campaign details.
2.1 Enter a campaign name
In the Campaign name field, enter a descriptive name that helps you identify the campaign.
For example:
Spring 50% Deal 2026
The campaign name is required.
2.2 Select the campaign type
Open the Campaign type dropdown.
Choose Bulk campaign to send automated voice calls to a selected audience.
REVE Chat also provides an Automation campaign type for workflow-based outreach.
Important: You cannot change the campaign type after continuing to the next stage because Bulk Campaigns and Automation Campaigns use different setup processes.
2.3 Add a description
In the Description field, briefly explain the purpose of your campaign.
For example:
Promotional outreach for the seasonal clothing sale.
This field is optional.
2.4 Select Voice AI as the channel
Under Select channel, choose Voice AI.
The Voice AI option is identified with the description:
SIP call · talk · transfer
This channel enables AI-powered voice calling for your outbound campaign.
2.5 Select the caller number
Open the Caller number (SIP) dropdown and select the number you want to use for outgoing calls.
Only numbers with Outgoing calls enabled in Phone integrations can place calls.
If your required number is not available, review its outgoing calling configuration in Phone integrations.
Once you have completed all the required fields, click Continue.
Step 3: Select Your Target Audience
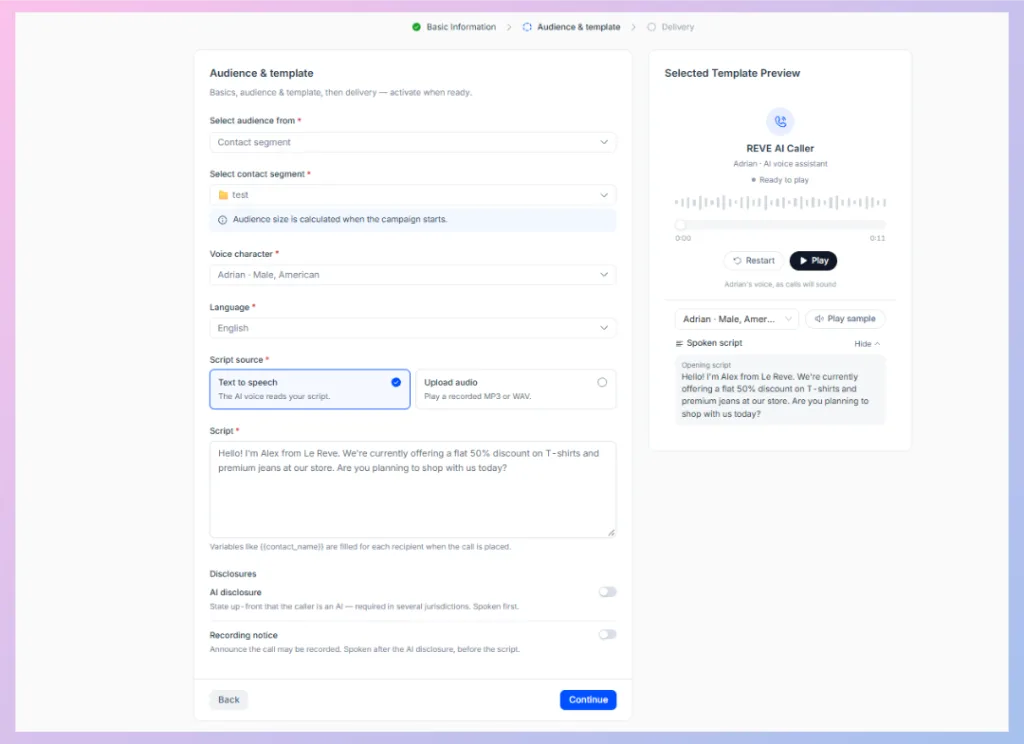
The second stage is Audience & template.
Here, you choose the recipients of your campaign and configure the content they will hear.
3.1 Choose an audience source
Open the Select audience from dropdown.
REVE Chat supports audience sources such as:
- Contact Segment: Select an existing group of contacts.
- Previous Campaign: Use contacts based on a previous campaign’s outcome.
- Excel or CSV File: Upload a prepared list of recipients.
- Phone Numbers: Enter or paste recipient numbers directly.
The available fields depend on the selected audience source.
3.2 Select a contact segment
If you choose Contact Segment:
- Find the Select contact segment dropdown.
- Open the list of available segments.
- Select the segment containing your intended recipients.
For example, you could select an existing segment containing customers eligible for a promotional offer.
Note: The interface indicates that the audience size is calculated when the campaign starts. The final recipient count may therefore not be displayed during this stage.
Step 4: Configure the AI Voice
After selecting your audience, configure the voice that will be used during the campaign.
4.1 Select a voice character
Open the Voice character dropdown.
Choose the voice you want to use for your campaign.
For example, the interface displays:
Adrian · Male, American
Voice characters help determine how your calling message sounds.
4.2 Select the language
Open the Language dropdown.
Choose the language you want to use for the campaign.
For example:
English
The available languages depend on the options provided in the dropdown.
4.3 Preview the voice
On the right side of the screen, you will find the Selected Template Preview panel.
This panel allows you to review the selected voice before proceeding.
You can:
- Play the voice preview.
- Restart the audio.
- Listen to a sample using Play sample.
- Review the displayed spoken script.
- Use the available voice selection control.
Use the preview to check whether the selected voice is suitable for your campaign.
Step 5: Choose the Script Source
Under Script source, select how you want to prepare the audio content.
There are two options.
Option 1: Text to Speech
Select Text to speech if you want the selected AI voice to read a written script.
- Select Text to speech.
- Locate the Script text area.
- Enter the message you want the AI voice to deliver.
- Review the script for accuracy and clarity.
- Use the Selected Template Preview panel to listen to the content.
Example script:
“Hello! I’m Alex from Le Reve. We’re currently offering a 50% discount on selected T-shirts and jeans at our store. Would you be interested in learning more about the offer?”
Keep the opening message clear so recipients can quickly understand who is calling and why.
Using variables in your script
Text-to-speech scripts support variables such as:
{{contact_name}}
You can use a supported variable to personalize part of the calling message.
For example:
“Hello {{contact_name}}, we’re calling to remind you about your upcoming appointment.”
The platform fills supported variables using the recipient’s corresponding contact information when the call is placed.
Make sure the required contact information is available.
Option 2: Upload Audio
Choose Upload audio if you already have a recorded voice message.
- Select Upload audio under Script source.
- Provide your prerecorded audio file using the upload control.
- Use a supported audio format: MP3 or WAV.
- Review the selected audio before continuing.
This option is useful when your business has an existing voice recording that it wants to use for the campaign.
Note: Text to Speech and Upload Audio are alternative script sources. Choose the option that best matches your communication requirements.
Step 6: Configure AI and Recording Disclosures
Below the script settings, you will find the Disclosures section.
Two disclosure options are available.
AI Disclosure
Enable AI disclosure to inform recipients that the caller is an AI system.
The interface indicates that this disclosure is spoken first.
Recording Notice
Enable Recording notice to inform recipients that the call may be recorded.
The interface indicates that this notice is spoken after the AI disclosure and before the main script.
Configure these settings according to your organization’s requirements and applicable laws.
After reviewing your audience, voice, script, and disclosures, click Continue.
Step 7: Configure Campaign Delivery
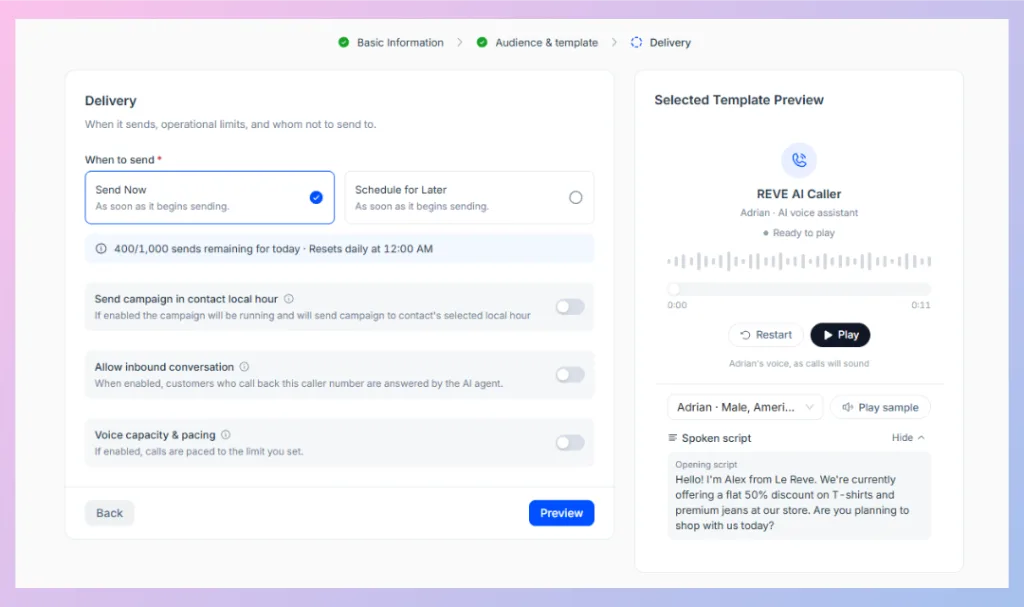
The third stage is Delivery.
Here, you decide when calls should be sent and configure additional operational settings.
7.1 Choose when to send
Under When to send, two options are available:
Send Now
Select this option if you want the campaign to begin sending when it is started.
Schedule for Later
Select this option if you want to schedule the campaign for a future date and time.
Choose the option that matches your campaign requirements.
7.2 Review the daily sending allowance
Below the sending options, REVE Chat displays your available daily sending capacity.
For example, the screenshot shows:
400/1,000 sends remaining for today
The interface also displays when the daily allowance resets.
These figures reflect the account’s displayed allowance and remaining capacity. They are not fixed limits for every account.
7.3 Configure contact-local calling hours
Locate Send campaign in contact local hour.
Enable this option if you want the campaign to follow the selected local calling hours for contacts.
This setting can be useful when your audience includes people in different time zones.
7.4 Allow inbound conversations
Locate Allow inbound conversation.
When enabled, customers who call back the configured caller number can be answered by the AI Agent.
This can be useful when recipients want to contact your business after receiving an outbound campaign call.
7.5 Configure voice capacity and pacing
Locate Voice capacity & pacing.
When enabled, this option allows outbound calling activity to be paced according to the limit you configure.
Use this setting when you need greater control over the pace of outgoing calls.
Once you have reviewed the delivery settings, click Preview.
Step 8: Review Your Campaign Before Launching
Clicking Preview takes you to the campaign review stage.
Review the configured details before starting the campaign.
The review includes information such as:
| Setting | What to review |
| Campaign name | Confirm the correct campaign has been selected. |
| Calling channel | Make sure Voice AI is selected. |
| Target audience | Check the selected recipient source and audience. |
| Script source | Confirm whether Text to Speech or Upload Audio is selected. |
| Voice and language | Check the selected voice character and language. |
| Disclosures | Confirm the appropriate disclosure settings. |
| Sending schedule | Verify whether the campaign should start immediately or later. |
| Contact-local hours | Review the local-hour setting. |
| Inbound conversations | Confirm whether callbacks should be answered by AI. |
| Capacity and pacing | Review any configured calling limits. |
If you need to change something, return to the corresponding setup stage and update it.
After confirming the details, use the available action on the review screen to initiate or schedule the campaign.
Important: Review the recipients, calling script, delivery timing, and applicable consent requirements before activating a live outbound campaign.
Step 9: View and Manage Your Campaign
After creating your campaign, return to:
Automation → Marketing campaign
The dashboard allows you to manage campaigns from one place.
View campaign details
The campaign list displays the following information:
| Column | Description |
| Campaign | Name of the campaign. |
| Campaign ID | Unique identifier assigned to the campaign. |
| Channels | Communication channels used in the campaign. |
| Type | Bulk send or Automation. |
| Created date | Date and time when the campaign was created. |
| Last updated | Date and time of the most recent update. |
| Status | Current campaign status. |
Filter campaigns
Use the tabs at the top of the dashboard to switch between:
- All
- Automation
- Bulk campaign
- Archived
Select Bulk campaign to view your bulk campaigns.
Search for a campaign
Use the search field to locate campaigns in the list.
Manage campaign status
The dashboard shows Active and Inactive campaign statuses with toggle controls.
Use the available status control to manage whether an eligible campaign is active or inactive.
Archived campaigns appear separately under the Archived tab and display an Archived label.
Using Voice AI in an Automation Campaign
In addition to Bulk Campaigns, REVE Chat supports workflow-based Automation Campaigns.
The Automation Campaign builder provides a visual workspace for connecting campaign actions.
The supplied example shows the following sequence:
Audience entry → Voice AI call → WhatsApp message → SMS message
Understanding the Automation Builder
The builder includes several important elements.
Audience entry
The starting point of the workflow.
Voice call node
A Voice AI calling action that displays available outcomes such as:
- Reached
- Responded
- No Response
- Declined
- Failed
- Else
Follow-up message nodes
Additional channel actions can be included in the workflow.
For example, the screenshot shows WhatsApp and SMS nodes connected after the Voice AI step.
Outcome connections
Each node has output connectors that can be linked to subsequent workflow actions.
The example WhatsApp node displays outcomes including Reached, Viewed, Clicked, Responded, Failed, and Else.
Working with the builder
For an Automation Campaign, select the Automation campaign type during creation rather than Bulk campaign.
In the Builder view, you can inspect the audience entry point, communication nodes, and their outcome connections.
The builder also provides controls for:
- Test now: Test the campaign workflow.
- Save: Save workflow changes.
- Active/Inactive: View or change the campaign’s activation state.
- Executions: Access the campaign executions view.
The illustrated workflow is an example, not a required sequence for every Automation Campaign.
Note: The screenshots show the Automation Builder but do not show all of its individual node-configuration screens. The exact configuration of audience-entry rules, Voice AI actions, and follow-up nodes depends on the options available when each node is opened.
Best Practices for AI Voice Campaigns
- Use a clear campaign name. Choose a name that helps your team recognize the campaign’s purpose.
- Select the right audience. Use relevant contact information and avoid unnecessary outreach.
- Keep the opening script concise. Clearly introduce your business and explain the purpose of the call.
- Test the selected voice. Listen to the preview before sending calls to customers.
- Review personalized variables. Make sure the corresponding contact information is available.
- Configure disclosures appropriately. Follow the AI disclosure, recording, and calling requirements applicable to your audience.
- Check delivery settings. Review the schedule, local calling hours, and pacing configuration.
- Review before activating. Verify the campaign settings to reduce avoidable configuration mistakes.
Frequently Asked Questions
Can I change the campaign type after continuing?
No. The Basic Information screen indicates that the campaign type cannot be changed after continuing because Bulk Campaigns and Automation Campaigns use different setups.
Can I use my own recorded voice message?
-Yes. Select Upload Audio and provide a supported MP3 or WAV file.
Can I personalize the calling script?
-Yes. Text-to-speech scripts support variables such as {{contact_name}}, provided the required contact information is available.
Can I schedule a campaign for later?
-Yes. Select Schedule for Later in the Delivery stage.
Can customers call back the AI Agent?
-Yes. The Allow inbound conversation setting enables the AI Agent to answer calls made back to the selected caller number.
Can I use Voice AI with WhatsApp or SMS in the same campaign workflow?
-Yes. The Automation Builder shown in REVE Chat supports workflows containing Voice AI, WhatsApp, and SMS actions.
Where can I find my created campaigns?
-Go to Automation → Marketing campaign. Use the All, Automation, Bulk campaign, or Archived tabs to find the relevant campaign.
Related Article
👉 Understanding Voice Call Campaign with AI
Learn about the feature’s capabilities, benefits, campaign types, and common use cases.

 Start free trial