
How to Manually Create a Ticket
- July 27, 2025
- 3 mins read
Table of Content
Support agents can manually create tickets from the REVE Chat Inbox when a customer issue needs to be recorded, assigned, and followed up separately. This is useful for requests received through phone calls, internal communication, or other situations where a ticket was not automatically created.
Prequery Before Creating Ticket
- Log in to your REVE Chat dashboard.
- Open Inbox from the left-side navigation.
- Expand Tickets.
- Select Your Tickets.
The ‘’Your Tickets’’ page displays the tickets currently assigned to you. You can also view tickets according to their status, such as Open, In Progress, and Solved.

Step 1: Click Create Ticket
On the Your Tickets page, click + Create Ticket in the upper-right corner.
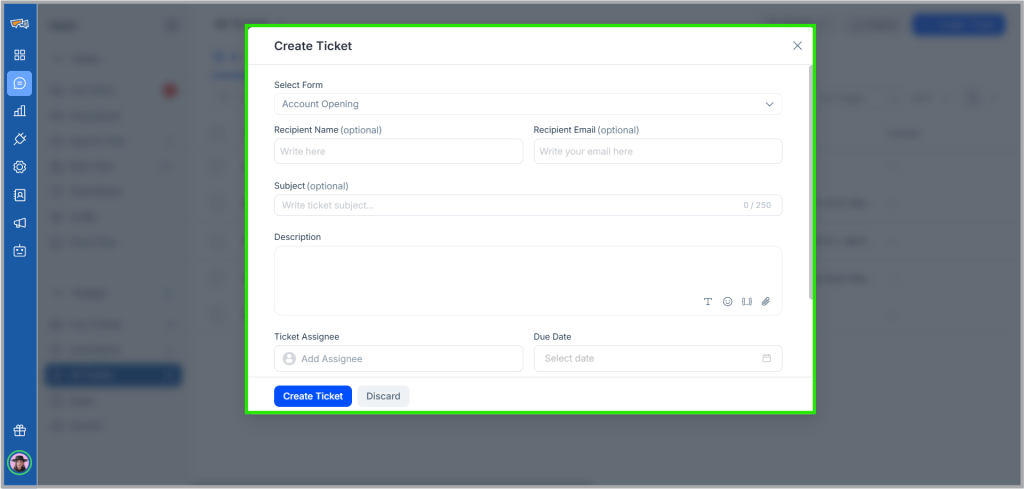
The Create Ticket window will open, where you can enter the customer’s information and ticket details.

Step 2: Select a Ticket Form
From Select Form, choose the ticket form you want to use.
For example, you can select the Default Form or another available form configured for your organization.
The selected form determines the information used for creating the ticket.

Step 3: Enter the Recipient Information
Enter the details of the customer for whom you are creating the ticket.
Recipient Name
Enter the customer’s name.
Recipient Email
Enter the customer’s email address.

Fields marked with an asterisk (*) are required and must be completed before the ticket can be created.
Step 4: Add the Ticket Subject and Description
Subject
Enter a short and clear title that summarizes the customer’s issue.
For example: Refund for T-shirt
A specific subject makes the ticket easier for agents to identify later.
Description
Provide the details of the customer’s request or problem.
For example: Client requested a refund because the delivered T-shirt was the wrong size.
Include enough information so that the assigned agent can understand the issue without needing additional context.
Step 5: Assign the Ticket
Use Ticket Assignee to select the agent responsible for handling the ticket.
Assigning the ticket ensures that the request has a clear owner and can be followed up accordingly.
Step 6: Set a Due Date
Select a Due Date when the ticket needs to be handled or followed up within a particular timeframe.
This helps agents keep track of time-sensitive customer requests.
Step 7: Select the Ticket Priority
Use Ticket Priority to indicate how urgently the request should be handled.
Select the appropriate priority based on the importance and urgency of the customer’s issue.
For example, the ticket shown in the form is set to Medium priority.
Step 8: Add Ticket Tags
Use Ticket Tags to categorize the ticket.
For example, you might add tags such as:
- Important
- Complaint
- Refund
- Billing
Tags make it easier to organize, search, and filter related tickets later.
Step 9: Create the Ticket
Review the information you entered and click Create Ticket.
The ticket will then be created in REVE Chat and can be managed through the Tickets section of the Inbox.
If you do not want to create the ticket, click Discard to close the form without saving it.
Information Available When Creating a Ticket
When manually creating a ticket, you can configure the following information:
| Field | Purpose |
|---|---|
| Select Form | Selects the form used for the ticket |
| Recipient Name | Identifies the customer |
| Recipient Email | Adds the customer's email address |
| Subject | Provides a short summary of the issue |
| Description | Records the details of the customer's request |
| Ticket Assignee | Assigns responsibility to an agent |
| Due Date | Sets a target date for follow-up |
| Ticket Priority | Indicates the urgency of the request |
| Ticket Tags | Categorizes the ticket for easier organization |
Once created, the ticket becomes part of your REVE Chat ticket workflow, where the support team can continue managing and updating it until the customer’s issue is resolved.