



How to Broadcast WhatsApp Campaigns
- July 28, 2025
- 4 mins read
Table of Content
A WhatsApp broadcast campaign allows you to send an approved message to a selected group of customers at once. Each recipient receives the message as an individual WhatsApp conversation and cannot see the other recipients.
In REVE Chat, you can select a connected WhatsApp Business number, choose an approved message template, select an audience segment, and send the campaign immediately or schedule it for later.
Before You Begin
Make sure the following requirements are complete before creating your campaign:
- You have an active REVE Chat account with access to the Campaign module.
- An eligible WhatsApp Business number is connected to REVE Chat through the official Meta and WhatsApp business setup.
- You have an approved WhatsApp message template.
- Your customer contacts have been added to REVE Chat.
- You have created an audience segment containing the intended recipients.
- Every recipient has agreed to receive the relevant type of WhatsApp message from your business.
- Your WhatsApp Business Account is active and not restricted by Meta.
How to Broadcast a WhatsApp Campaign
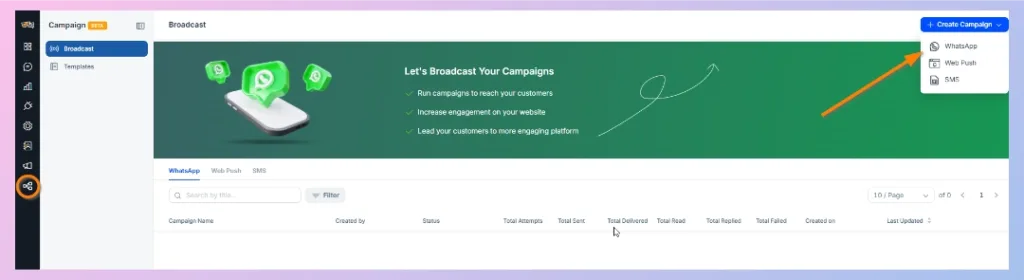
Step 1: Open the Campaign Module
- Sign in to your REVE Chat account.
- Select the Campaign icon from the main navigation.
- Open Broadcast from the Campaign menu.
- Make sure the WhatsApp tab is selected.
The Broadcast dashboard displays previously created WhatsApp campaigns and their current performance.
Step 2: Start a New WhatsApp Campaign
- Click Create Campaign in the upper-right corner.
- Select WhatsApp from the available campaign types.
The Create New Campaign window will open.
Step 3: Enter a Campaign Name
Enter a clear internal name in the Campaign Name field.
The campaign name helps your team identify the campaign on the Broadcast dashboard. Customers do not see this name.
Use a name that describes the campaign’s purpose, audience, or sending date.
Examples:
- July Product Launch
- Eid Offer for Existing Customers
- Subscription Renewal Reminder
- Dhaka Customers Back-in-Stock Update
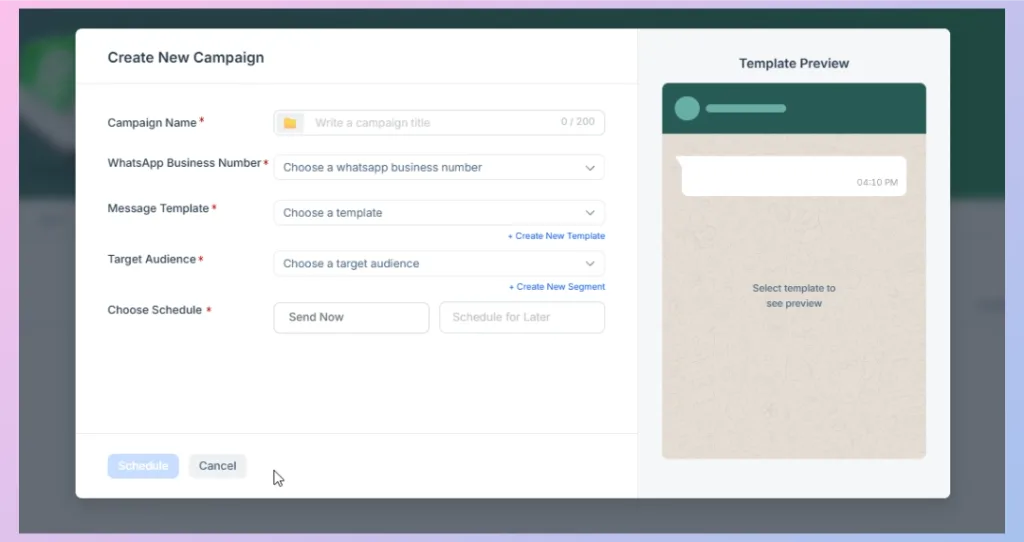
Step 4: Select a WhatsApp Business Number
Open the WhatsApp Business Number list and select the number that will send the campaign.
Choose the number carefully when your organization manages multiple brands, locations, or departments. The selected number should match the business identity customers expect to hear from.
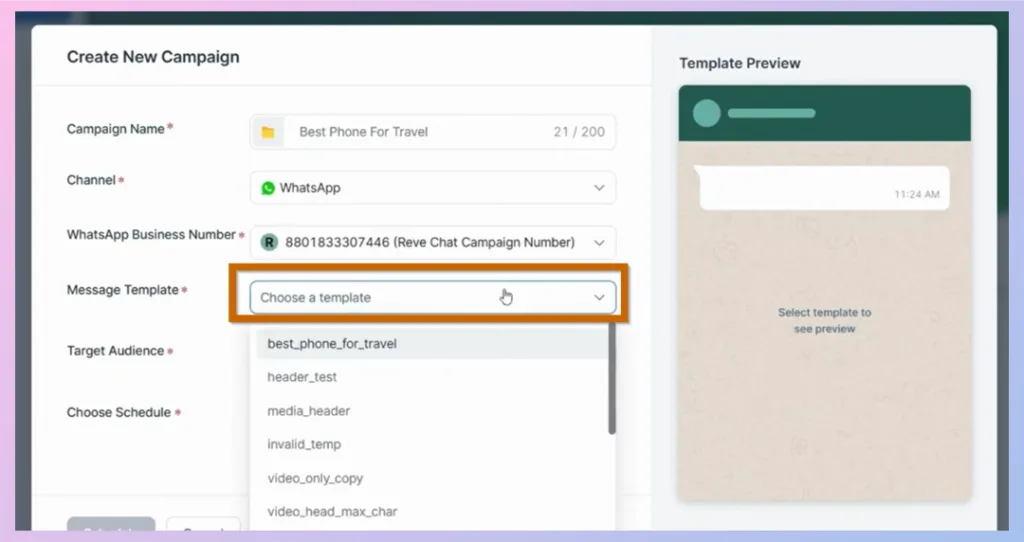
Step 5: Select a Message Template
Open the Message Template list and choose an approved WhatsApp template.
After you select a template, check the Template Preview on the right side of the window. Confirm that the message text, media, buttons, variables, and other elements appear correctly.
Need to create a template?
Learn how to create a WhatsApp message template for campaigns.
Important Note: WhatsApp requires businesses to use an approved message template when initiating a conversation. Meta can approve, reject, pause, or review a template at any time.
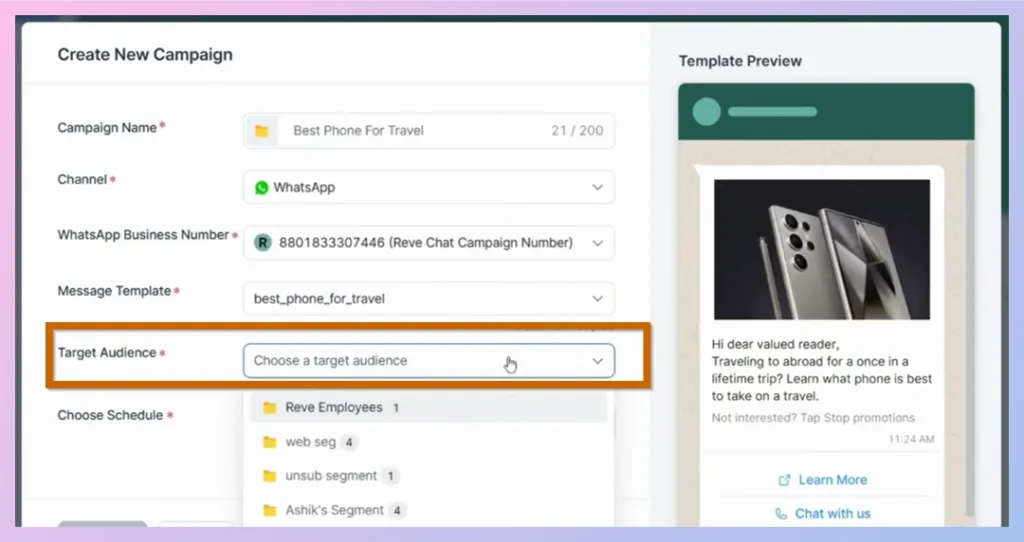
Step 6: Select the Target Audience
Open the Target Audience list and select the audience segment that should receive the campaign.
An audience segment is a group of contacts organized according to shared information or campaign criteria. For example:
- Customers who opted in to receive offers
- Customers with an upcoming renewal
- Customers from a particular city
- Customers who purchased a specific product
- Registered event participants
- Customers with pending bookings
Review the segment before continuing. Make sure it contains only relevant, opted-in contacts.
No audience segment available?
Create an audience segment before sending the campaign.
Warning: Do not use purchased, scraped, borrowed, or unrelated contact lists. WhatsApp requires the recipient to provide their phone number and give permission to receive messages from your business.
Step 7: Choose When to Send the Campaign
Now, there are two options available here.
Select Send Now when you want REVE Chat to begin processing the campaign immediately after submission.
Select Schedule for Later when the campaign should be sent on a future date.
When the scheduling fields appear, choose the required delivery date and time.
Before scheduling, confirm that:
- The selected date and time are correct.
- The campaign is not scheduled outside an appropriate sending period.
Note: Review your REVE Chat account or workspace time settings before selecting a campaign time, especially when sending to customers in different regions.
Step 8: Submit the Campaign
After completing all required fields, click the enabled action button at the bottom of the window to submit the campaign.
Do not close or refresh the page while the campaign is being submitted.
Next Steps:
👉 Learn how to create a WhatsApp Campaign Template in REVE Chat.
👉 Learn how to create an audience segment in REVE Chat.

 Start free trial