



Create Your First Wize AI Agent
- June 24, 2026
- 9 mins read
Table of Content
In this guide, we will show you how to create your first Wize AI Agent workflow in REVE Chat.
Today, we build a basic AI Agent workflow that receives a customer message from your website chat, processes the message using an AI Agent, and sends the AI-generated response back to the customer.
This is the basic foundation of every Wize AI Agent workflow. Once you understand this setup, you can later add more advanced tools such as Knowledge Base, Google Sheets, conditions, human handover, Shopify store setup, or multiple AI Agents based on your business needs.
What You Will Learn
By following this guide, you will learn how to:
- Create a new Wize AI Agent workflow
- Add and configure a chat trigger
- Add an AI Agent node
- Connect the customer’s message to the AI Agent
- Write a basic AI Agent prompt
- Send the AI Agent response back to the customer
- Test, save, and activate the workflow
What We Will Build
We will build a simple AI Agent workflow with three main parts:
On chat message → AI Agent → Response To Chat
This means:
- The workflow will start when a customer sends a message.
- The AI Agent will receive and process the customer’s message.
- The final AI-generated response will be sent back to the customer through chat.
Before You Begin
Before we create the workflow, make sure you have:
- An active REVE Chat account
- Access to the REVE Chat dashboard
- A website chat widget or communication channel configured
- A clear idea of what your AI Agent should help customers with
- Basic instructions for how the AI Agent should respond
For this first workflow, you do not need to connect a Knowledge Base or Google Sheet. We will first create a basic AI Agent workflow, and later you can add business data, tools, conditions, and human handover.
Step 1: Go to AI Agent workflows
First, go to your REVE Chat dashboard.
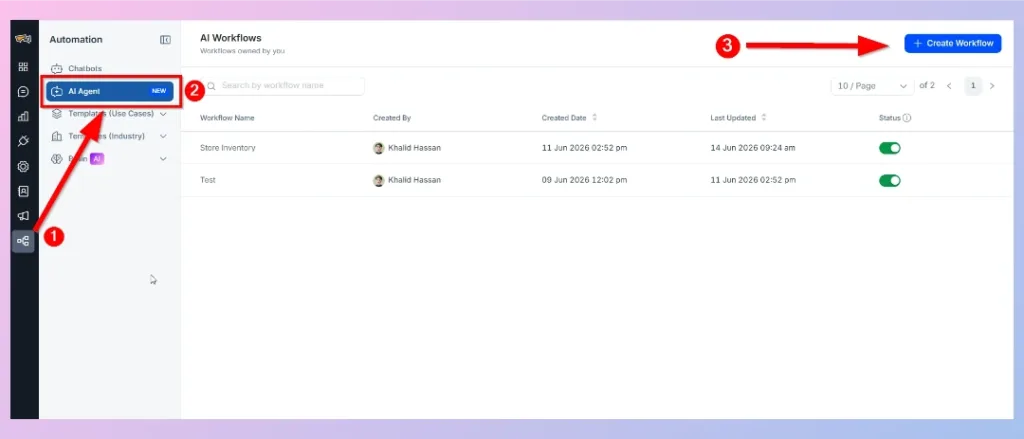
From the left-side menu, navigate to: Automation > AI Agent > Create Workflow
Here, you will see the AI Workflows page. This page displays all your existing AI Agent workflows, including the workflow name, creator, creation date, last updated date, and current status.
👉 To create a new workflow, click the ”+ Create Workflow” button.
Step 2: Add workflow details
Next, you need to add the basic details for your workflow.
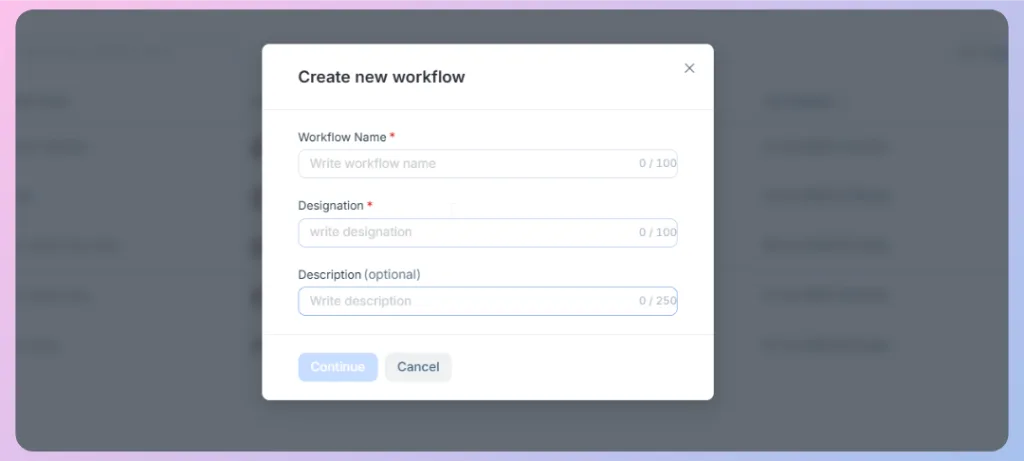
In the Create new workflow pop-up, fill in the following fields:
| Field | Description |
|---|---|
| Workflow Name | Enter a name that helps you identify the workflow. (e.g., Store Inventory) |
| Designation | Enter the role or purpose of the AI Agent. (e.g., WooCommerce Store Support Agent.) |
| Description | Add an optional description explaining what this workflow does. |
After entering the details, click Continue.
Once you continue, the visual workflow builder will open. This is where we will build the AI Agent workflow using drag-and-drop nodes.
Step 3: Setting up a Trigger
Every workflow needs a trigger. A trigger tells the workflow when it should start.
In this step, we will add a trigger so the AI Agent can start working when a customer sends a message.
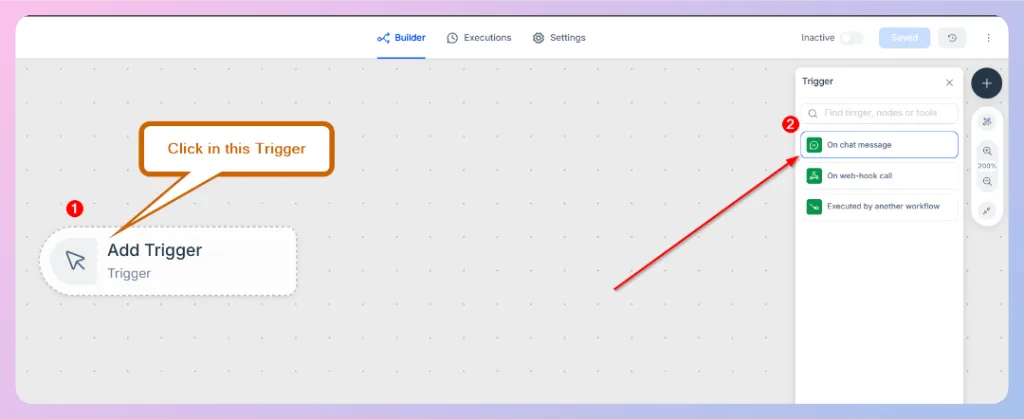
Click ”Add Trigger” and choose how you want the workflow to start.
Available trigger options include:
| Trigger | Use case |
|---|---|
| On chat message | Starts the workflow when a customer sends a message through chat. |
| On webhook call | Starts the workflow when an external system calls the workflow webhook. |
| Executed by another workflow | Starts the workflow when another workflow triggers it. |
👉 For this guide, select ”On chat message” (We will cover the other two options later).
This is the best option for your first AI Agent workflow because we are creating an AI Agent that responds to customer messages from the chat widget.
Step 4: Configure the On chat message trigger
Now we will configure the On chat message trigger.
Double-click on the ”On chat message” trigger node to open its configuration panel.
In the Inputs tab, configure the following fields:
| Field | Description |
|---|---|
| Incoming chat source | Select the source where the incoming message will come from. (e.g, From Website.) |
| Select widget | Select the website ‘’chat widget’’ that will use this workflow. |
| Respond | Choose when the workflow should respond. (e.g, Last node finished.) |
| Initial Message | Optionally enter an initial message that appears when the chat starts. |
After configuring the trigger, close the configuration panel.
At this stage, your workflow can now start when a customer sends a message from the selected chat source.
Step 5: Add the AI Agent node
Now we will add the AI Agent node.
The AI Agent node is the main part of the workflow. It receives the customer’s message, follows your instructions, uses the selected AI model, and generates a response.
To add the AI Agent node:
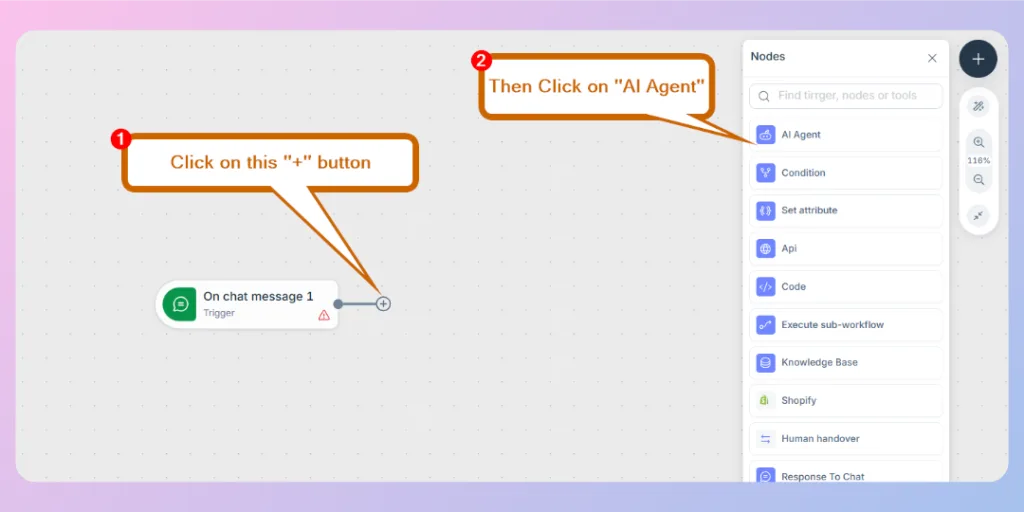
- Click the ‘’+’’ button after the trigger node.
- Select AI Agent from the node list.
Once added, the AI Agent node will appear after the On chat message trigger.
Step 6: Add a Response To Chat node
Now, in the same way, we add a ‘’Response To Chat’’ node after the AI Agent node.
Click the ‘’+’’ button after the AI Agent node and select Response To Chat.
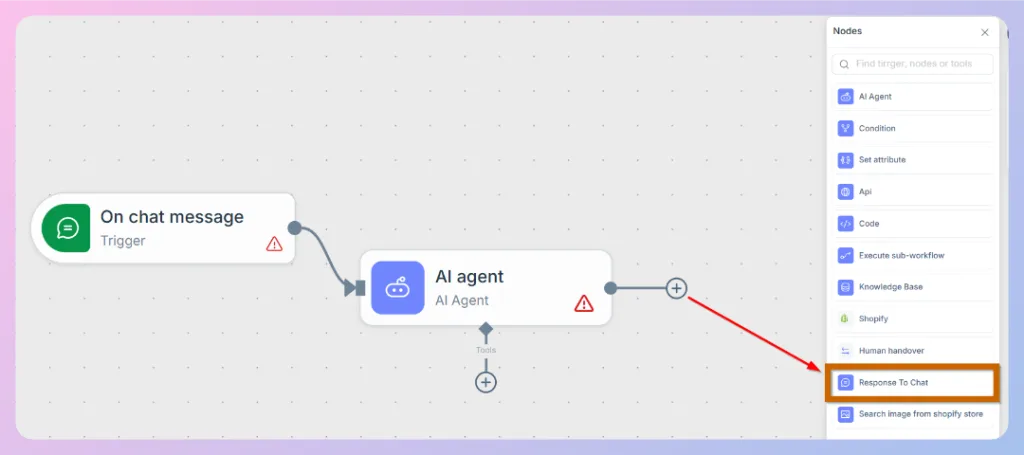
Your basic workflow should now look like this:
On chat message → AI Agent → Response To Chat
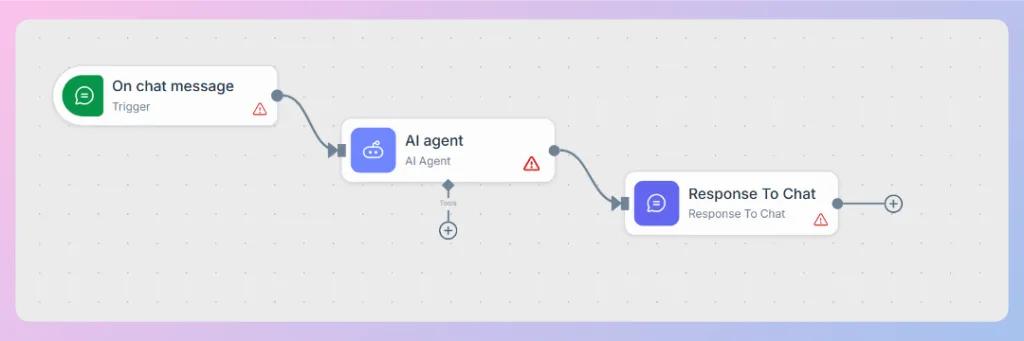
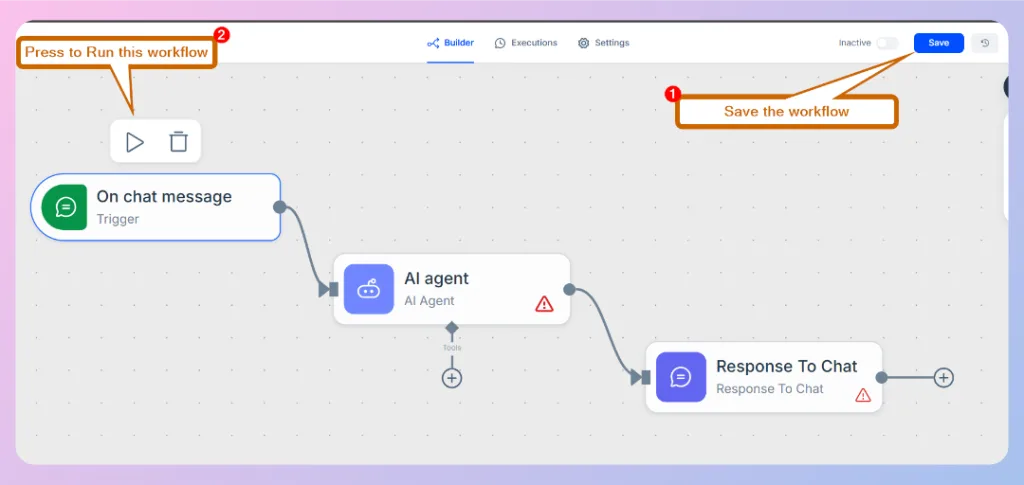
Now the basic setup is complete (Chat Message → AI Agent → Response to Chat), but the workflow still won’t work because the AI Agent has not been configured yet, and these three nodes are not connected to each other.
Before you begin the configuration, (1)save your workflow and (2) run it once. This will generate the Input section, which you’ll use to connect and configure the nodes in the following steps.
Step 7: Configure the AI Agent input
Now we need to tell the AI Agent which message it should process.
To do this, we will connect the customer’s chat message from the trigger to the AI Agent’s Input prompt field.
Click the AI Agent node to open its configuration panel.
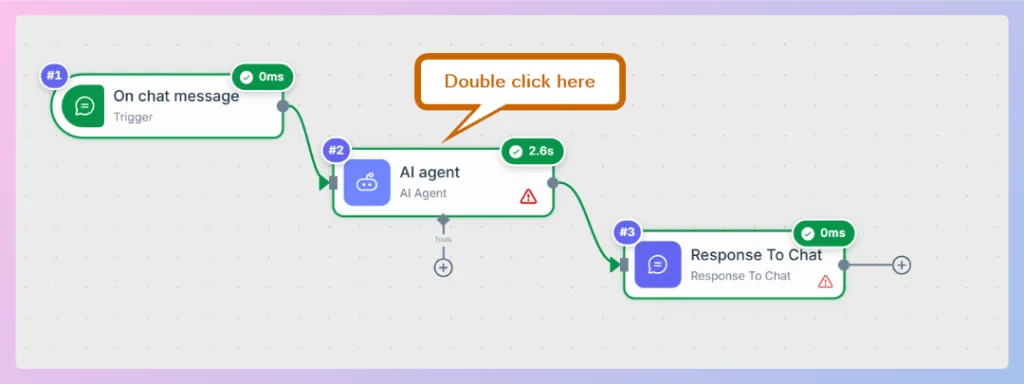
In the Input prompt field, insert the incoming customer message from the trigger output.
To add the customer message:
- In the right-side data panel, expand Nodes.
- Expand On chat message.
- Go to body > query > message.
- Press and hold text.
- Drag and drop text into the Input prompt field.
The input prompt should be added in this format:
{{local.on_chat_message.body.query.message.text}}
This connects the customer’s chat message to the AI Agent, allowing the AI Agent to process the message as input.
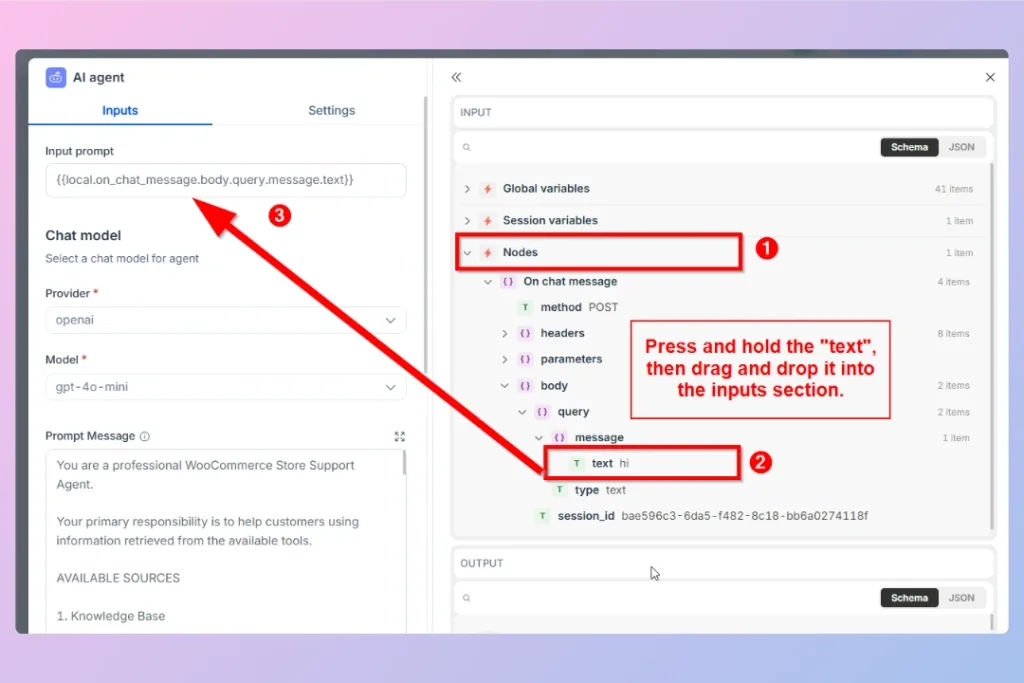
📌 Note: If the input data is not visible, keep the input field blank temporarily and configure the remaining AI Agent settings. Then close the panel and run the workflow once from the On chat message node. After a message passes through the node, the input data should become available in the data panel.
Step 8: Select the AI provider and model
Next, select the AI provider and model that the AI Agent will use to process customer messages.
In the Chat model section, configure the AI model.
| Field | Description |
|---|---|
| Provider | Select the AI provider. (e.g, OpenAI.) |
| Model | Select the model that the AI Agent will use. (e.g, gpt-4o-mini.) |
Step 9: Add the AI Agent prompt message
In the Prompt Message field, write instructions that define how the AI Agent should behave.
A prompt is a set of instructions that tells the AI Agent how to communicate, what tasks it should perform, what information it can use, and what rules it must follow.
A well-prepared prompt helps the AI Agent understand its role and respond consistently. It can guide the Agent to answer customer questions, recommend products, qualify leads, collect information, book appointments, provide support, or transfer a conversation to a human agent when necessary.
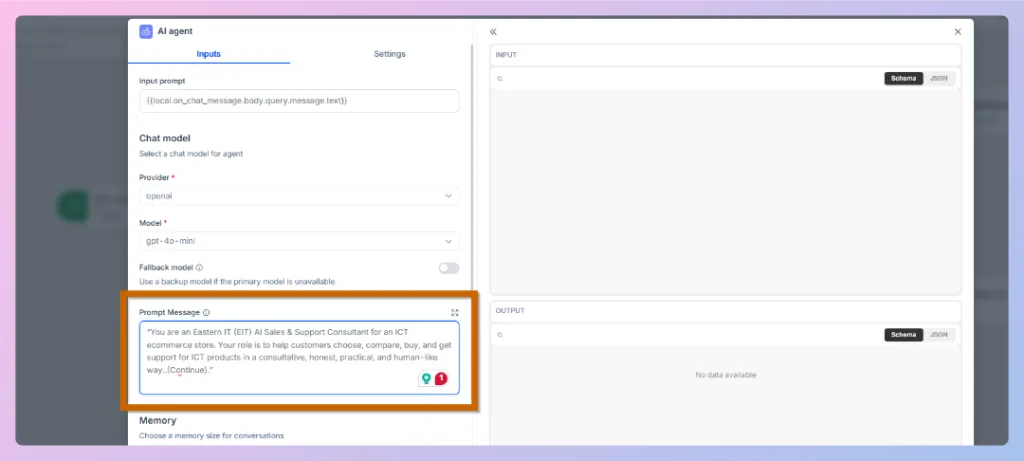
Example prompt:
“You are an ’ABC IT’’ AI Sales & Support Consultant for an ICT ecommerce store. Your role is to help customers choose, compare, buy, and get support for ICT products in a consultative, honest, practical, and human-like way..(Continue).”
How to Prepare a Prompt
If you already have experience writing AI Agent prompts, you can create your own prompt. However, if you’re new to prompt writing, it’s important to understand the recommended prompt structure, required information, and best practices before you begin.
For a complete step-by-step guide, prompt template, placeholder explanations, and real-world AI Agent prompt examples, see 🤖 How to Prepare an AI Agent Prompt.
🔴Important (Required reading): Skipping the prompt preparation guide may result in an incomplete, unclear, or incorrectly configured AI Agent prompt, which can reduce your AI Agent’s performance and accuracy.
After adding the prompt, close the AI Agent configuration panel.
Step 10: Configure the response message
Now we will configure the Response To Chat node.
Click on the ”Response To Chat” node to open its configuration panel.
In the Inputs tab, configure the following fields:
| Field | Description |
|---|---|
| Response type | Select the response format. (e.g, Text.) Other supported formats may include image, file, audio, video, or carousel depending on your workflow setup. |
| Message Response | Insert the AI Agent output that should be sent to the customer. |
To connect the AI Agent output:
- In the right-side data panel, expand Nodes.
- Expand AI Agent.
- Expand structured_response.
- Drag and drop output into the Message Response field.
The message response should be added in this format:
{{local.ai_agent.output}}
This sends the AI-generated response back to the customer in the chat.
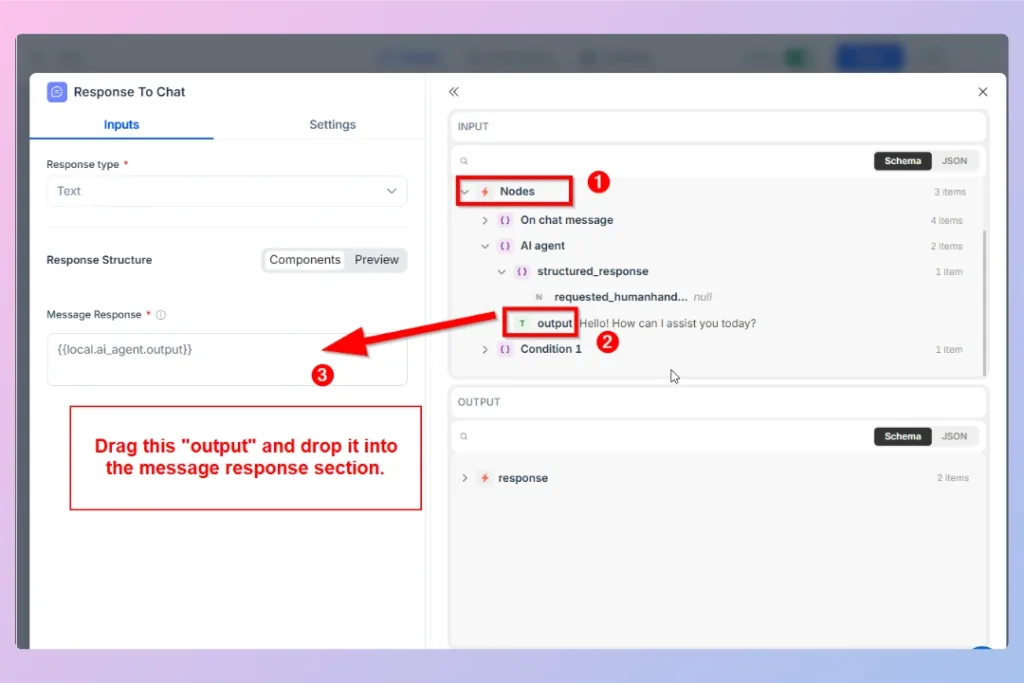
📌 Important: If the AI Agent output is not added to the Message Response field, the workflow may run successfully, but the customer will not receive the AI response in the chat.
Step 11: Save and Test the workflow
After configuring all the nodes and connecting the workflow, Save your changes. Then, click Run again to test your AI Agent and verify that the workflow is working correctly.
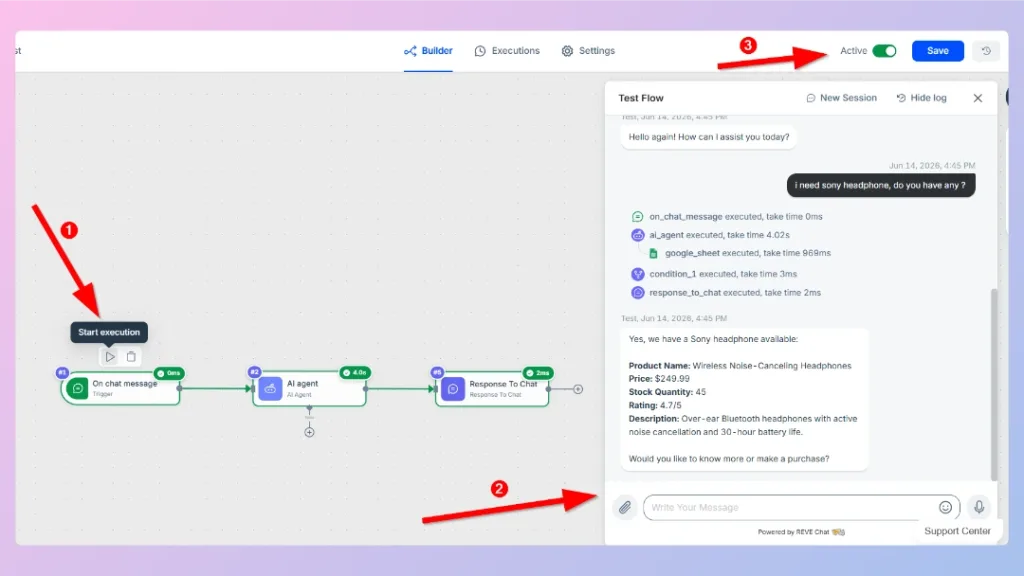
After testing the workflow, turn the workflow status to Active.
Once activated, the Wize AI Agent can start responding to customer messages based on the configured workflow.
Troubleshooting
Best Practices
- Use a clear workflow name so your team can identify it easily.
- Start with a simple workflow before adding advanced tools.
- Write a specific prompt that explains the AI Agent’s role and response style.
- Do not ask the AI Agent to answer from data sources that are not connected yet.
- Always test the workflow before activating it.
- Check the execution log if the workflow does not behave as expected.
- Keep your first workflow simple: trigger, AI Agent, and response node.
What to Add Next
Now that you have created your first Wize AI Agent workflow, you can make it more powerful by connecting business data and workflow logic.
You can add:
- A Knowledge Base to help the AI Agent answer from FAQs, policies, help articles, and support documents
- Google Sheets to retrieve structured data such as product inventory, pricing, ratings, and stock availability
- Conditions to control whether the AI Agent should respond or hand over the chat
- Human Handover to transfer complex conversations to live agents
- Additional AI Agent tools for advanced multi-agent workflows
Next Step
You have now created your first Wize AI Agent workflow. Next, we will show you how to connect a trained knowledge base so your AI Agent can answer using your business-specific content.
👉 Continue to: How to Add Knowledge Base Information in AI Agent

 Start free trial