When it comes to messaging, WhatsApp is easily the #1 platform out there. To leverage its popularity, REVE Chat can help you integrate with the new WhatsApp Business API. The integration will help you give customers the freedom to contact you from whatever device they use for WhatsApp and deliver them the best support.
Benefits of WhatsApp for Business
WhatsApp Business is a chat app that can add value to customer communications through the functionality and ease of personal messaging.
WhatsApp offers many benefits for businesses:
WhatsApp helps businesses engage with customers personally and deliver prompt answers.
Companies can chat with customers in real-time, provide prompt support, and foster customer trust.
Your business will get a unique identity by creating a verified “Business Profile” by using the website URL, location, etc.
Templates messages can be created to start more conversations, notify customers and guide them to the next step.
WhatsApp ensures a great deal of security to customer interactions with features like end-to-end encryption and two-factor authentication.
Benefits of WhatsApp Integration With REVE Chat
WhatsApp integration with REVE chat opens the window of opportunities for seamless and personal communication with customers.
Integrating WhatsApp business with REVE Chat can benefit your business on different levels:
Integrating WhatsApp with REVE chat will help your business devise an omnichannel strategy and extend its reach.
The integration can help you respond to WhatsApp chats directly from the dashboard and reply promptly to customers.
You can transfer chats to the right department and route them to the available agents to boost conversion rates.
Our integration will use the official WhatsApp Business API and comply with the WhatsApp Terms of Service.
We collaborate with 360dialog which is a verified WhatsApp Solution Provider and has the rights to allow clients access to the WhatsApp Business API.
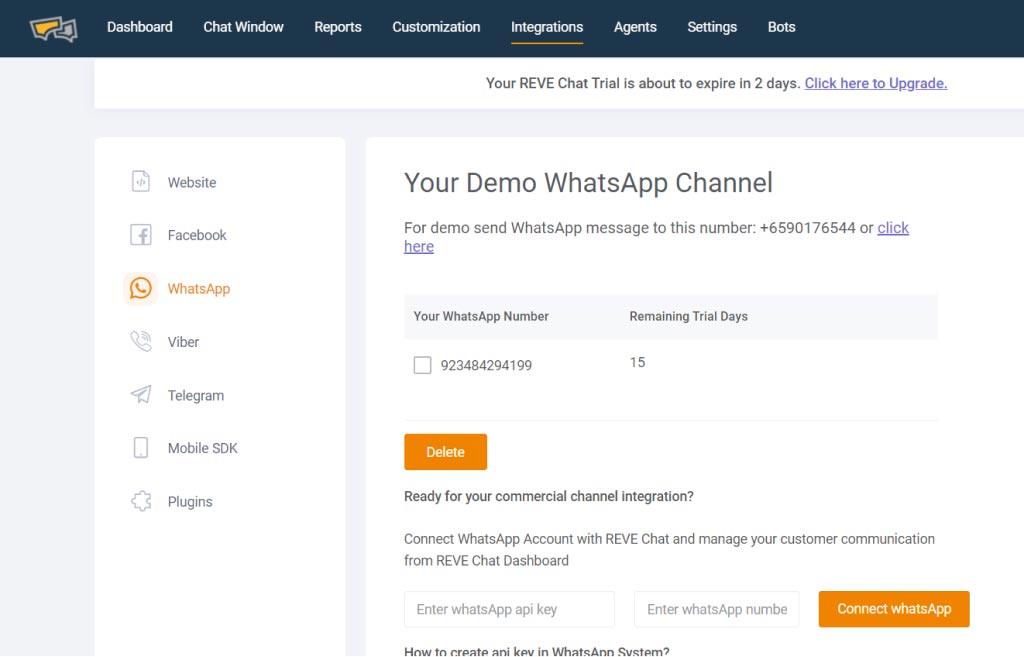
Integrating WhatsApp with REVE chat involves a few steps. Let’s break down the steps for better understanding:
Log into your REVE Chat dashboard. Click on the Integration menu.
Click on 'Connect WhatsApp' to complete the integration process.
Before the integration, you need to complete the WhatsApp Business API registration process. To do that, click here.
After completing the registration, you need to copy-paste API Key into the field above to connect your WhatsApp Business Account with REVE Chat.
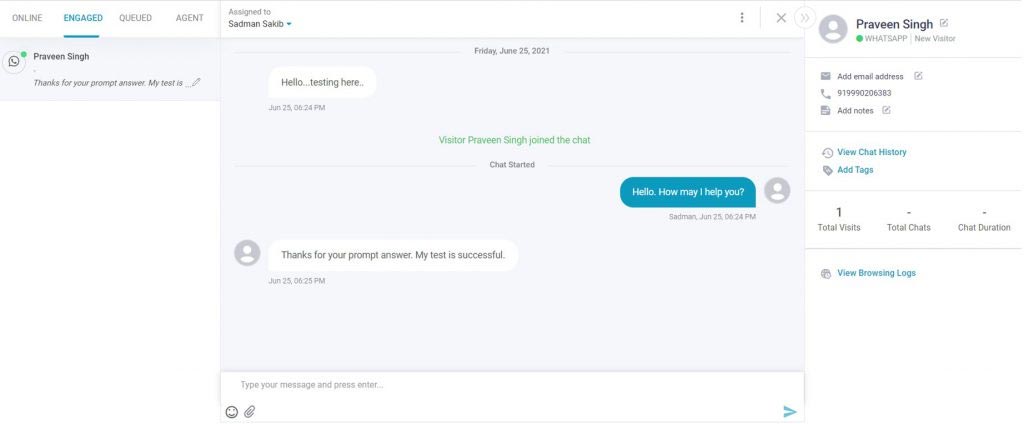
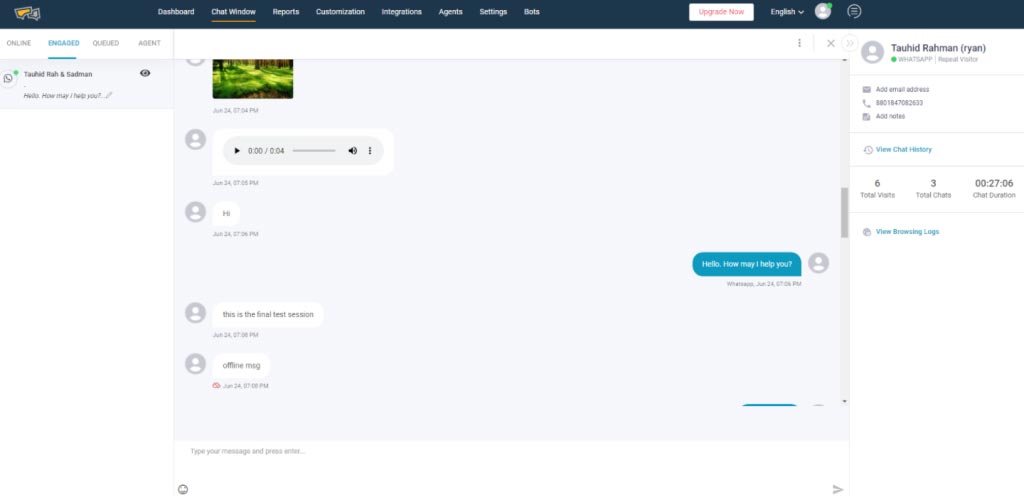
Once the integration is complete, you can click on the “Chat Window” option to see how customer conversations look like in the dashboard.
Note: WhatsApp integration with REVE Chat will help you offer rich media content with multiple format options such as videos, images, GIFs, PDF to add value to customer conversations.
Adding the WhatsApp channel with REVE Chat for Twilio API is a simple process that needs to be followed step-wise.
In order to integrate the WhatsApp channel for Twilio API you need to have a Twilio account.
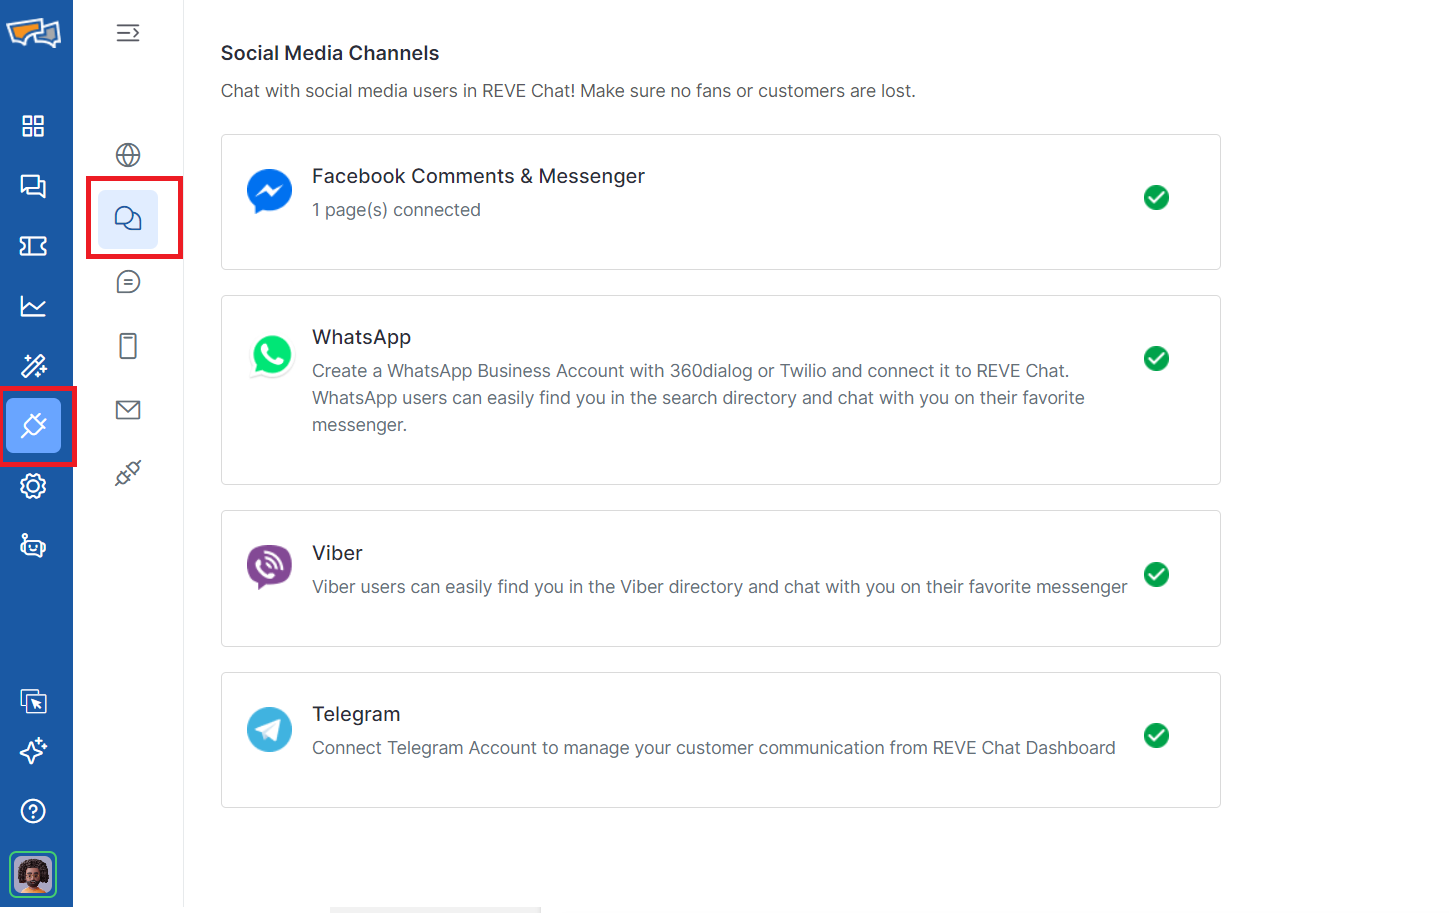
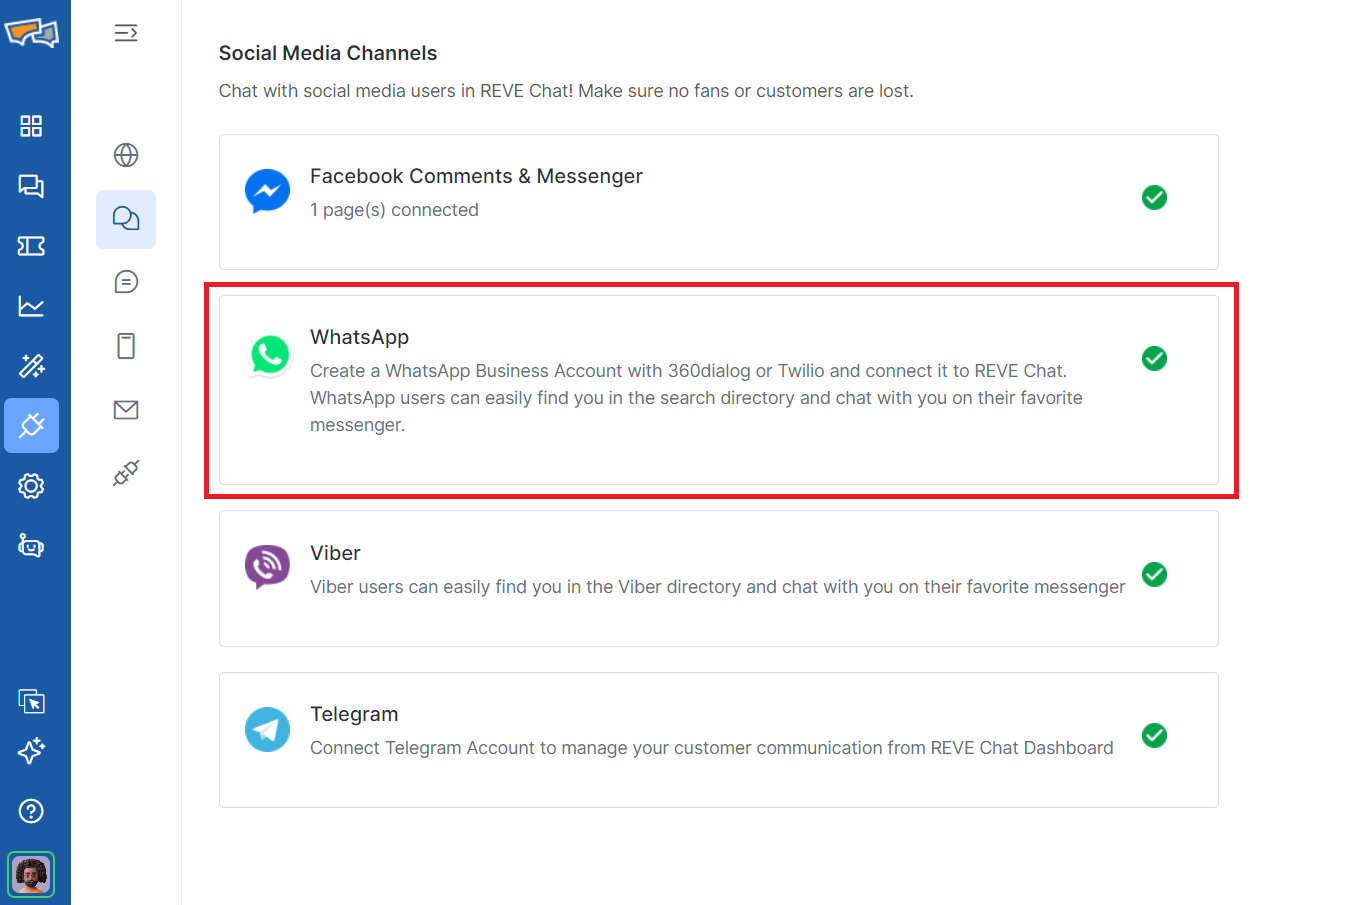
Given that you have one Twilio account, to integrate this with the Reve Chat, go to the dashboard >> Integrations >> Social Media Channels.
Under this you will get an option for WhatsApp. Upon Clicking you will get two options namely 360 Dialogue and Twilio. Go to the Twilio Tab.
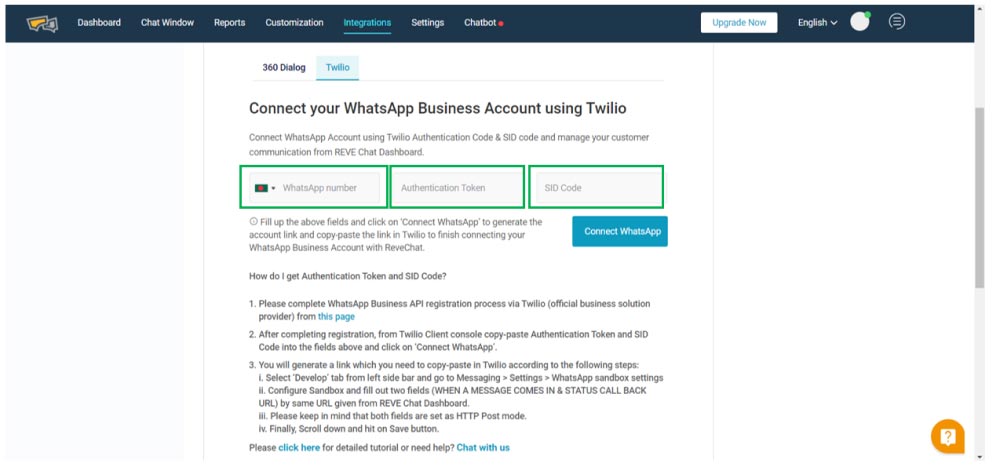
Under Twilio Tab you will find the fields for giving some data for your Twilio API as below:
WhatsApp Number: It is your WhatsApp number you have for your business.
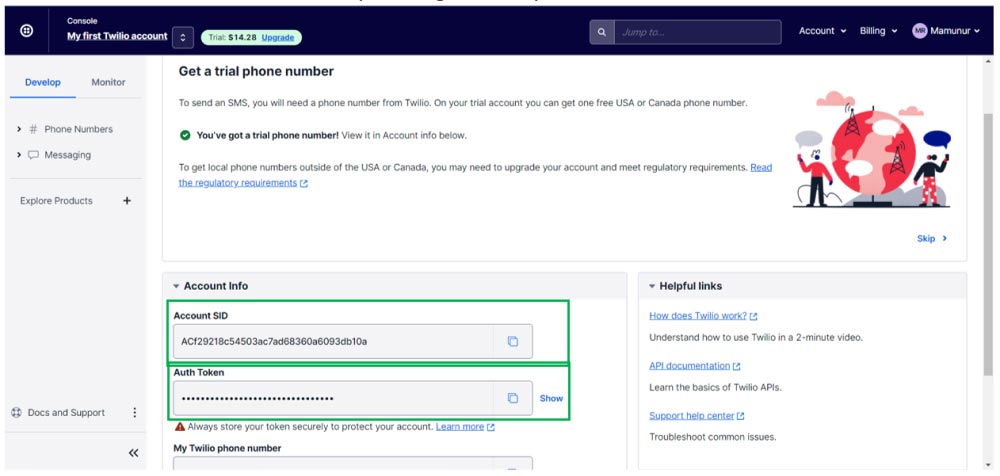
Authentication Token and SID: Upon completing the registration process for Twilio API you will land to Twilio API homepage, there you will get the both of the information.
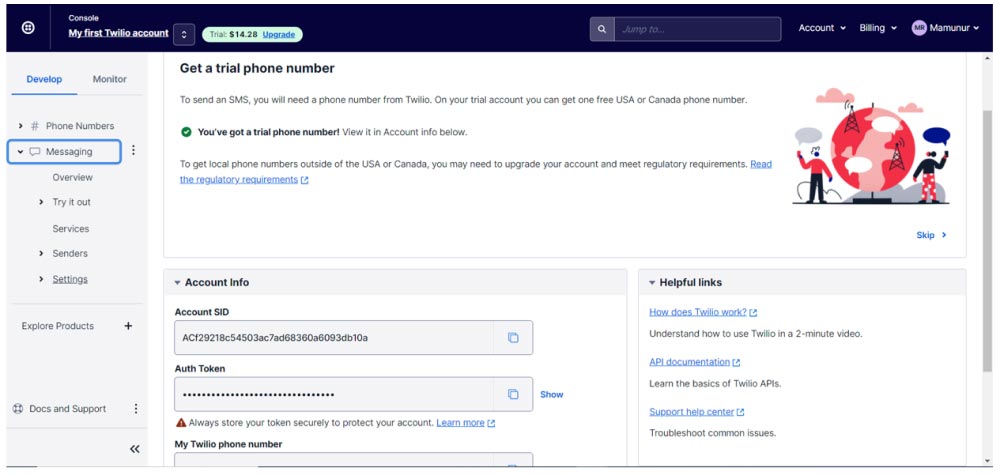
The Account SID and Auth Token you will get under your Twilio console as below:
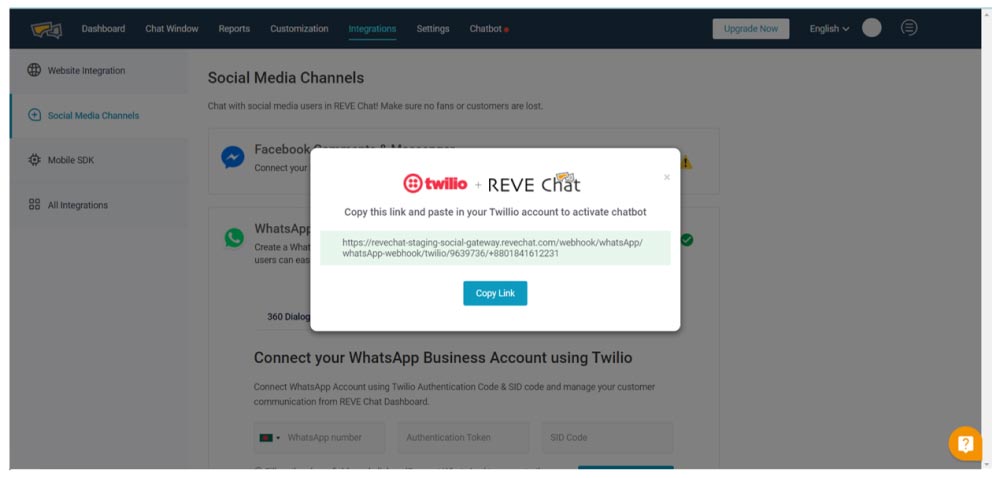
Upon putting all the information in the Reve Chat WhatsApp integration, Click ‘Connect WhatsApp’ Button right beside the input field. Upon successful attempt, one pop up will appear with a link.
Copy the link and paste it in your Twilio Console as per following instruction:
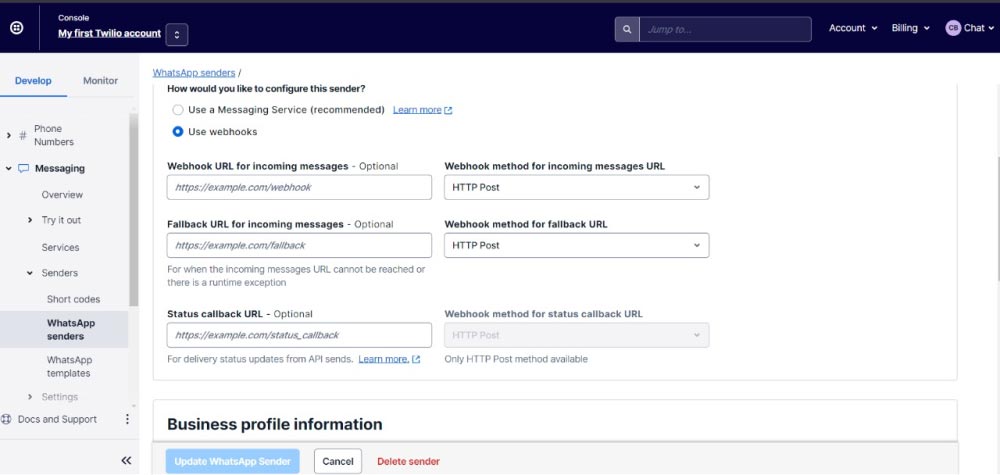
In Twilio Console go to Messaging >> Settings
Go to Messaging > WhatsApp Senders. You will get an option to choose your business number. Upon choosing, you will find several fields for pasting the webhook URL you have copied from the REVE Chat dashboard. Paste the link in the first two fields and click on "Update WhatsApp Sender" button.
Viola! You are Done!
Once you save the information your whatsapp business solution provider account (Twilio) is connected as a channel with REVE Chat and your agents can now serve your customers who communicated through your WhatsApp channel.
How to Set Up WhatsApp Cloud API
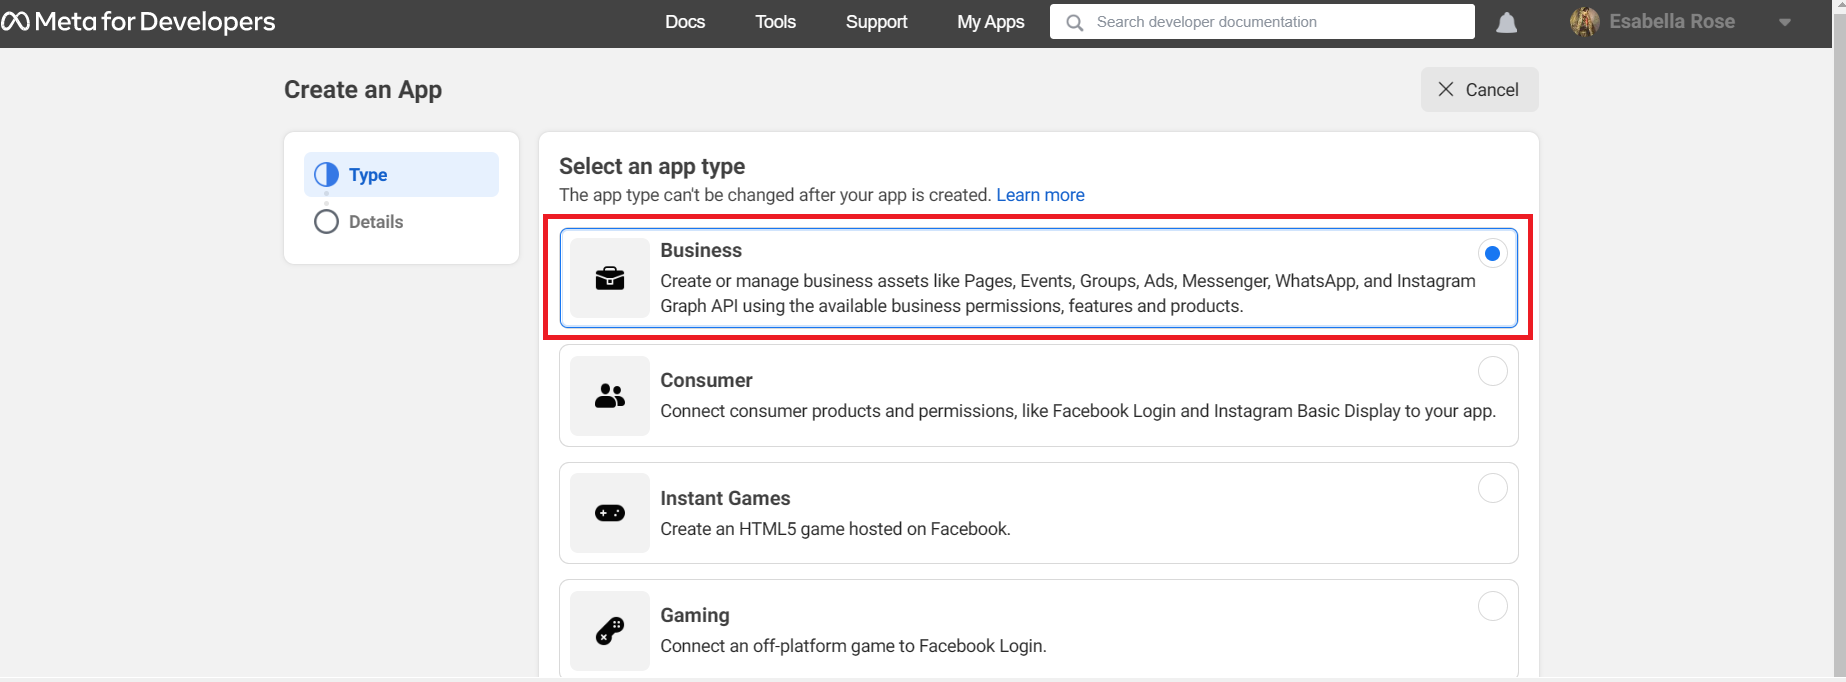
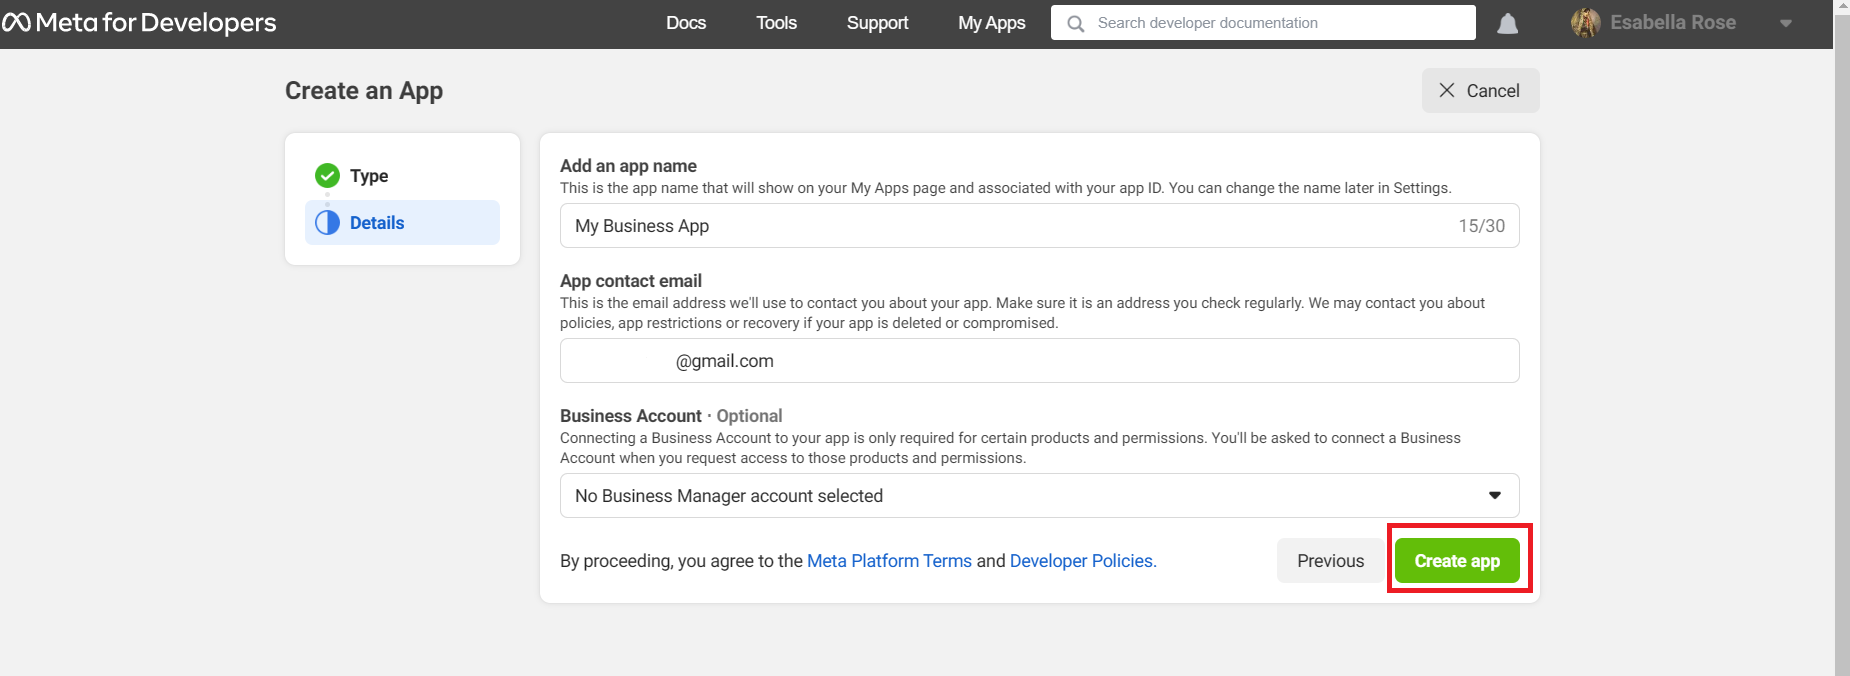
You must configure the WhatsApp Cloud API on your Facebook Developer Account in order to use it. Please follow the instructions below.
Give a basic description of your business. Leave it unselected if you don't have a Business Manager account. Tap Create app. Your Meta dashboard will be displayed.
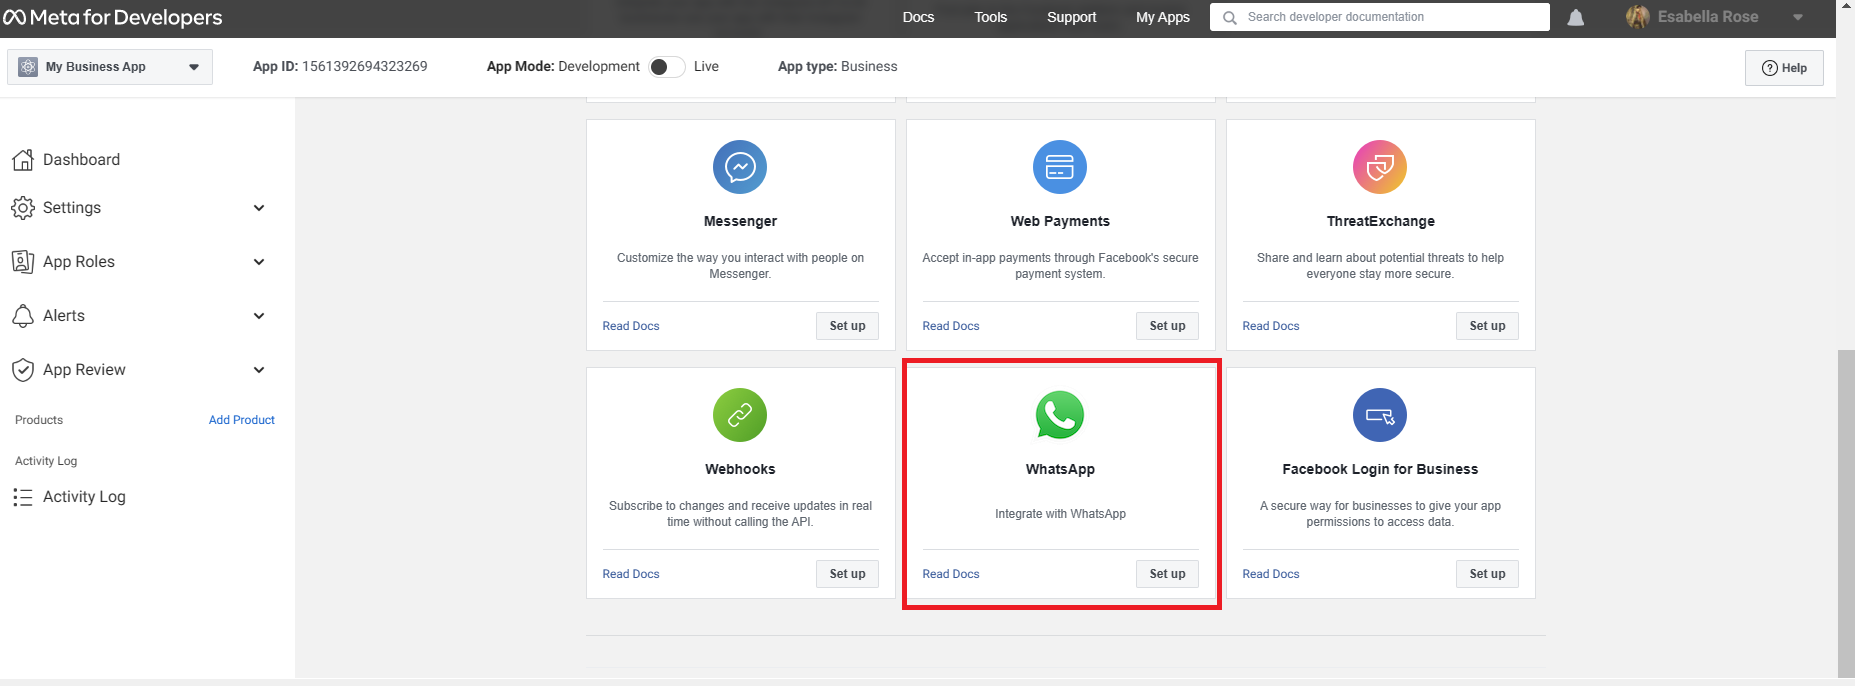
Once the page appears, scroll down, select WhatsApp and click setup.
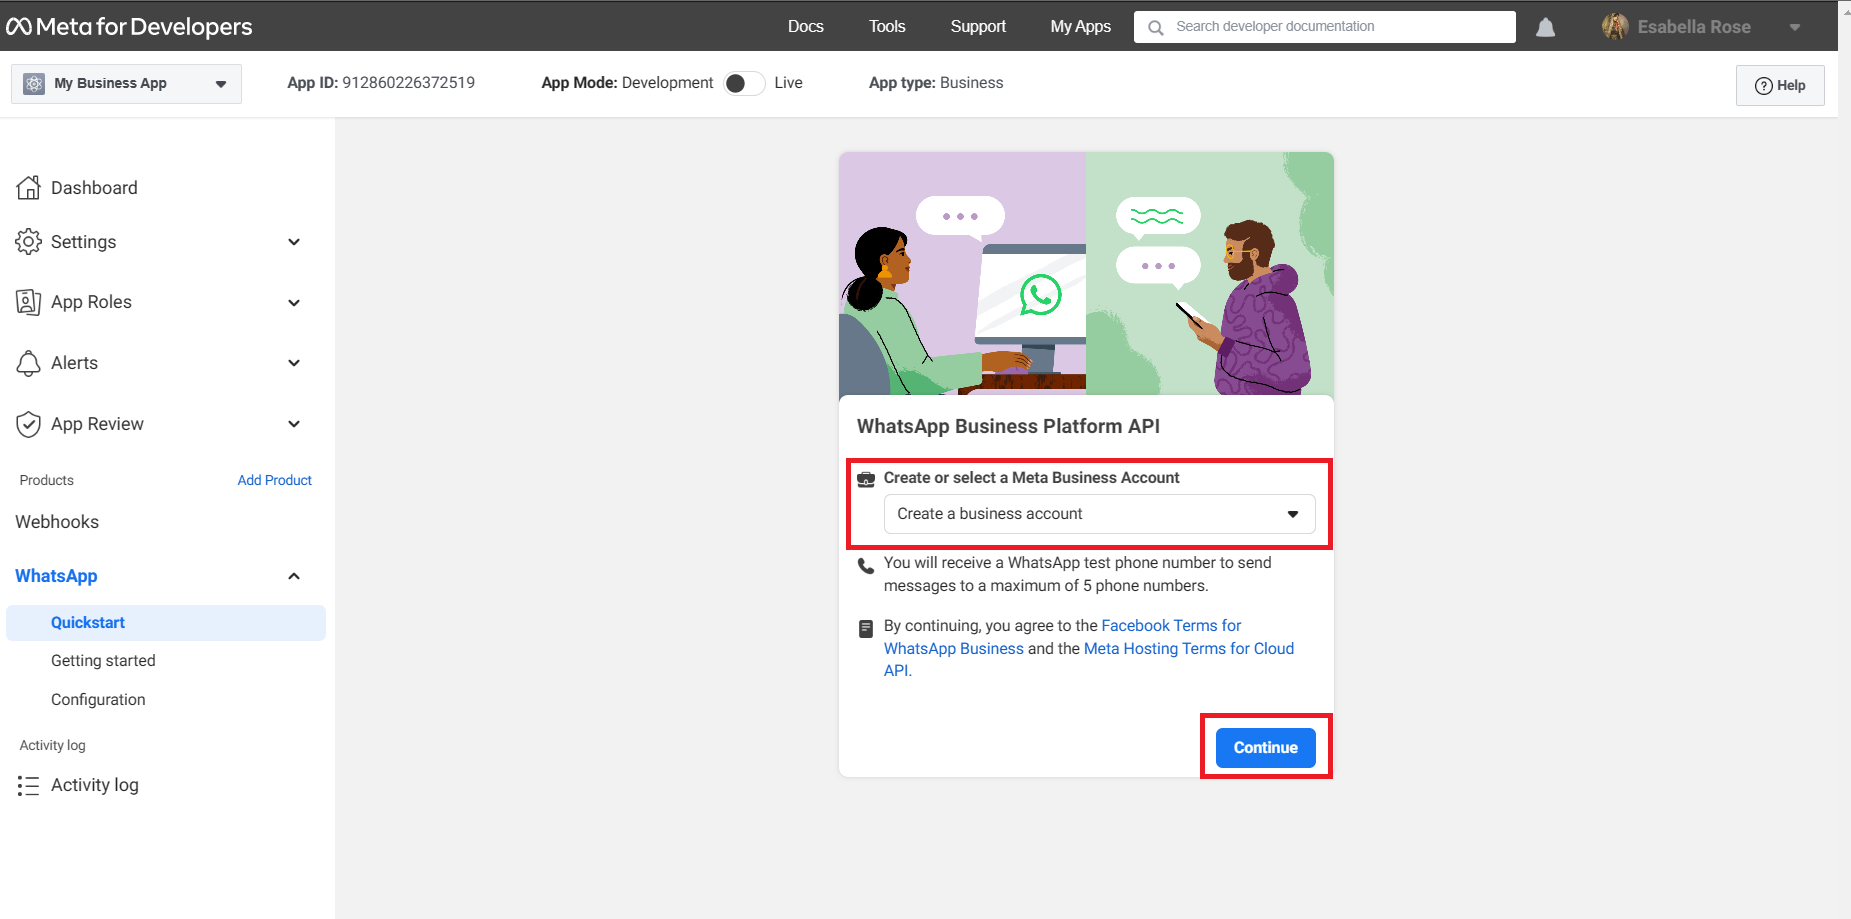
If you didn't pick your Business Manager account in step 3, you may leave your Business Account unselected here and Facebook will automatically generate a business account for you later. On the other hand, if you want to make a choice to select your meta business account; you can choose from the dropdown if you already have the Meta Business Account. Then click to Continue.
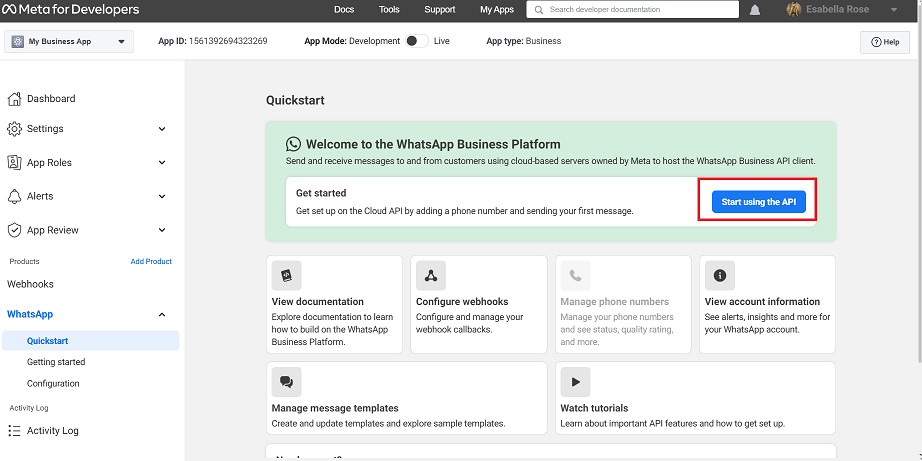
Click on the Start Using the API
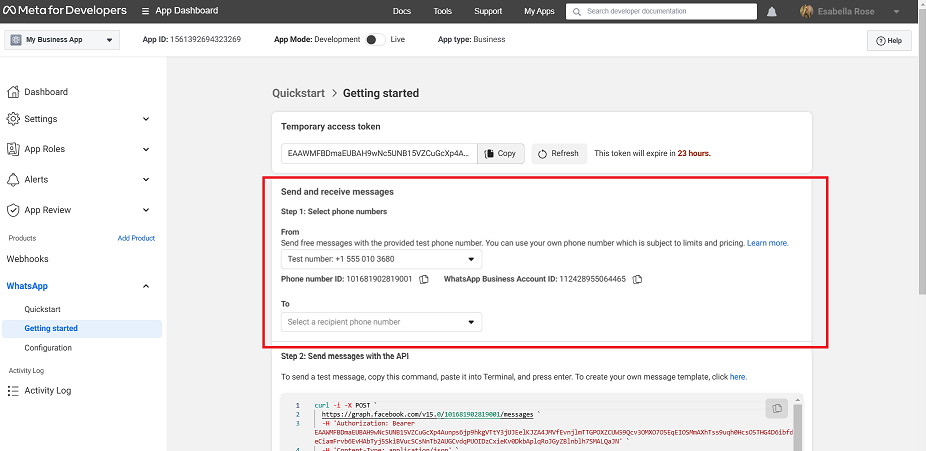
To check whether your integration is successful, send a message to your personal or business WhatsApp number using the test number WhatsApp generated. [Not Mandatory]
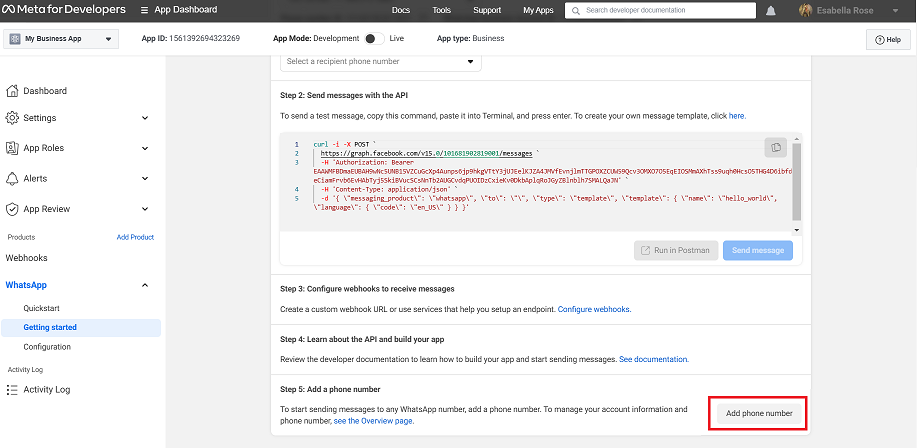
The next step is to demonstrate how to add your phone number to your WhatsApp Cloud API account.
Add Your Phone Number
To add a phone number to your WhatsApp Cloud API account, click Add Phone Number.
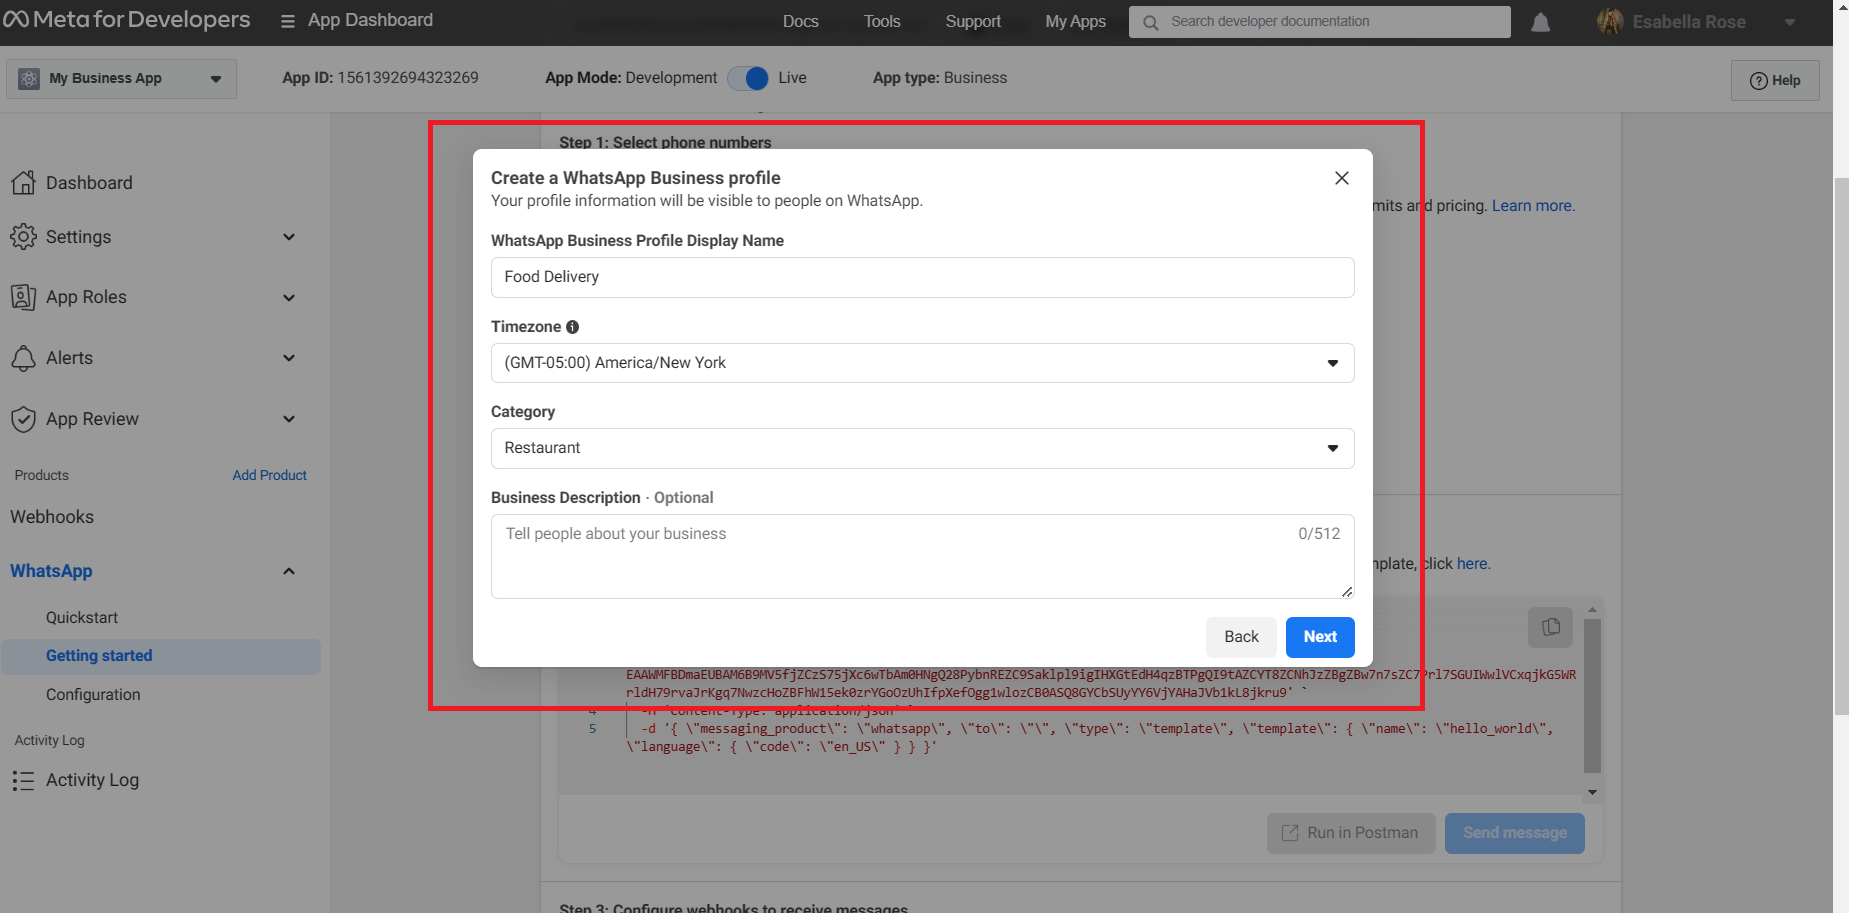
Input the information of your WhatsApp business profile, then click Next.
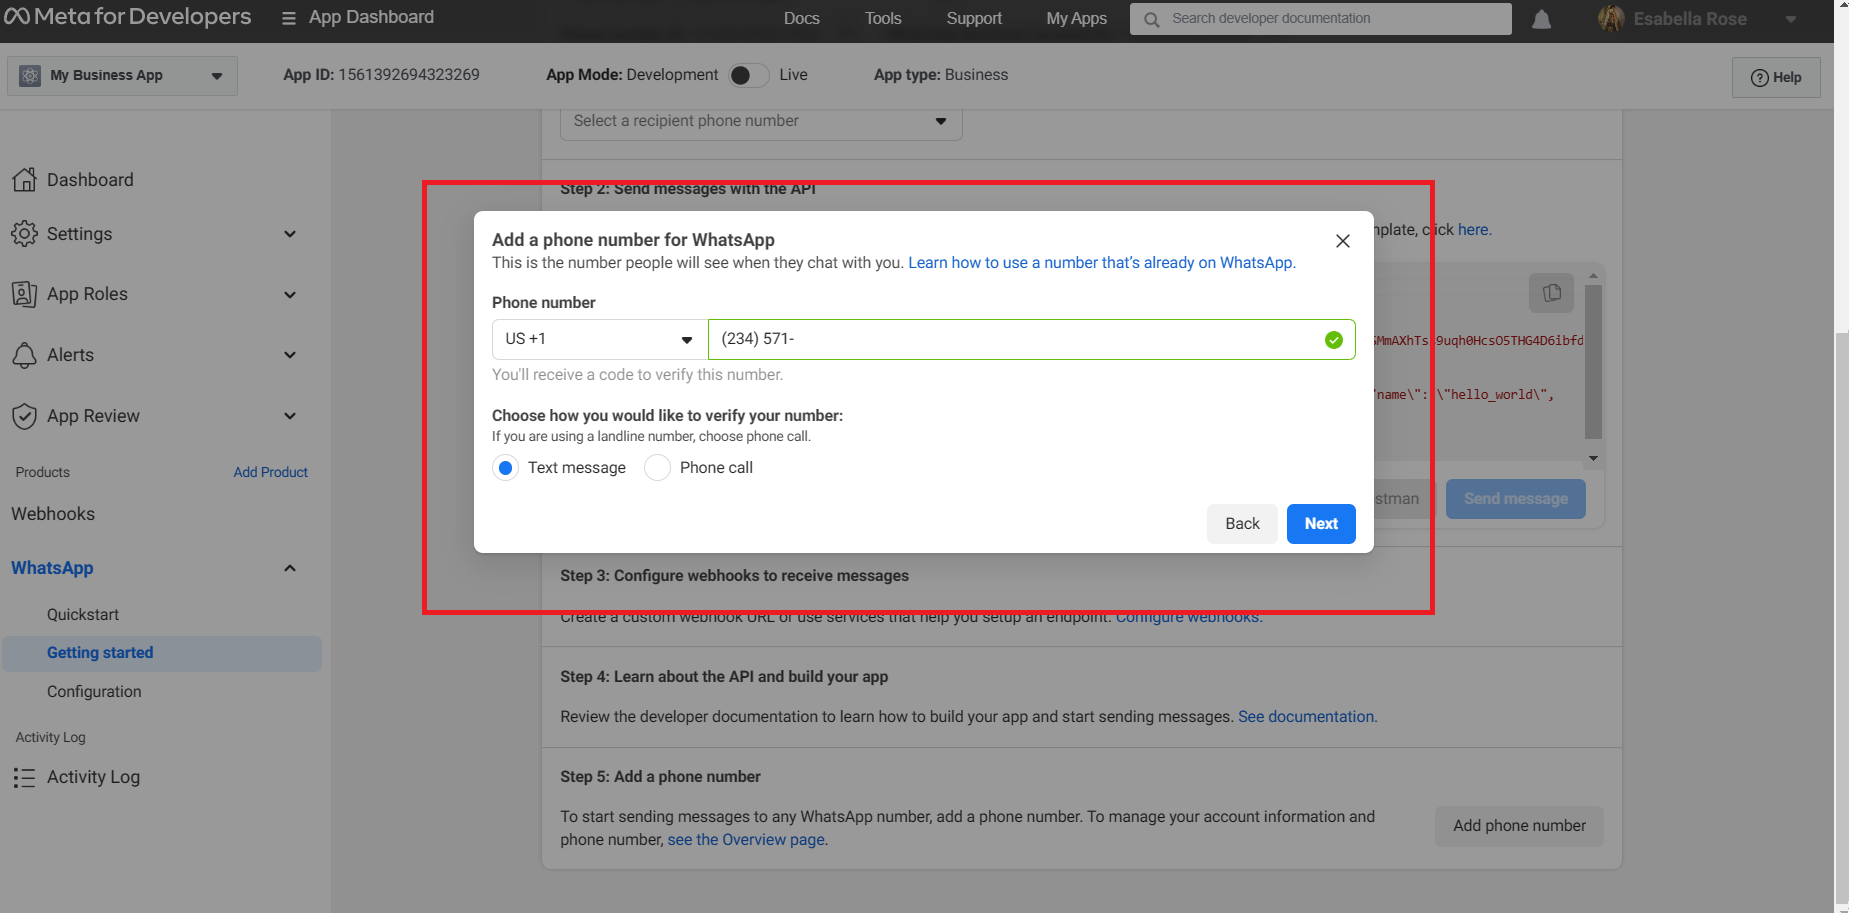
Add a phone number to your WhatsApp Cloud API. A WhatsApp account that already exists cannot be linked to the number you add. To integrate with existing WhatsApp number, follow this Learn how to use a number that's already on WhatsApp
Verify the phone number you entered. There will be a 6-digit verification code texted to the phone. When you get the verification code, enter it.
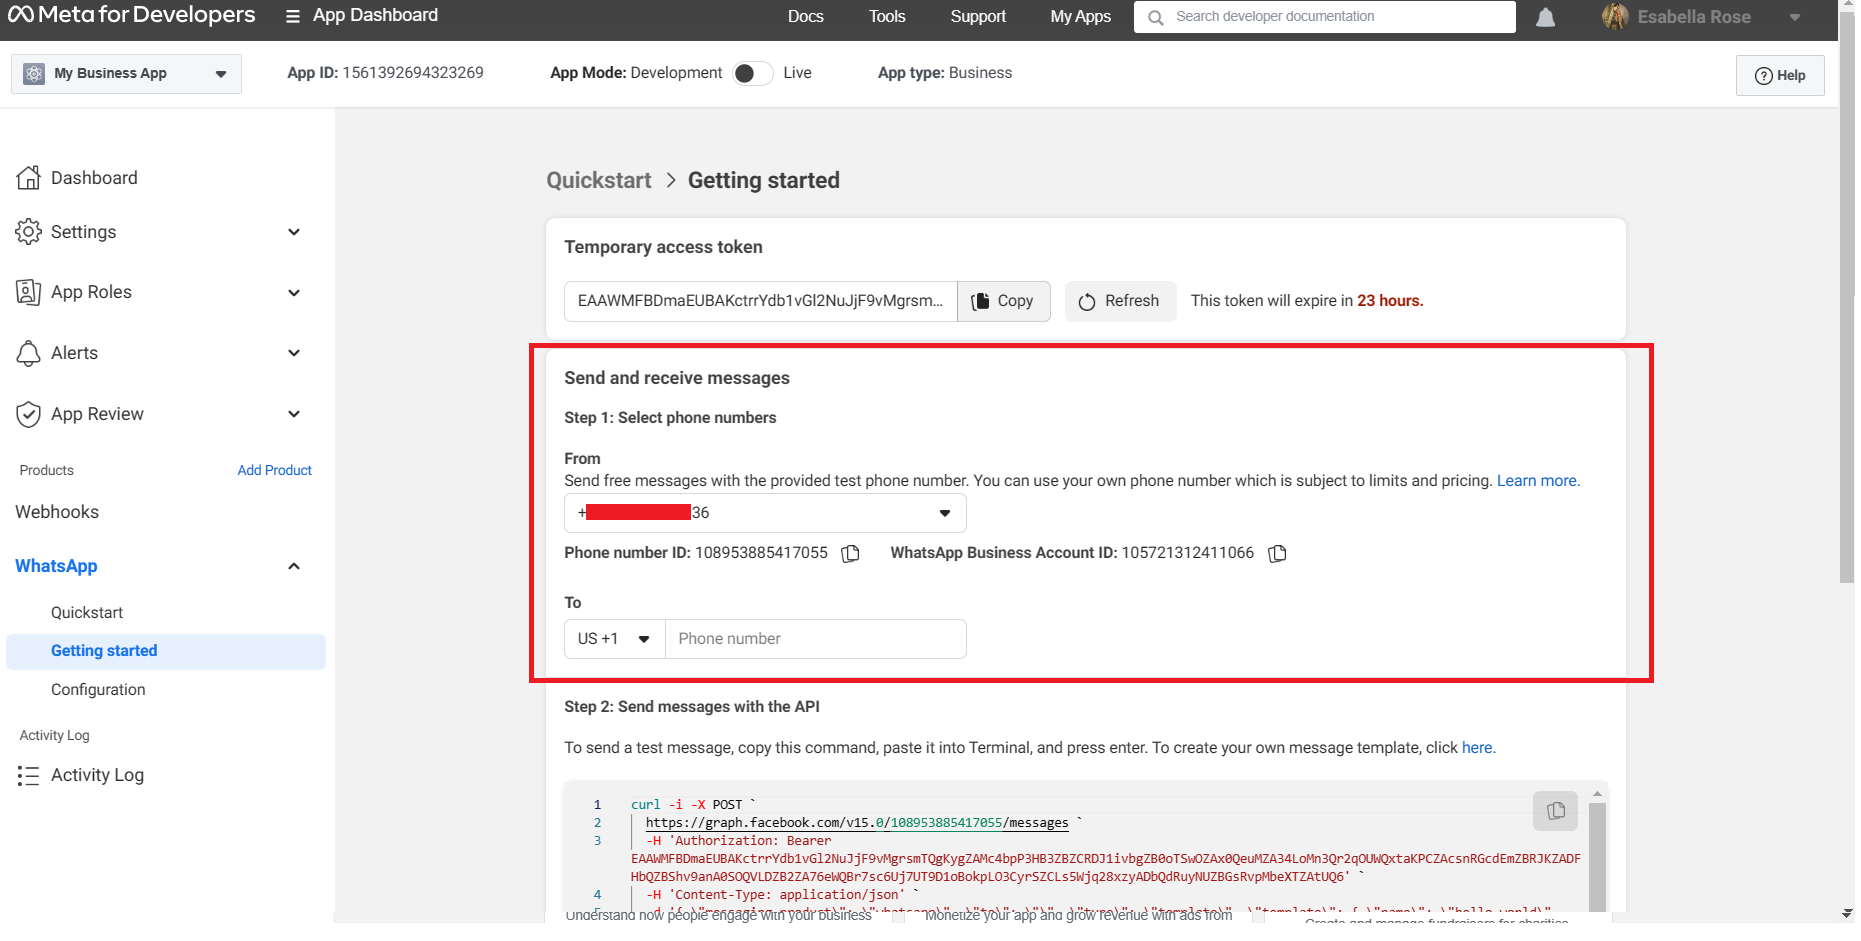
Look at the area labeled "Send and receive messages." Your added number will be shown.
Now, your WhatsApp Cloud API account and your phone number are linked. Once WhatsApp Cloud API is configured on your Facebook Developer Account, you must link it to a messaging service like REVE Chat in order to begin sending and receiving messages.
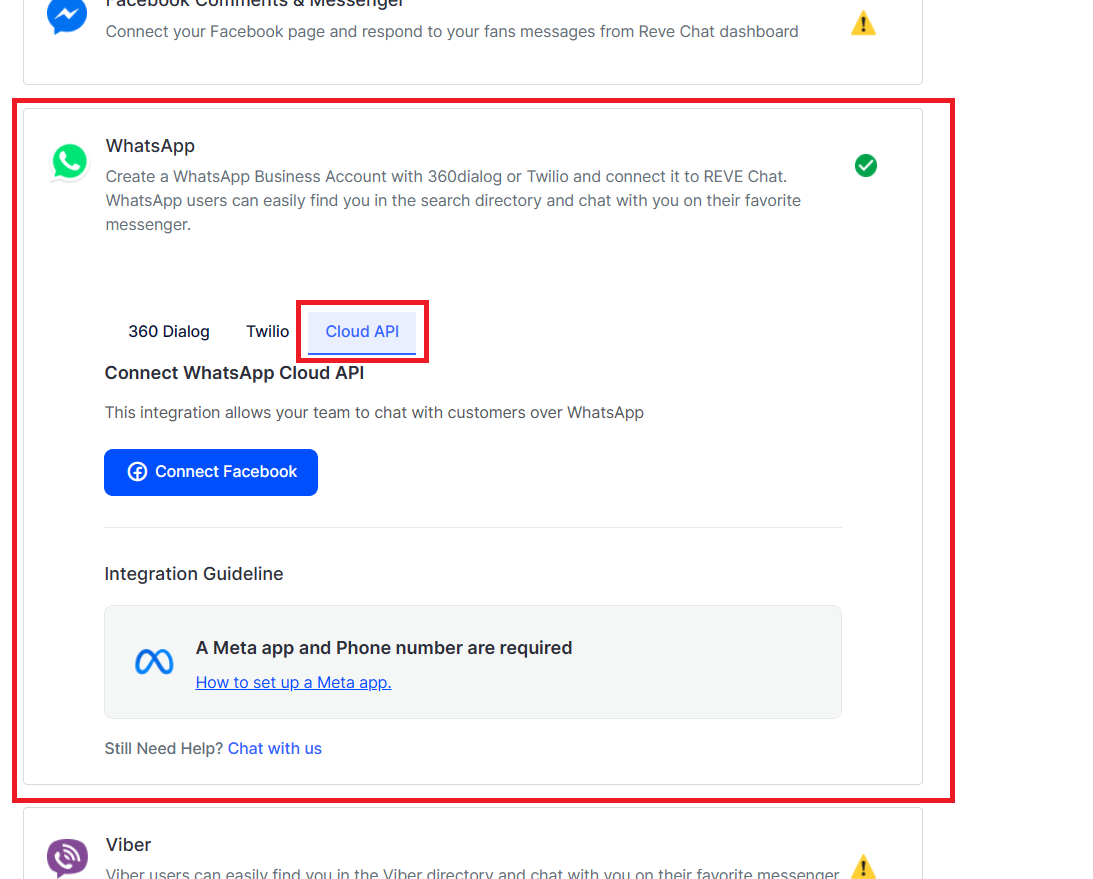
After login to your REVE Chat account, go to the Integration Module and tap on Social Media.
Click on the WhatsApp Tab
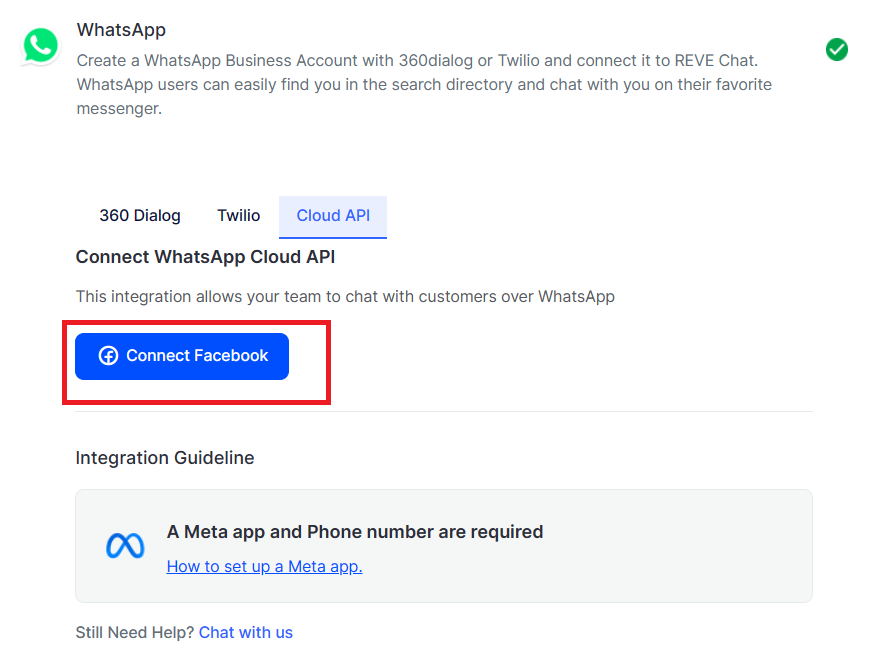
Select the Cloud API section under WhatsApp
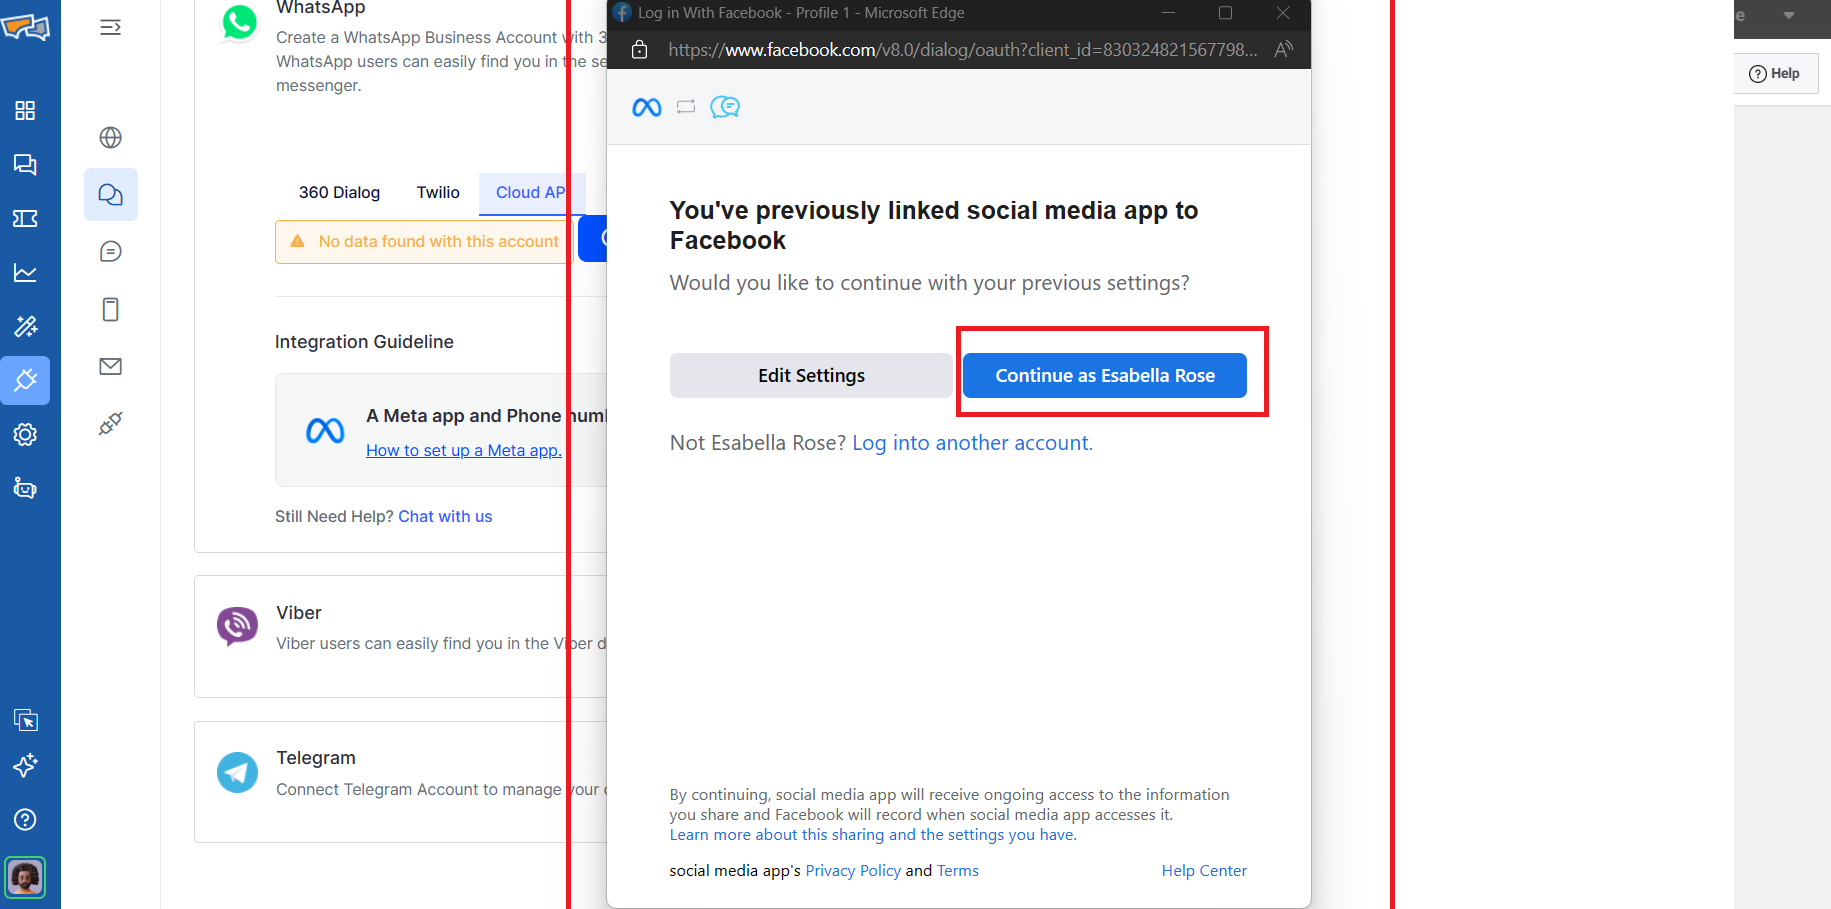
Click on the Connect Facebook
You can now choose your Facebook account
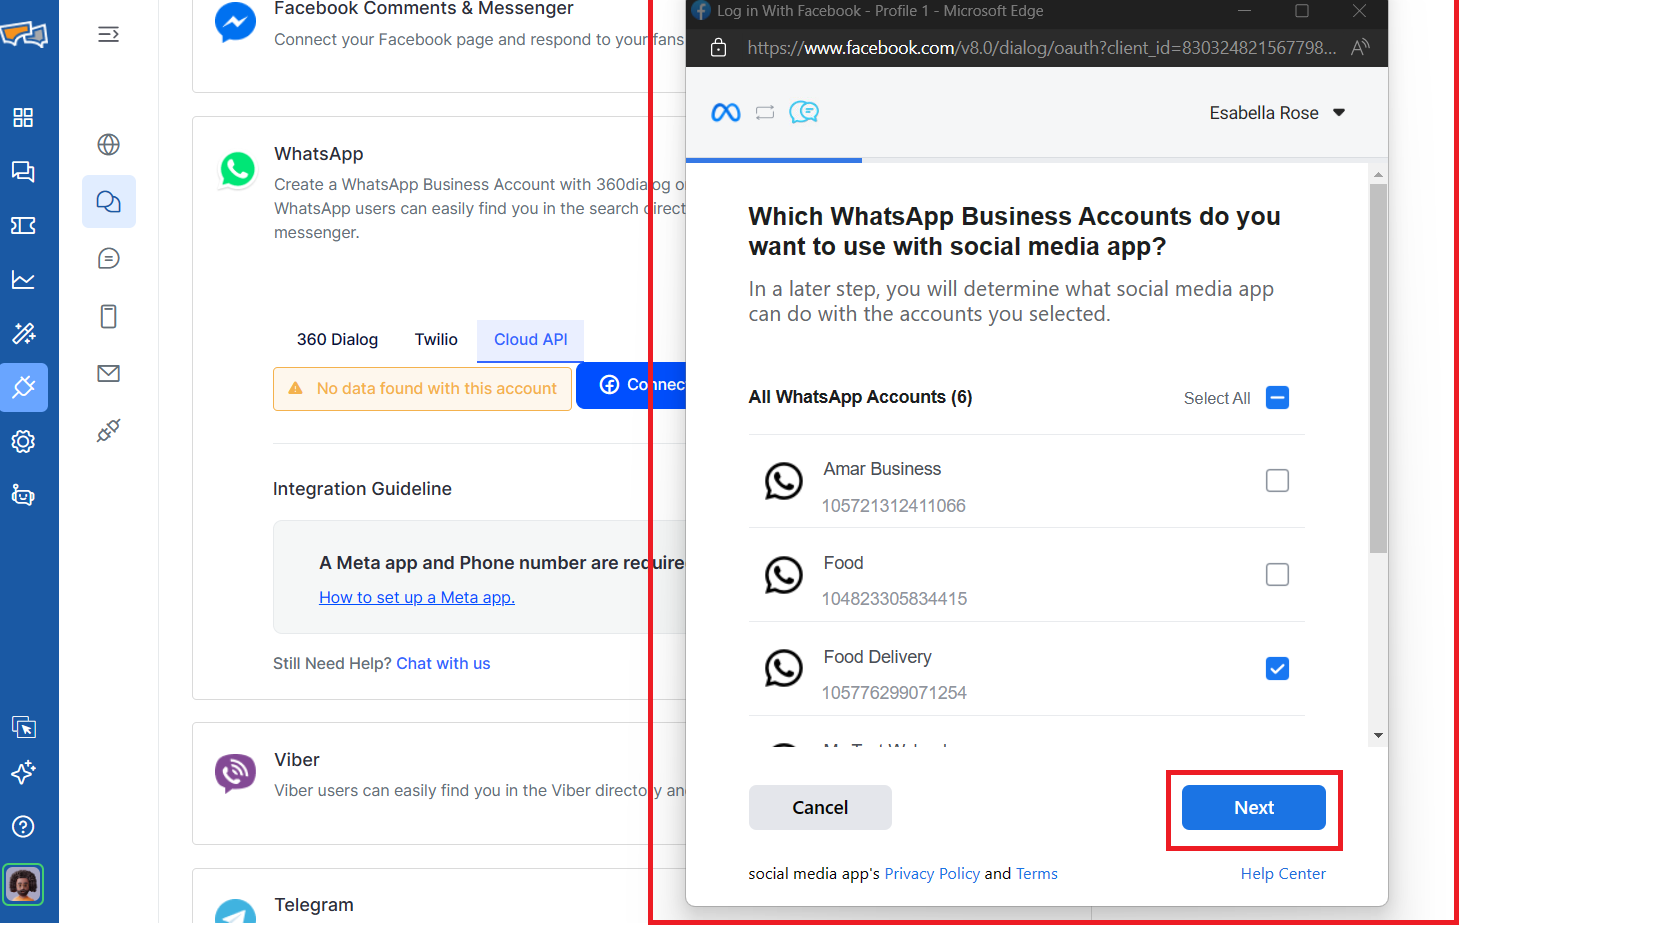
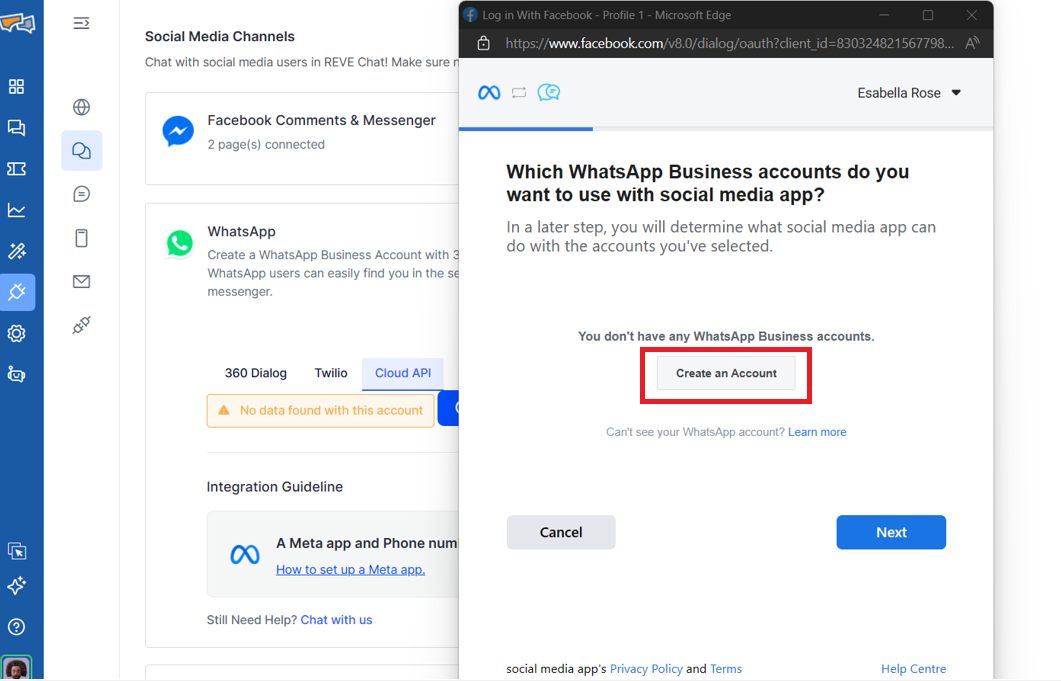
You can choose your WhatsApp Business Account and click Next
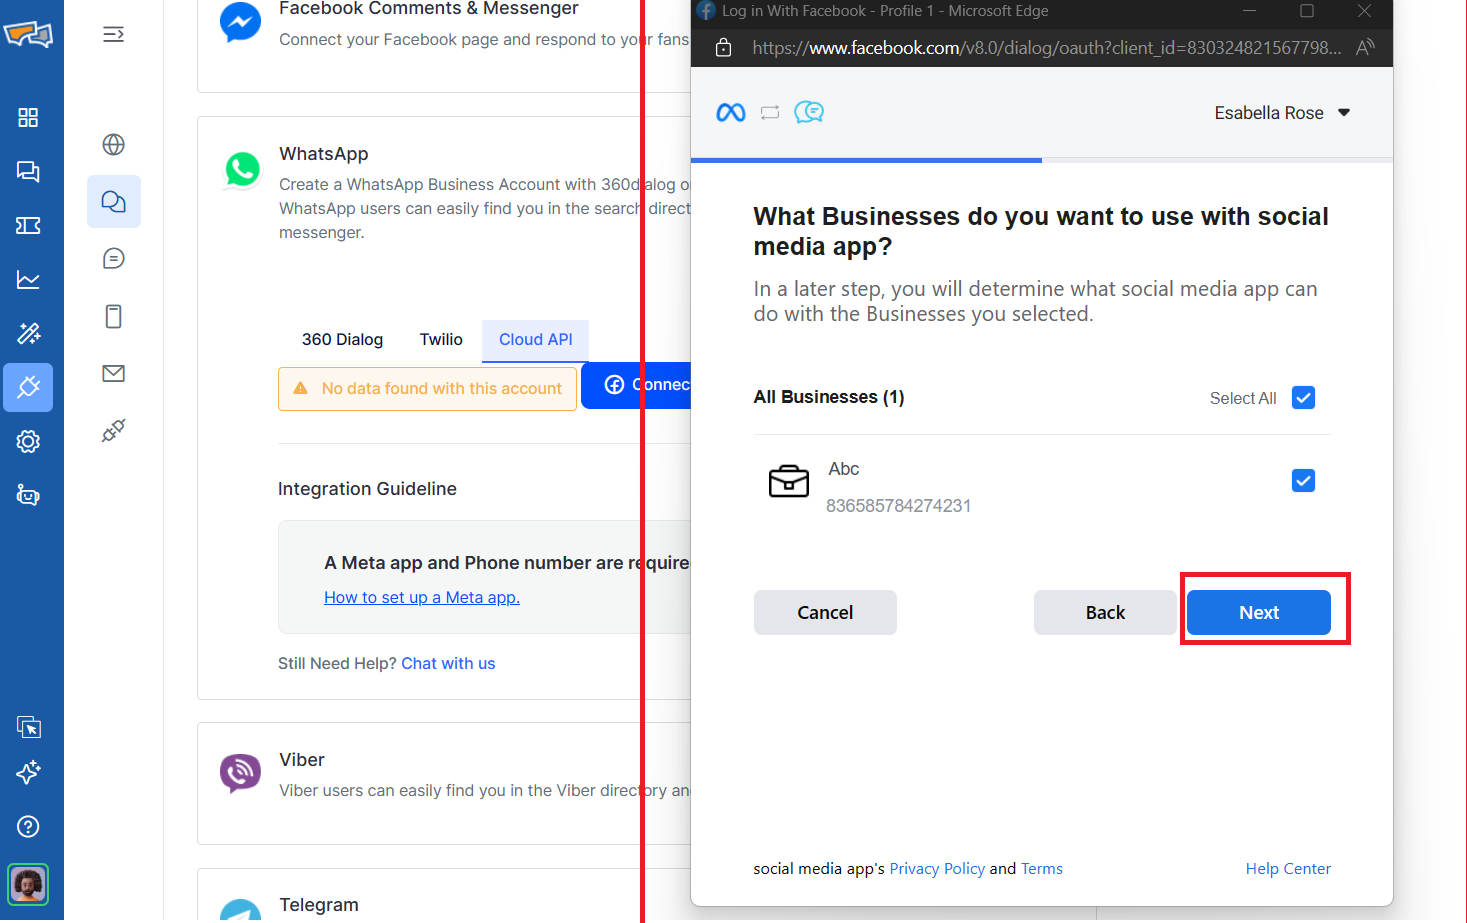
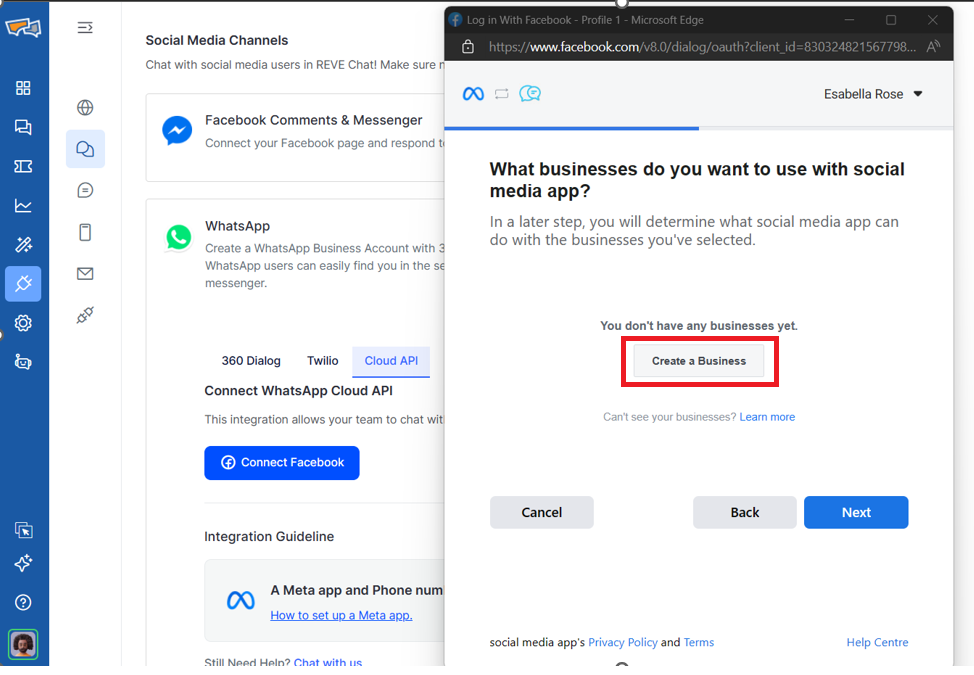
Then you can choose your Business and click Next
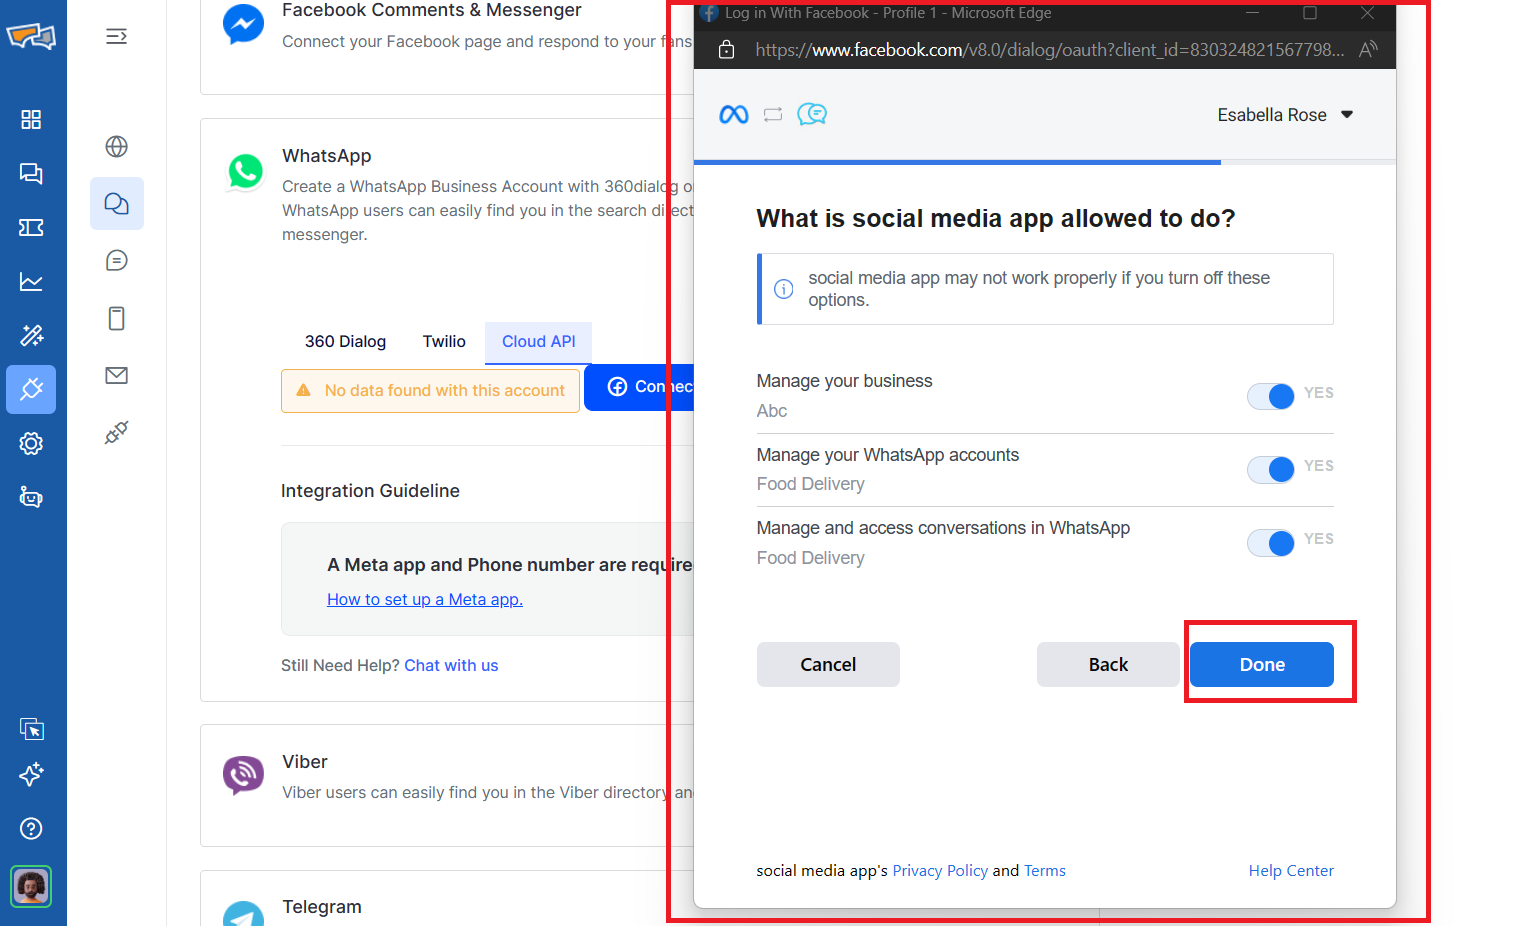
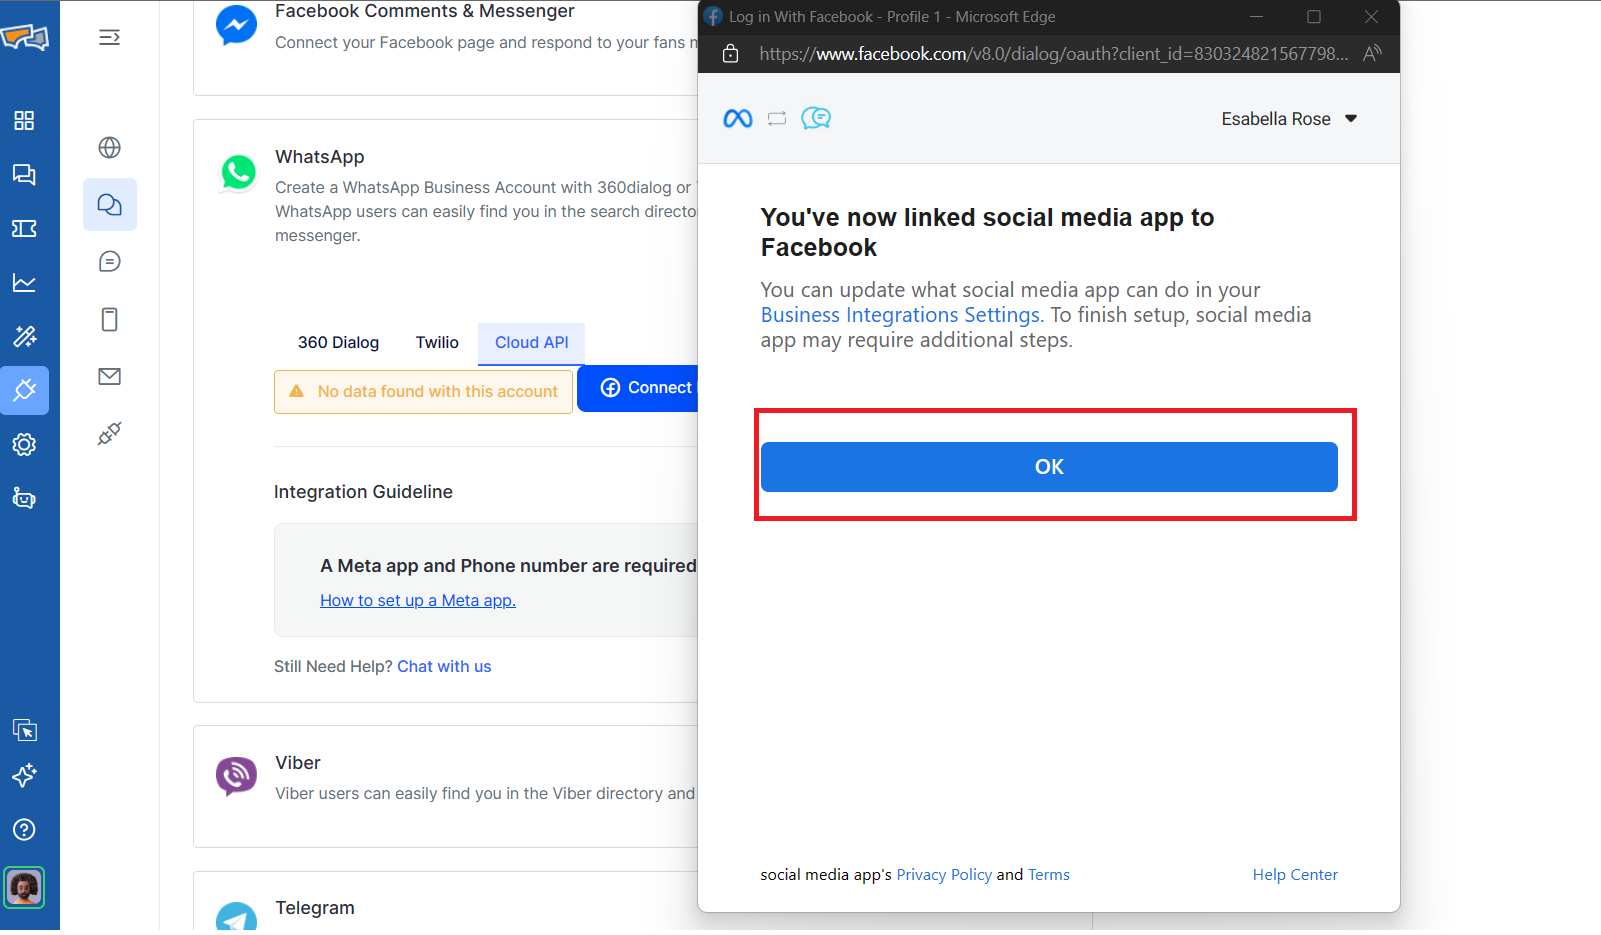
You can customize what your social media app is allowed to do and then click Done.
Now Click OK
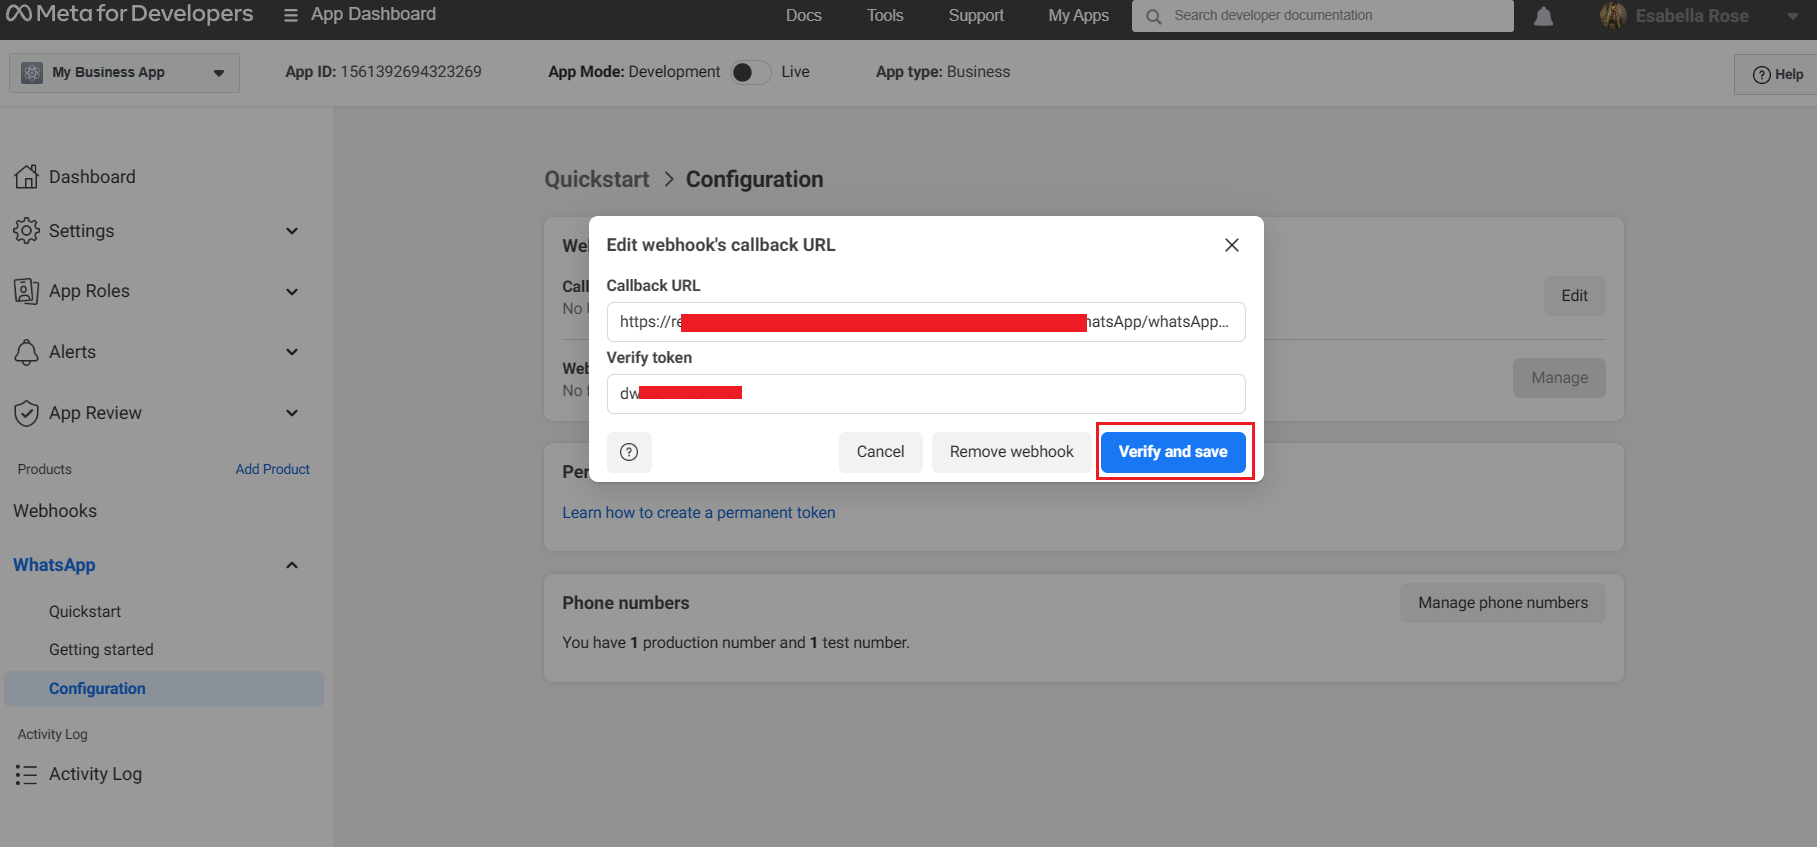
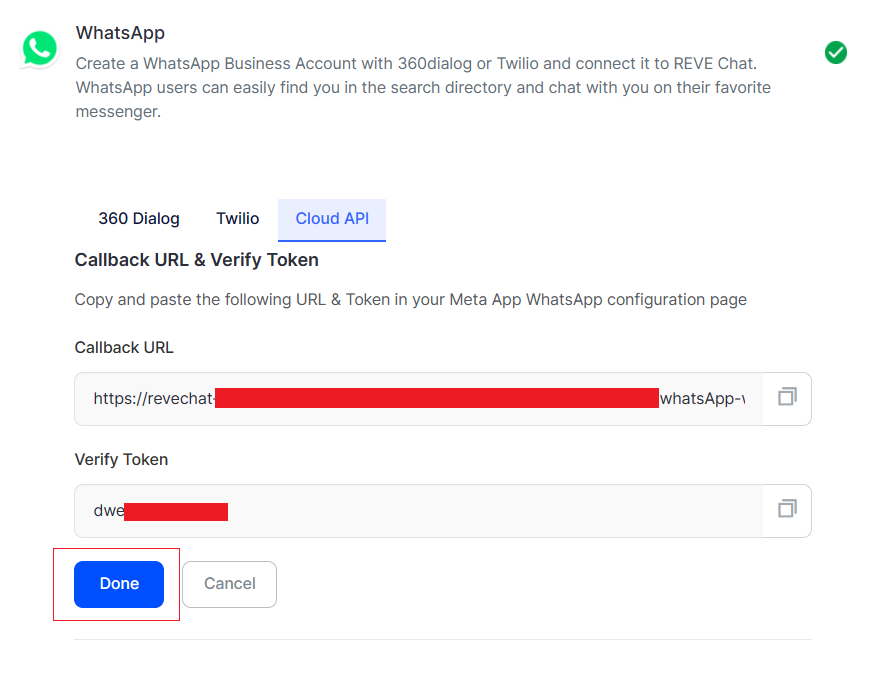
Copy Callback URL & Verify Token. It must be added to the configuration page for your WhatsApp Cloud API. Before selecting Done, you must finish the setup on your WhatsApp Cloud API configuration page.
On the configuration page for your WhatsApp Cloud API, add the Callback URL and Verify Token. Then click Verify and Save.
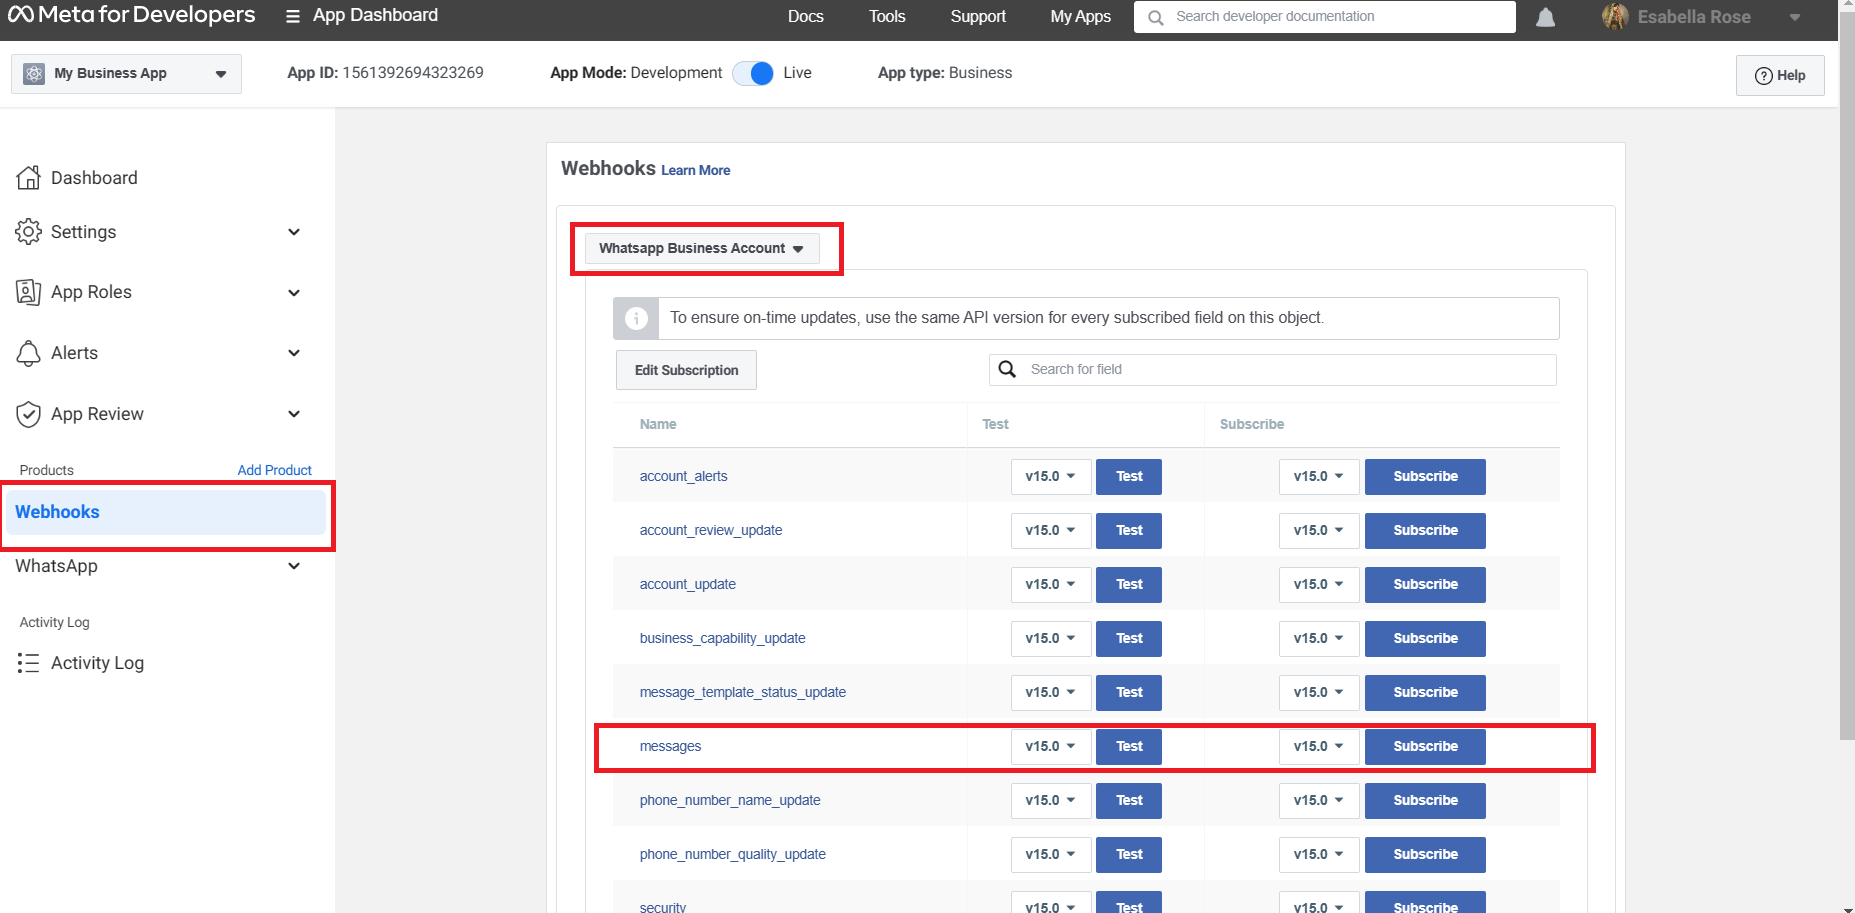
Subscribe to the Message Webhook event
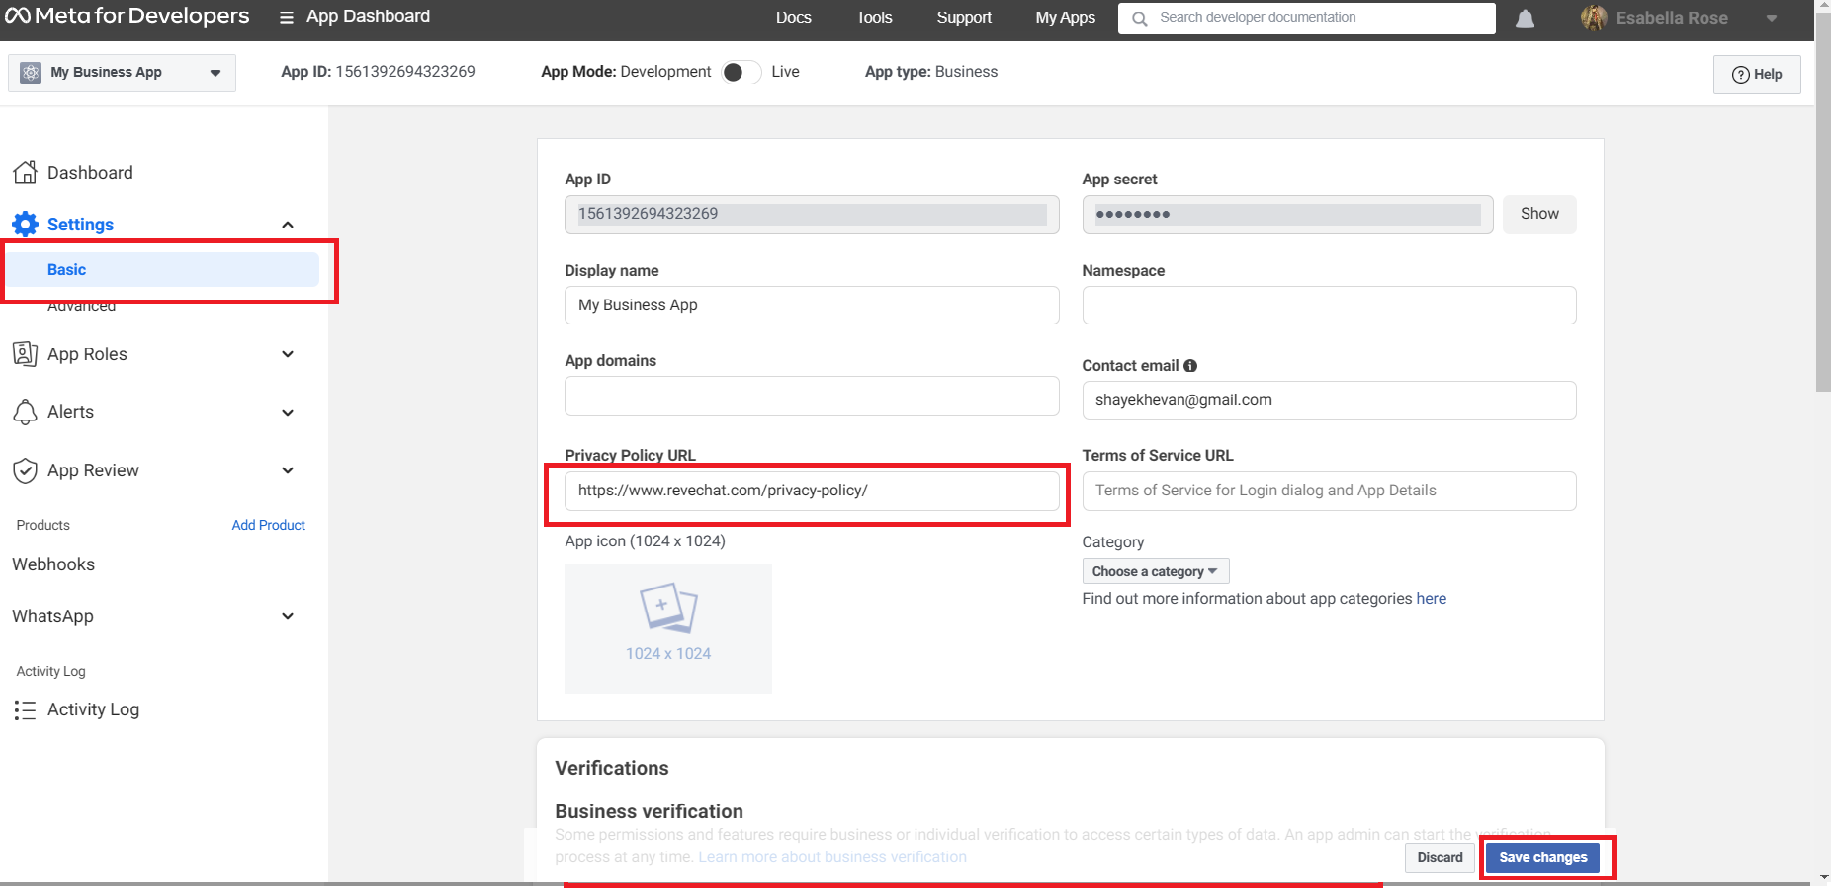
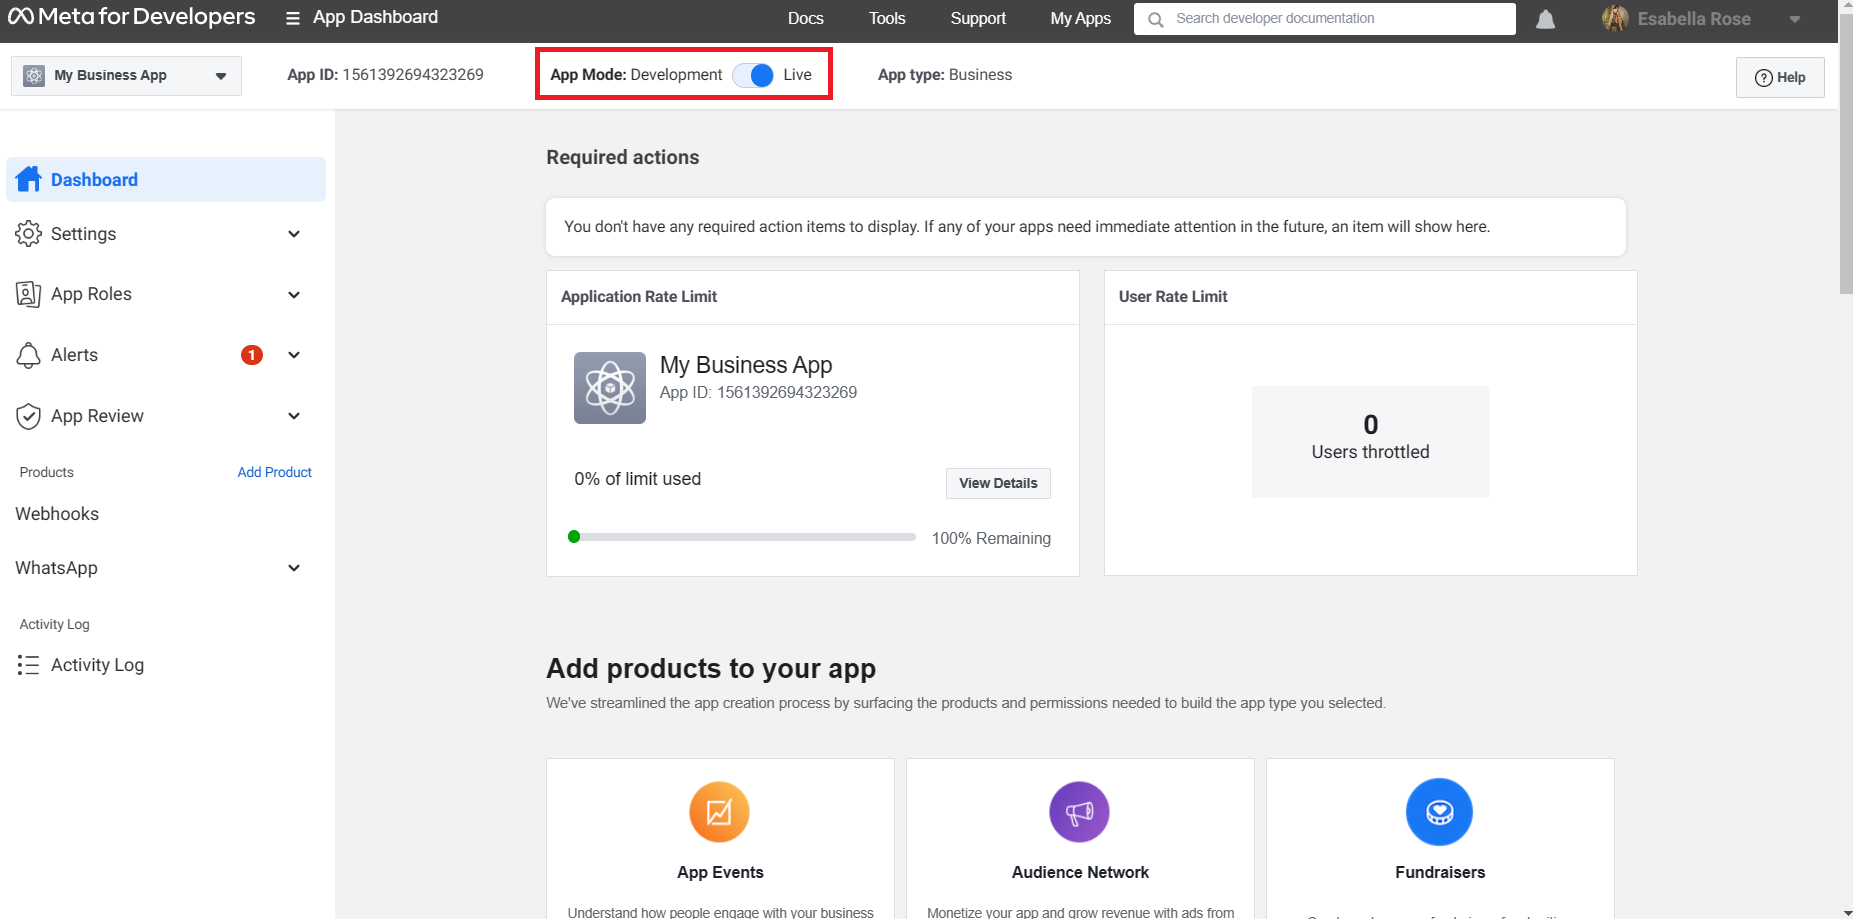
You must have to add Privacy URL to make the APP Live
It’s time to make the toggle from development mode to Live
Go back to REVE Chat and click Done.
Bravo, you’ve successfully connected your WhatsApp Cloud API to REVE Chat!
Note
In case you do not have any kind of WhatsApp Business Account, then this pop-up window will arise, and you can create a WhatsApp Business Account by tapping Create an Account.
If you do not have any kind of Business, then this pop-up window will be shown, and you can create a Business by clicking Create a Business.